Our journal of what we pray is our sojourn of life along the narrow way, even the old paths, submitting to the Bible as a light unto both.

Category: critters (Page 2 of 2)

This Mite Be Trouble

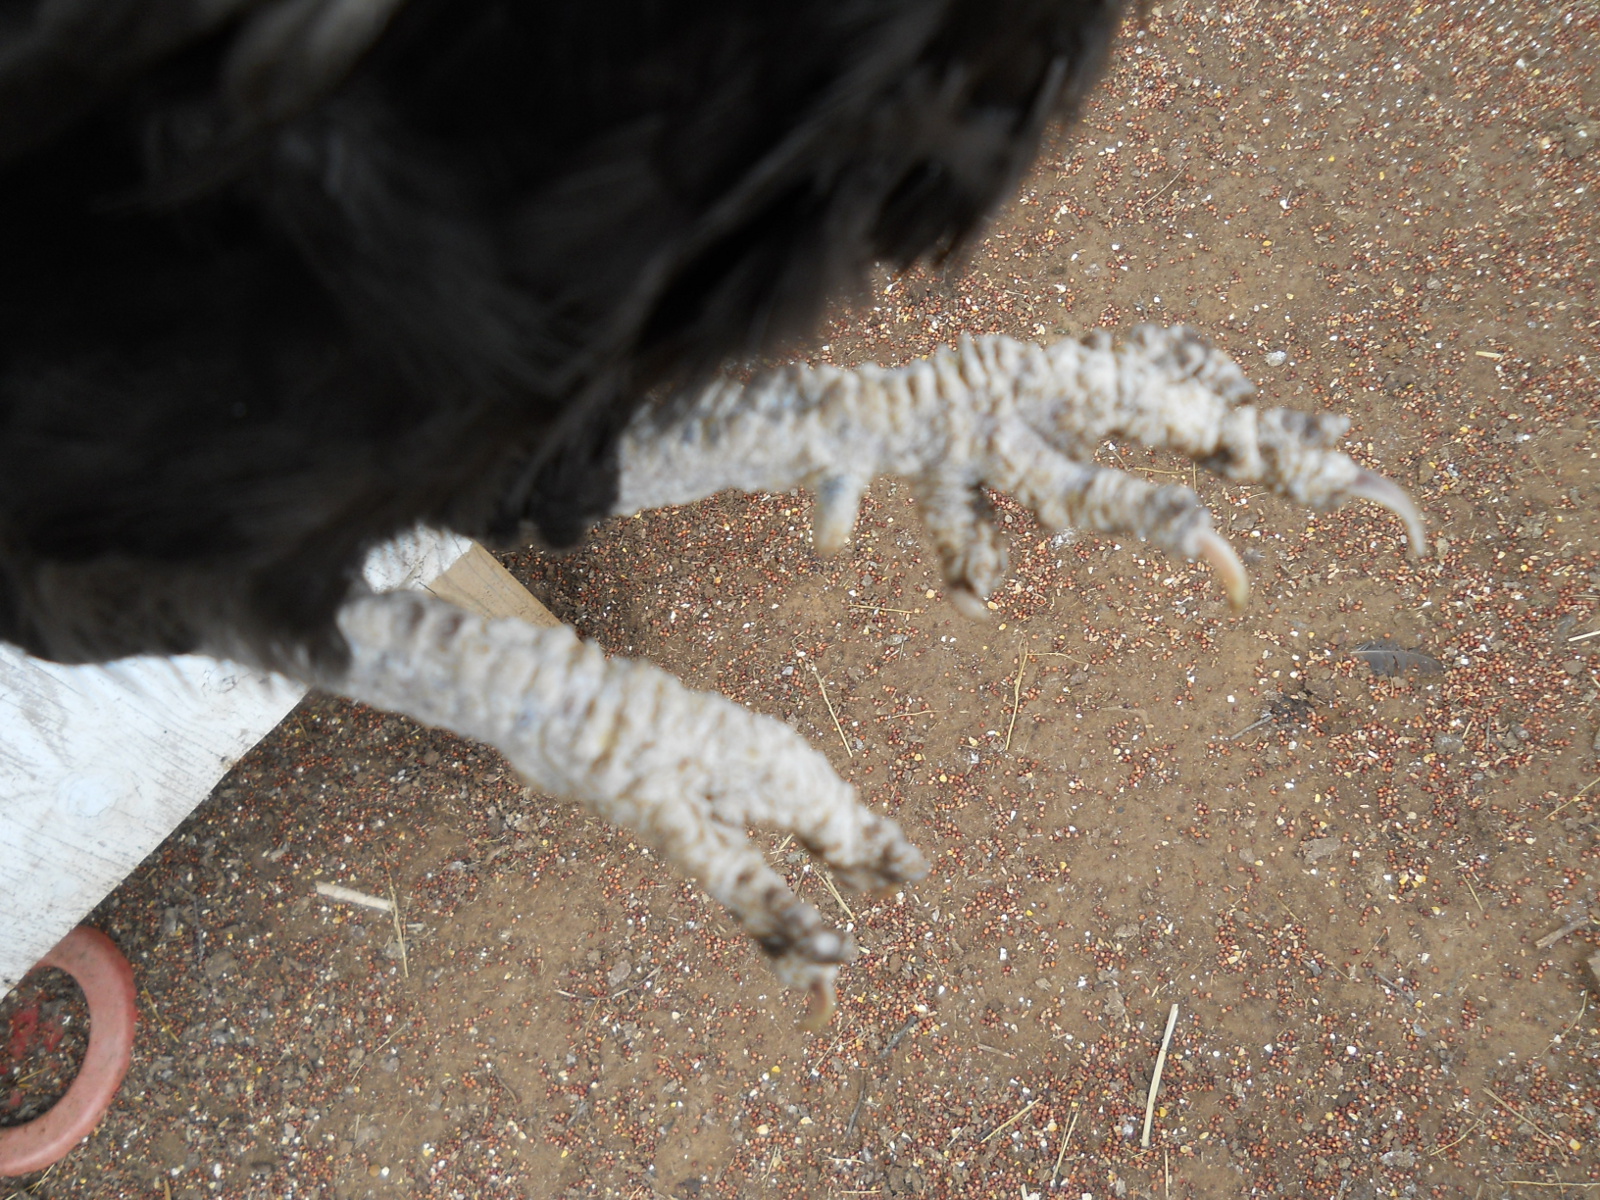
Some time ago it was evident that one of our newer roosters was having some trouble walking — it would almost goose step. I noticed that its legs had developed a white crust on them, but thought that it was perhaps just a genetic defect or something. I picked off one of the crusties on the leg, and it looked like moist skin, like when a layer of human skin is removed. I wondered what was going on, but at the time, I just let it go. Then, over time, several of our chickens seemed to start getting the same crust on their legs or their scales started to look and feel “odd,” and I noticed that some of them were starting to have trouble walking, even some preferring not to do much of it.

Ok, something appeared to be wrong; and at that point, I figured I’d better investigate.

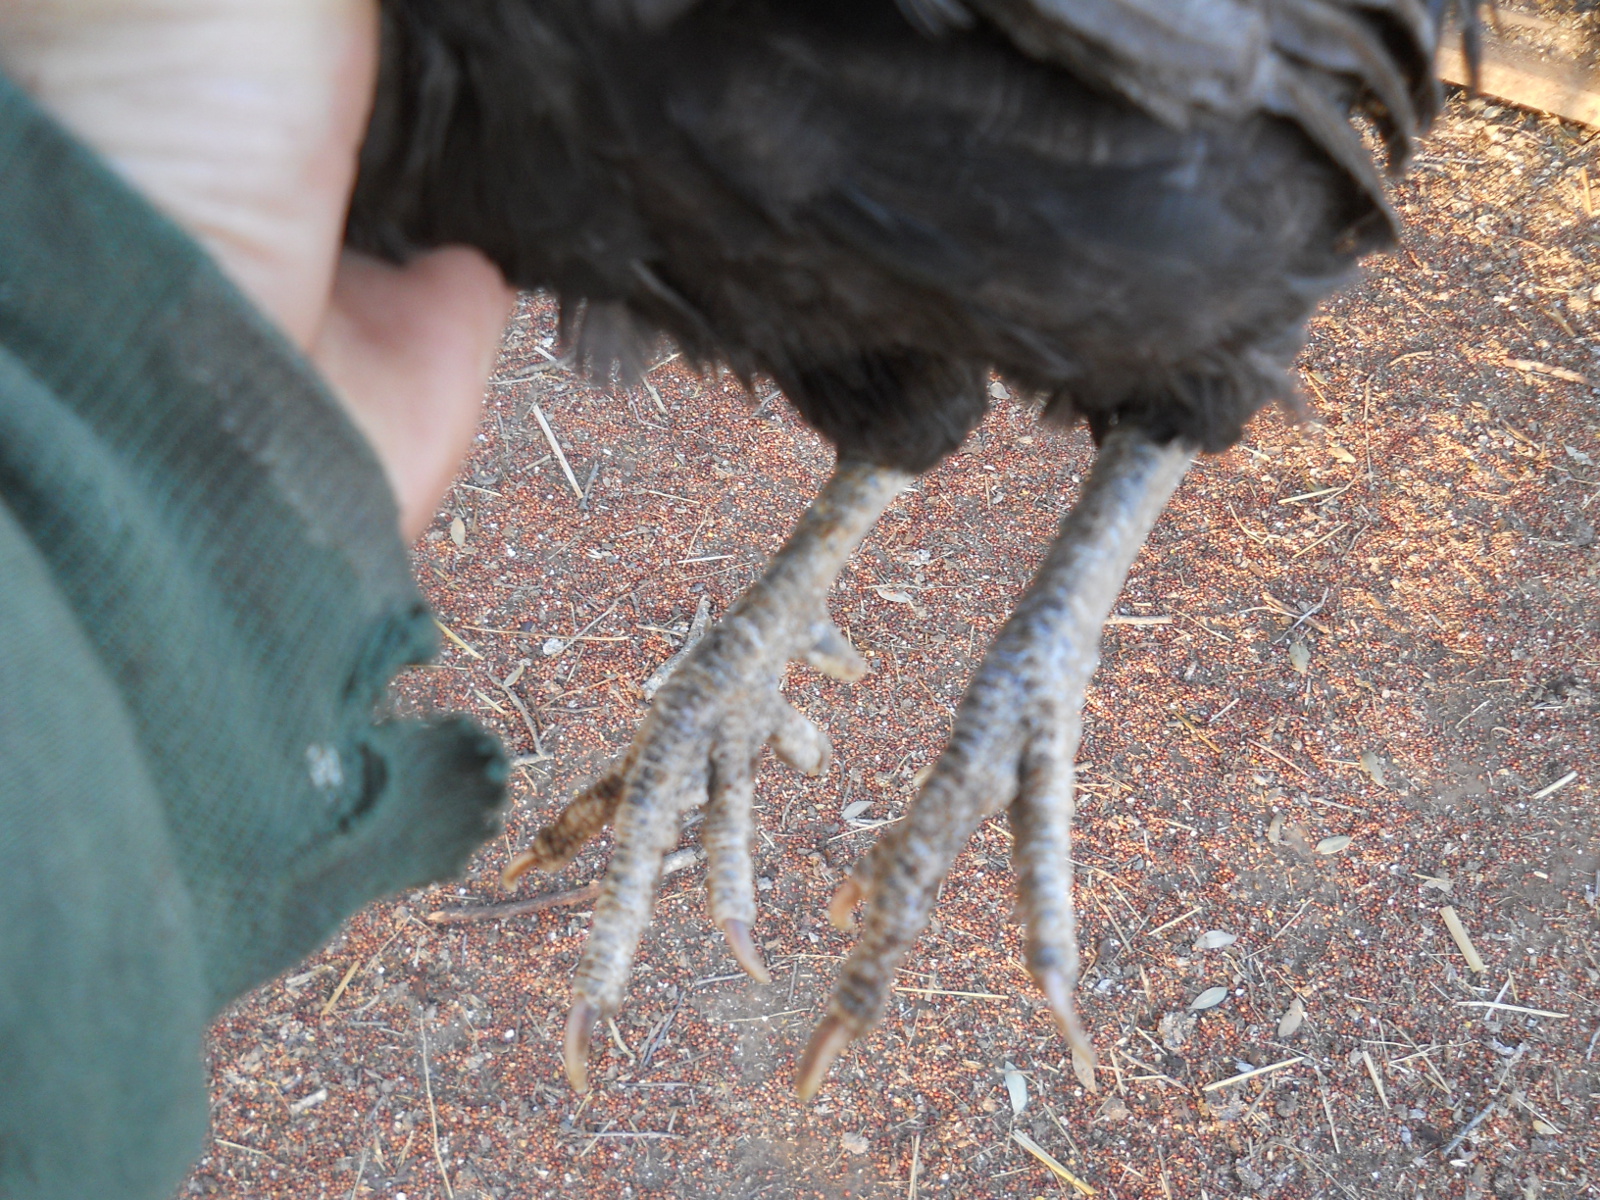
Here is a picture of the rooster’s legs:

Chicken Scaly Leg Mites Crusty Legs

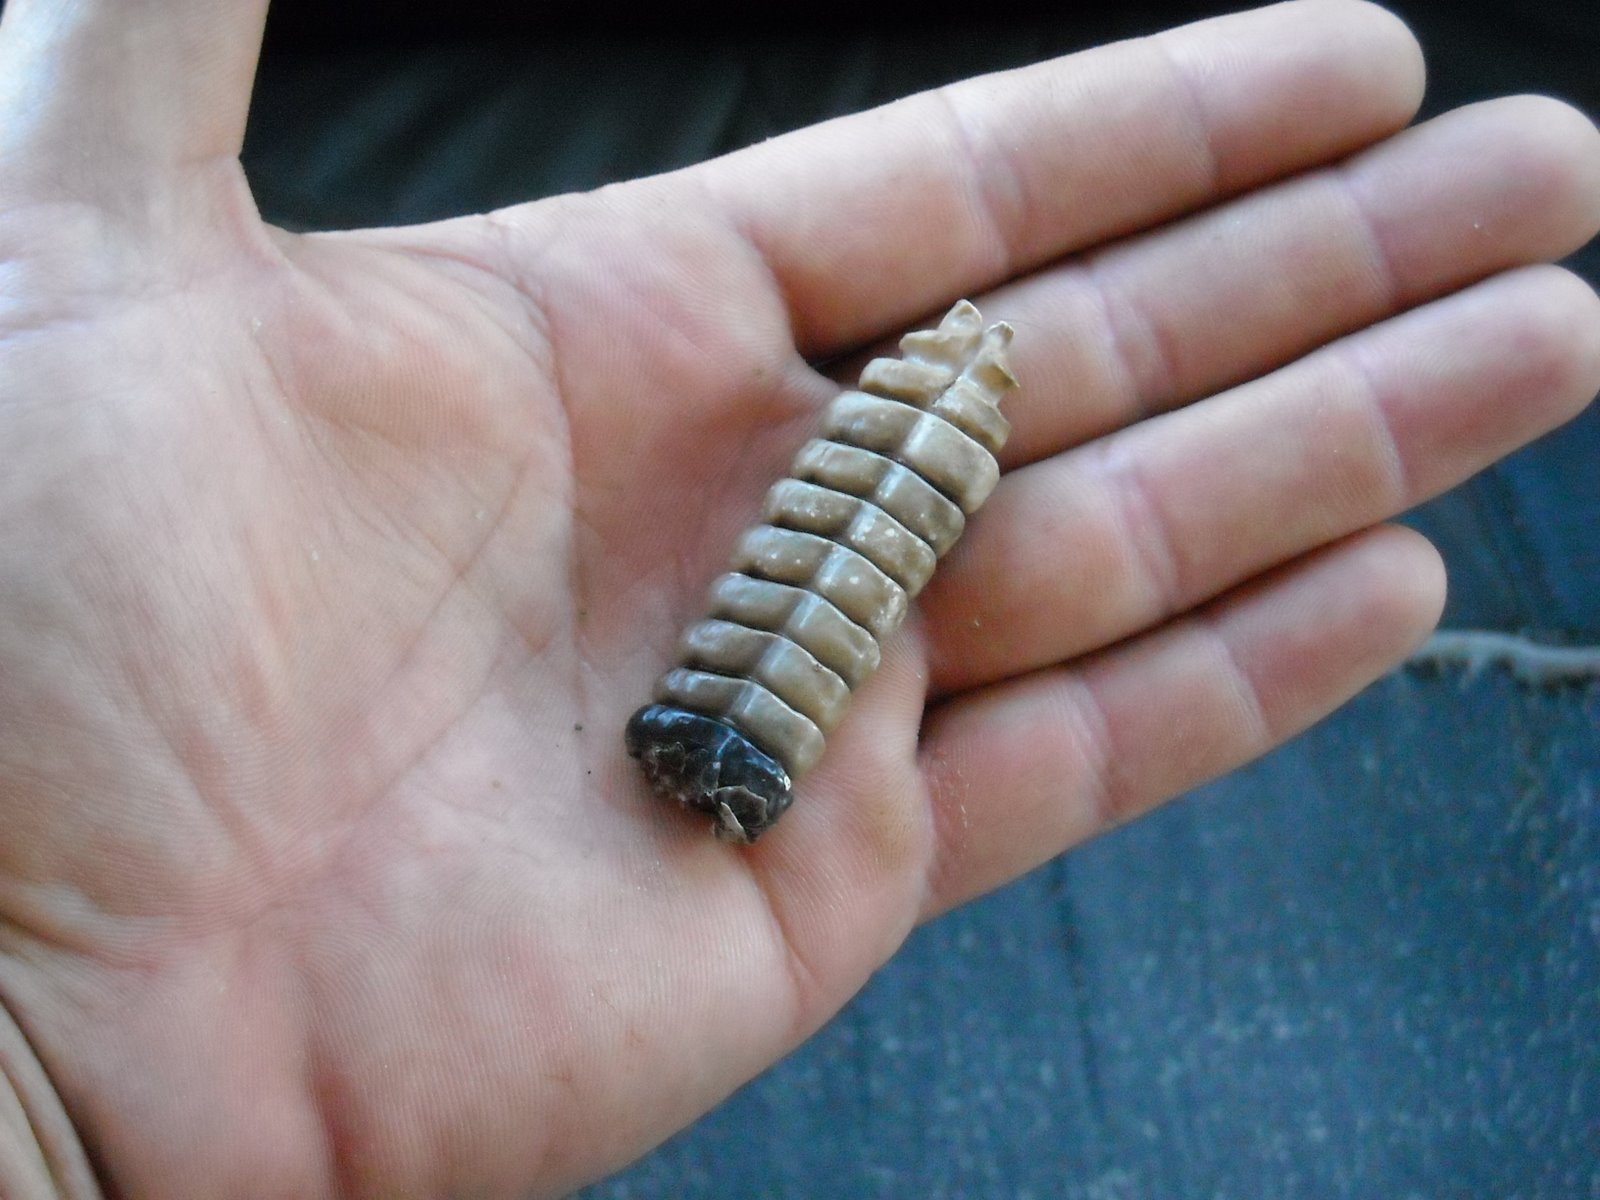
In searching the Internet, and after finally working out a helpful search term, and after viewing several images, I discovered what I believed to be the culprit: scaly leg. This is apparently caused by a mite that burrows into the legs and causes the scales to protrude or that white crust I was seeing, and can in the end cause lameness. Wow! I was then glad I finally looked into it, although I felt badly for that rooster because I hadn’t researched it earlier.

And so, after further investigation, the simplest way I found to remedy this situation is to get some cheap cooking oil (not motor oil, because of the potential toxicity) and dip each leg in it for a couple of seconds (from an off off-gird standpoint, I assume we could probably use lard, but we just bought the oil instead rather than use up any lard now). This was supposed to be done for at least several days, and needed to be done to all infected birds, as the mite apparently spreads from bird to bird.

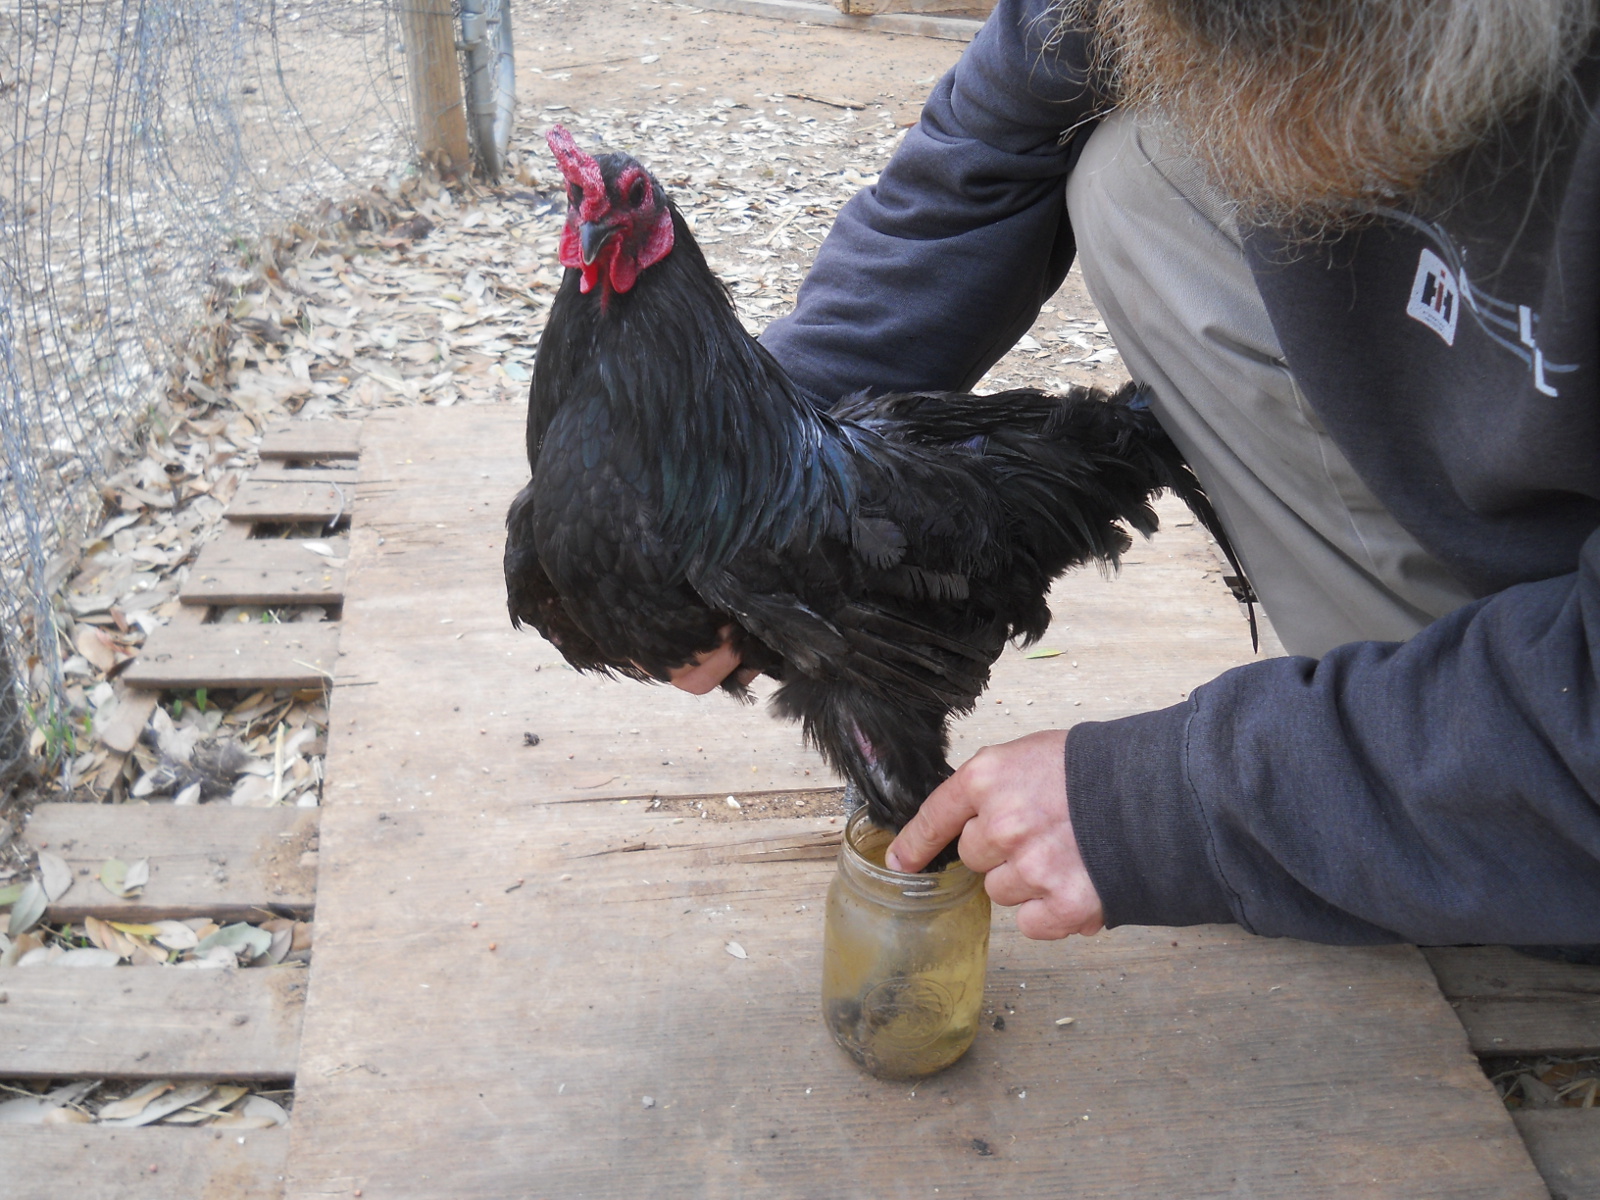
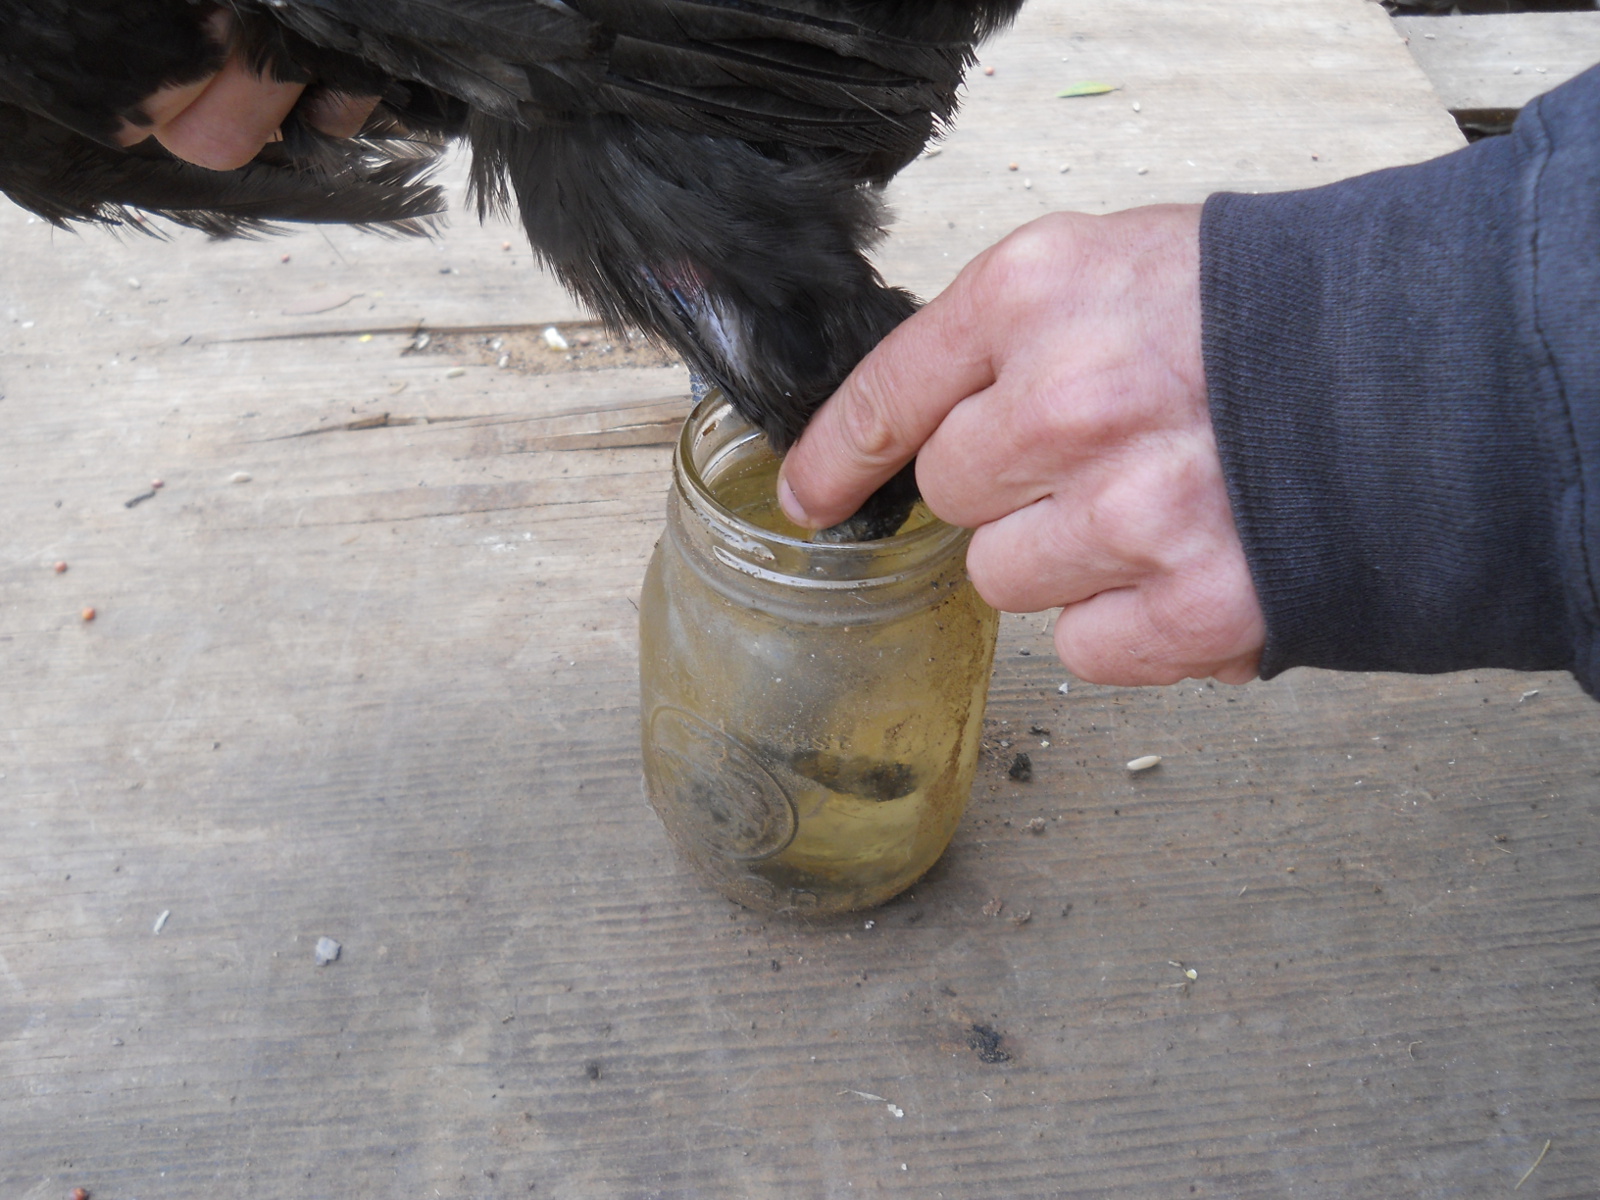
What I ended up doing was dipping each bird’s legs at night for about four days in a row, and then switched to every other day for about another week, and a couple more times at three days apart. Because we had so many to do, when I was dipping them every other day, I started alternating days with part of the flock. I used a pint jar so I didn’t have to have a lot of oil used at one time. It took a day or two to get the hang of not allowing the chicken to spill the oil, which I did by also holding the jar with the dipping hand.

Here I am dipping that rooster’s legs:

Chicken Scaly Leg Mites Dipping in Cooking Oil
Chicken Scaly Leg Mites Close Up of Dipping in Cooking Oil

And sure enough, a few weeks later, apparently the mites died, and their legs began to heal. And here is that original rooster:

Chicken Scaly Leg Mites Healed Legs

Nice!

Well, that little therapy appeared to work really well; and since then, it looks like the other chickens have had similar results.

We are thankful to the Lord for allowing us to fairly easily help the chickens, and we are grateful to Him for Him granting the healing that He did.

— David

Thrilla in the Cella’

It was a dark and, well, dry night because of the drought……..

It was a night like any other — I had to go down into the root cellar to grab a few things for the evening’s supper. I always wear my head lamp to see better in there and to keep my hands free…that’s what I do.

But something was different this time as I pulled open the large, heavy door…

Root Cellar Large Door Entrance

…descended the steps into the hard, cracked earth…

Root Cellar Steps

…and opened the non-creaky door into the pitch black room….

Root Cellar Small Door Entrance

The last time I had left the root cellar all of the jars and cans were neatly stacked and in order. It was nothing special — it’s just the way I left them.

But this time……..this time I warily stepped over the door threshold and gasped as my eyes met with jars toppled carelessly on top of each other:

Root Cellar Jars and Cans

And cans that had been ruthlessly knocked to the ground……

Root Cellar Cans on Ground

Now, having grown up in California, I would normally have said, “Oh, that must have been about a 5.2 on the Richter scale” and thought nothing of it. However, where we live in Texas has virtually no seismic activity, and even with the sonic booms we get around here that shake the ground beneath us, I skillfully deduced that some “one” — or some “thing”!! — must have caused this. Who or what could it be??????

AHA!!! A clue! It must be someone who left a long, skinny purse or boot behind! I was now hot on the trail to find the perpetrator and was impressed at my amazing talent for discerning clues:

Shed Snake Skin

Upon looking around for more clues, I noticed a strange-looking fellow on top of the cans of corn appearing very comfortable and using them as a bed. Maybe he had seen something along his travels through the root cellar and had the information to help me break this case wide open! I asked him if he knew what might be causing all of the ruckus upon which I had just stumbled. I couldn’t believe the bloke’s rudeness I encountered. He didn’t even turn his head to look at me, nor did he even acknowledge my existence!

Root Cellar Snake on Cans

I stepped closer and asked him again. Nothing! He just stuck his tongue out at me — how rude! His silence taunted me — perhaps he had the information I sought, and I was this close to finding out from him who the culprit was, but apparently I would receive no help from the likes of him. I looked carefully around the room for any other clues, however insignificant, that might help me solve this agrarian mystery, but to no avail:

Root Cellar Snake on Cans Close-up

With nothing else to go on, I left the root cellar that night, mystified as to what might have happened; and the questions remain to this day. I still wonder if the fellow I met down there knew something. Oh, well, I guess I will never know what caused the…….

thrilla in the cella’……!!!!

Susan

William of Orange

Recently, the our neighbors captured a garbage bandit in a live trap they had set. The culprit was an orange tabby cat, a male. He ended up being quite friendly, and some of their children wanted to keep him, but the decision was made against that, and he was offered to us actually.

Sue had been wanting a cat for some time, but we really need things to have utility value around here. We have had some mice problems in our barn; and so, I decided that he could be beneficial to have for our barn; and I could do a little something for Sue as well, especially given how friendly he seemed.

So, we decided to take him; and here is how we decided on a name:

On March 17 of each year, we have a tradition around here of having an orange party, with orange being the somewhat official color of Protestants, in protest of the Roman Catholic St. Patrick’s Day and their green color. Some time ago, Protestants in Northern Ireland and Scotland took the color orange in honor of William the III, also known as William of Orange, and for his stands against the Roman Catholics, especially on this day, July 12, where he defeated the antichrist Roman Catholic forces at the Battle of the Boyne (see the “Antichrist” section on our “Soul Info” page regarding our belief that the Pope and Roman Catholic Church are the Antichrist and religious system of Antichrist).

And so, since orange, being the color of Protestants, was derived from William of Orange; and since our cat is also “of orange” — of orange color, that is — we decided to call him William.

Here are some pictures:

Cats apparently like to lay around a lot it seems, especially during the day — at least, this one does:

William the Tabby Cat Sleeping
William the Tabby Cat Sleeping in the Cupboard

Also, I must say that he is the friendliest animal I think I’ve ever been around. We keep him inside with us during the day, unless he wants to cruise around outside; and he really likes to just hang around people:

William the Tabby Cat Laying Next to the Computer While I'm Working On It
William the Tabby Cat Resting His Head on the Computer While I'm Working On It

But, here he is earning his keep:

William’s fun to have around; and he seems to be doing his job, at least to some degree; and he doesn’t cost too much to maintain.

We’re thankful to the Lord for granting us this living mouse catcher, and we pray God grant that William fulfill his duties. We’re thankful for this friendly gift of creation, but we pray the Lord grant us a continued proper perspective on animals without sinning by having inordinate affections. Also, we stand with our Protestant brethren throughout time who have been faithful to Christ against Antichrist, even to death: see Foxe’s Book of Martyrs.

— David

A House – Update V – Homemade Termite Shields

In studying on how to build a pier and beam foundation, and how to prevent against termites, I learned that there are termite shields available to put on top of a concrete pier. Well, I wasn’t able to obtain any locally; so I thought I might try to make them myself. The following is the process of how I did that:

Since flashing is galvanized, which again helps against rust, I figured that would be a good material to use. I purchased 20″ flashing, and cut it into squares:

Cutting the Flashing for the Concrete Pier Homemade Termite Shield

Since they had to fit over a 5/8″ bolt sticking out of the concrete pier, I drilled two 3/8″ holes next to each other in the center of the flashing squares; and I was able to drill three squares at a time easily:

Drilling the Center Hole for the Concrete Pier Homemade Termite Shield

Since the two drilled holes were next to each other, and given the size of the pier’s bolt, I had to cut out the center hole a bit:

Cutting Out the Drilled Center Hole in the Flashing for the Concrete Pier Homemade Termite Shield

Here is the flashing pushed onto the pier. I usually had to work it down onto the bolt. Before putting it on, I sprinkled on some Seven termite powder because I heard that was a good thing to do, but my guess is the weather has removed most of it by now:

Flashing for the Concrete Pier Homemade Termite Shield Set in Place on the Pier

After placing the beam bracket on the shield over the bolt and finger tightening the nut down to hold the flashing in place, I folded the sides down to crease the flashing, and began to form it into its final shape. I originally tightened the bolt down all the way on quite a few of them, but realized that bent the brackets in the middle, which wouldn’t have allowed the beam to sit flat on them:

Folding the Sides of the Concrete Pier Homemade Termite Shield

On opposite sides of the pier, and starting several inches in from the side edge of the flashing, I cut the folded flashing from the lower edge to a point where two perpendicular creases met in a line, creating a square out of two flashing edges and a cut edge; and I did this for all four corners:

Cut Sides of Concrete Pier Homemade Termite Shield

Then I positioned myself on one side where I had made the cuts, reached around the other side of the pier, and tucked in underneath the opposite side of the flashing the cut edges in each of my hands:

Folding the First Cut Sides of the Concrete Pier Homemade Termite Shield

And then I folded the other sides on top of the tucked-in cut sides:

Folding the Final Cut Sides of the Concrete Pier Homemade Termite Shield

I didn’t want to leave the sides of the termite shield loose like that, so I decided to use rivets to fasten the corners in place. They are aluminum (again, to help against rust problems), and I chose 3/16″ short fastener rivets. I took a 2×4 and put it behind a folded corner to support the pressure of drilling; and using one hand, I closed the corner tightly around the 2×4. I then drilled a 3/16″ hole through the flashing in the corner of the overlapped flashing, and another hole in the corner of the folded-under flashing:

Drilling a Rivet Hole in the Concrete Pier Homemade Termite Shield

I then set the rivet in place…

Setting the Rivet in the Concrete Pier Homemade Termite Shield

…and squeezed the rivet tool several times until the stem of the rivet cut off:

Using Rivet Tool on Concrete Pier Homemade Termite Shield

And here is the completed rivet:

Completed Rivet on Concrete Pier Homemade Termite Shield

This is the completed termite shield:

Completed Concrete Pier Homemade Termite Shield

And here are all of the piers with all of their termite shields in place. No mind control for these concrete piers! 🙂

Concrete Piers with All Termite Shields Complete

We’re thankful to the Lord for His provisions, and for the idea and ability to put these together.

— David


Snake, Rattle and Hoe

Last night, it was time to go to sleep. Sabbath had begun a few hours earlier, I had already laid down, and Sue was preparing to retire. It seemed there were an unusual amount of insects in our camper; and while She was at the sink, a medium sized beetle-looking bug was trying to crawl out of the sink, but kept slipping back. As Providence would have it, Sue decided to help the little guy, grab him, and toss him outside. She got a hold of him with a tissue, opened the screen door to our camper, started shaking him out, and looked down only to behold something unexpected. She called to me; I was already starting to doze and wasn’t pleased: I thought she must have seen an extra large spider or something. I complained, but she said that she had seen a snake just below our camper door slithering around my rain boots, which sat next to the palette at the bottom of the steps. I looked down but didn’t see anything. She said it had crawled back underneath the camper. I walked down the steps with the flashlight; and sure enough, there it was. It was a rattle snake, and a fairly thick one too!

Wow. Ok, what to do. It was now coiled up between the two tires of the dual axle on this side of our camper. Shooting it with a pistol or shotgun, or even a .22 from the angle I was standing would probably just cause the bullet to ricochet into the camper. I figured I’d try to poke it enough with something so it would move out into the open, where I could shoot it. I got prepared with the shotgun and .22 rifle, Sue and I donned our rubber rain boots, and I grabbed our hoe and started poking it with the head-end. Well, all that did was cause it to move farther under the camper, coil up behind the rear tire, and start rattling. Hmmm. I went around to the back of the camper with all of the (literal) hardware, and examined the situation from there. It appeared I might have a shot with the .22 from back there without causing a severe ricochet. I prayed I was correct, because the 100 pound propane was off to the side but sort of down line. We prepped the shotgun in case it decided to escape, I lined up the .22 using the backside of the camper wall to brace the barrel against (the shot needed to be pretty accurate as the snake was right next to the tire), aimed for the body because I couldn’t see the head, prayed for a true shot, and fired. The Lord answered the prayer with a hit. This stirred up the rattler; it shook its tail and snapped at the bottom of the camper, but then recoiled, only this time exposing his head. I aimed again, fired, and connected. The rattling stopped, and its movements slowed. It exposed its head once again, and I shot it there again, and this time its movements mostly ceased. We waited a little bit to make as sure as possible it was dead, and using the hoe I slid it out. Sue went and got the machete for me. I pinned its head against the ground with the hoe and chopped it off to finish the ordeal.

And here it is:

This is it the next day, minus the rattle:

And here’s Sue taking it to the chickens for breakfast:

This was no youngin’! (ie. it had been to the “molt” shop for “shakes” many times. 😀 )

We thank God for His mercies in all of this (these are just the ones we’ve recognized): Sue rarely picks up bugs from inside the camper to throw them out; I often step outside with only sandals on during the night for restroom breaks; the propane tank hadn’t blown up; and the rattle snake was disposed of. Thanks to Providence for granting and causing our safety, and for His guidance and protection. We are very grateful to Him.

We also thank the Lord for granting this as a faith builder for us in His always seeing and caring eye, and we thank Him for His mercies in bringing us safely through this.

— David

Newer posts »