Our journal of what we pray is our sojourn of life along the narrow way, even the old paths, submitting to the Bible as a light unto both.

Year: 2010 (Page 6 of 7)

Garden 2009 – Update VI – Onions

Garden 2009 Growing Onion GreensI sit here writing this blog post on the first full day of Spring 2010. Wow, I never thought I’d still be writing about our Spring 2009 garden! In it, we planted onions; and they have been going strong through the wettest, harshest winter we’ve had since we’ve lived here in Central Texas. I had picked all of the green onion stems off of the onions last summer in order to dry them in our solar food dehydrator, and decided to leave the remaining onions in the ground and pick them as needed as we entered into Fall. In actuality, once everything else in the garden had come to its natural end, I forgot to go out and pick the onions much of the time. Then, mid-way through winter, Dave noticed there were green onion stems (aka: scallions) that had grown back long and healthy. Boy, talk about a gift that keeps on giving!

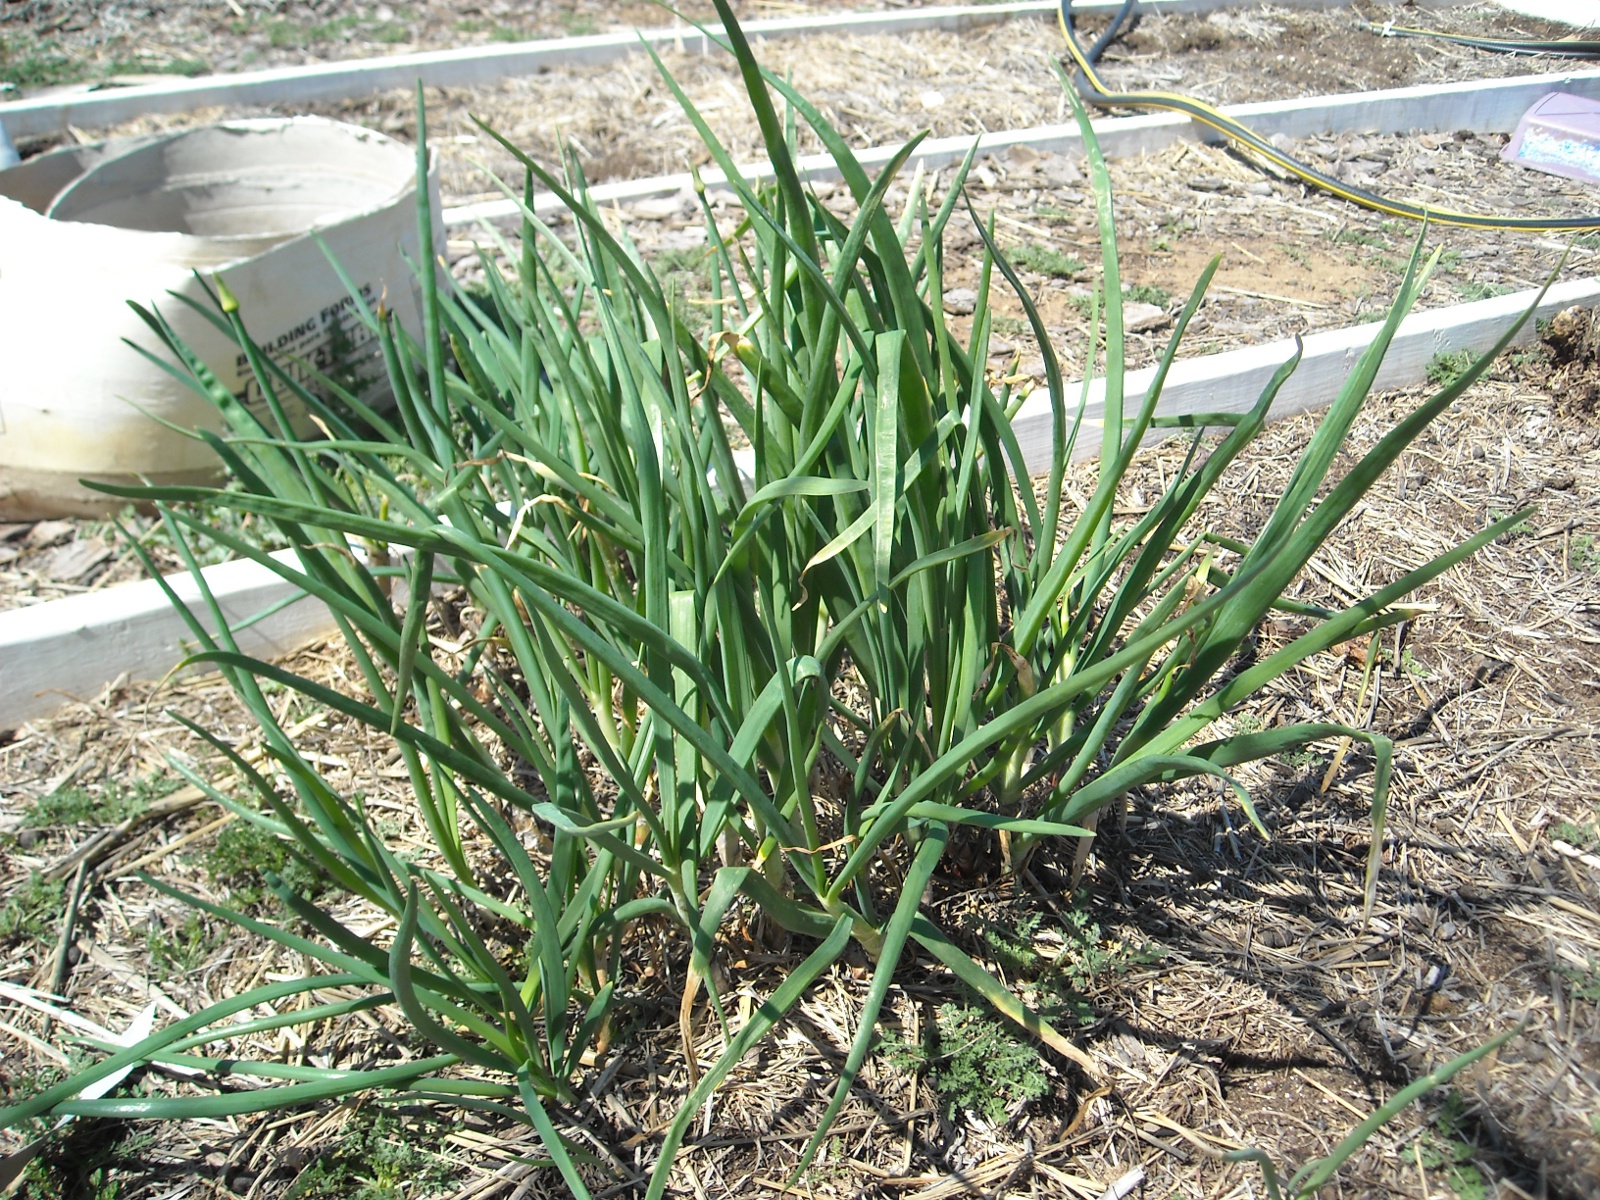
One recent evening I went out and pulled several onions when my supper dish recipe called for it. These bulbs are much smaller than regular onions you buy in the store, but the taste is delicious and robust. I was pleased and surprised with how well the onions had survived through Winter, and with the bright, healthy color and texture that had been maintained:

Garden 2009 Picked and Clipped Onions

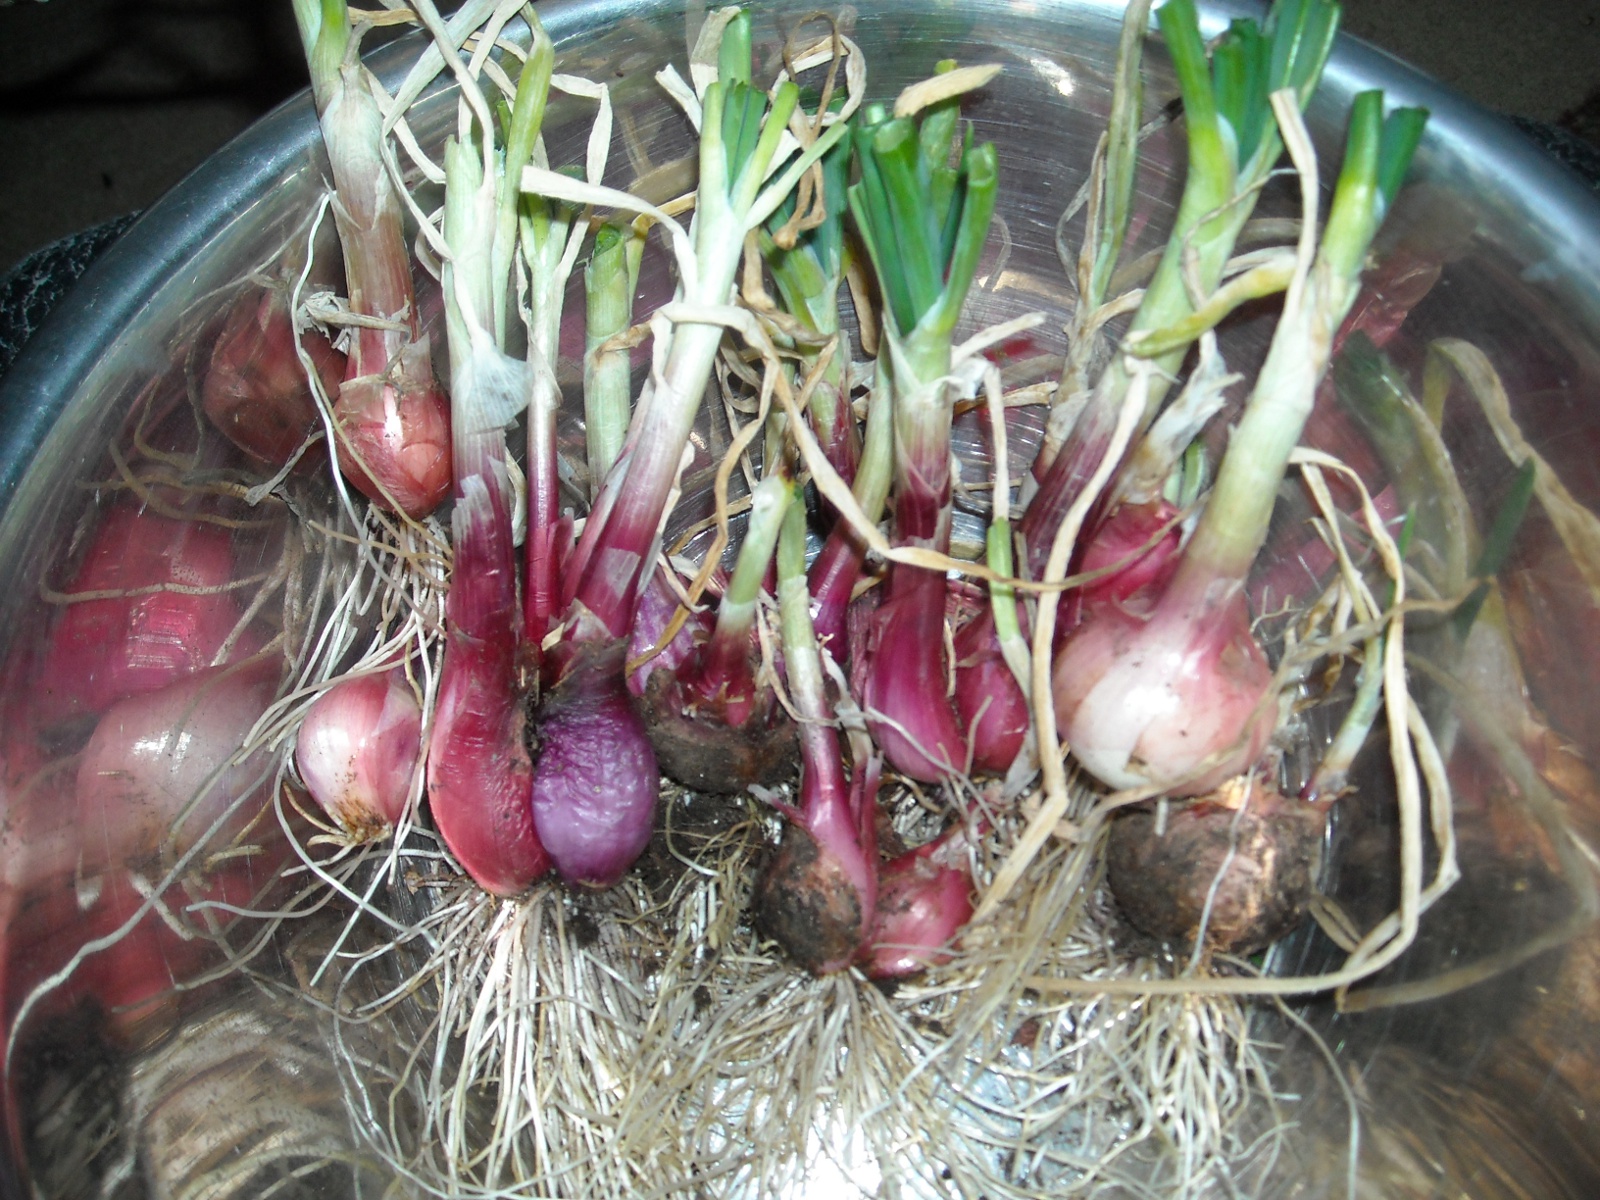
You really do get two vegetables for the price of one with these onions. The green onion stems are potent with their own milder onion taste. They also looked green and very healthy. It’s amazing how some garden vegetables are so fragile when severe weather comes; and others, like these green onions, seem to thrive:

Garden 2009 Picked and Clipped Onion Greens

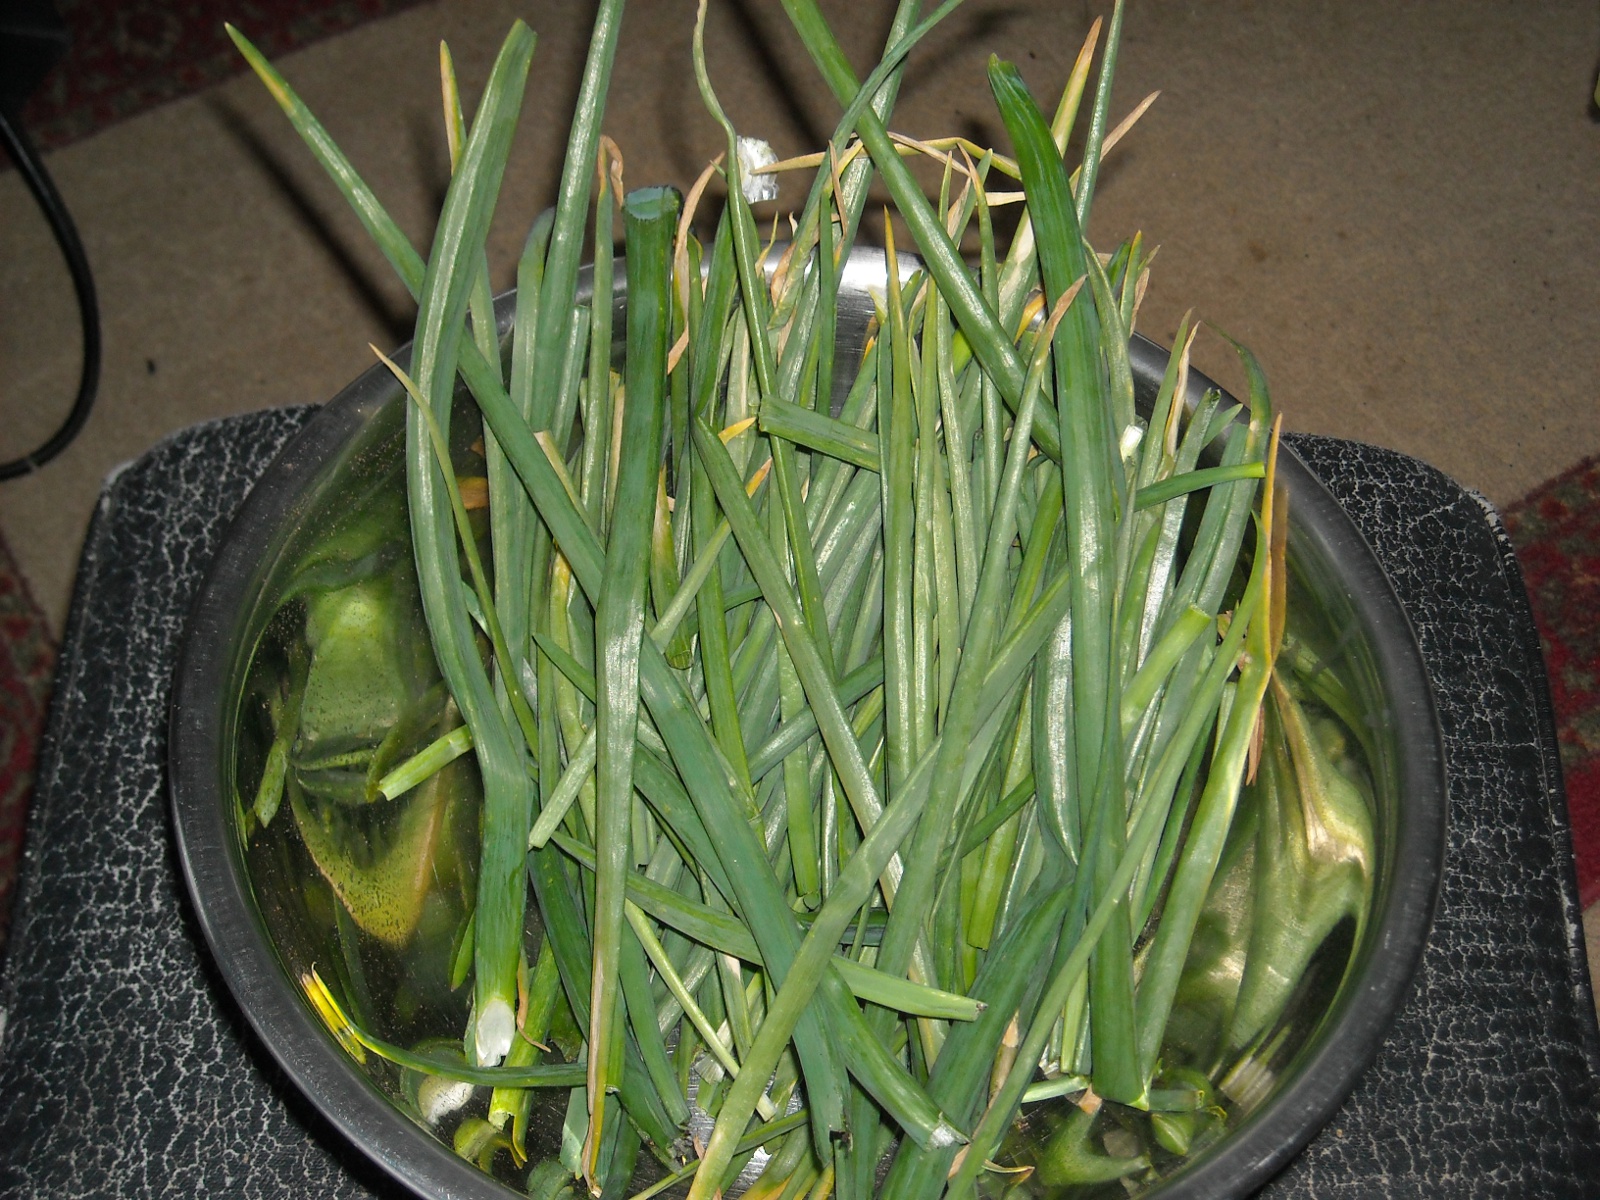
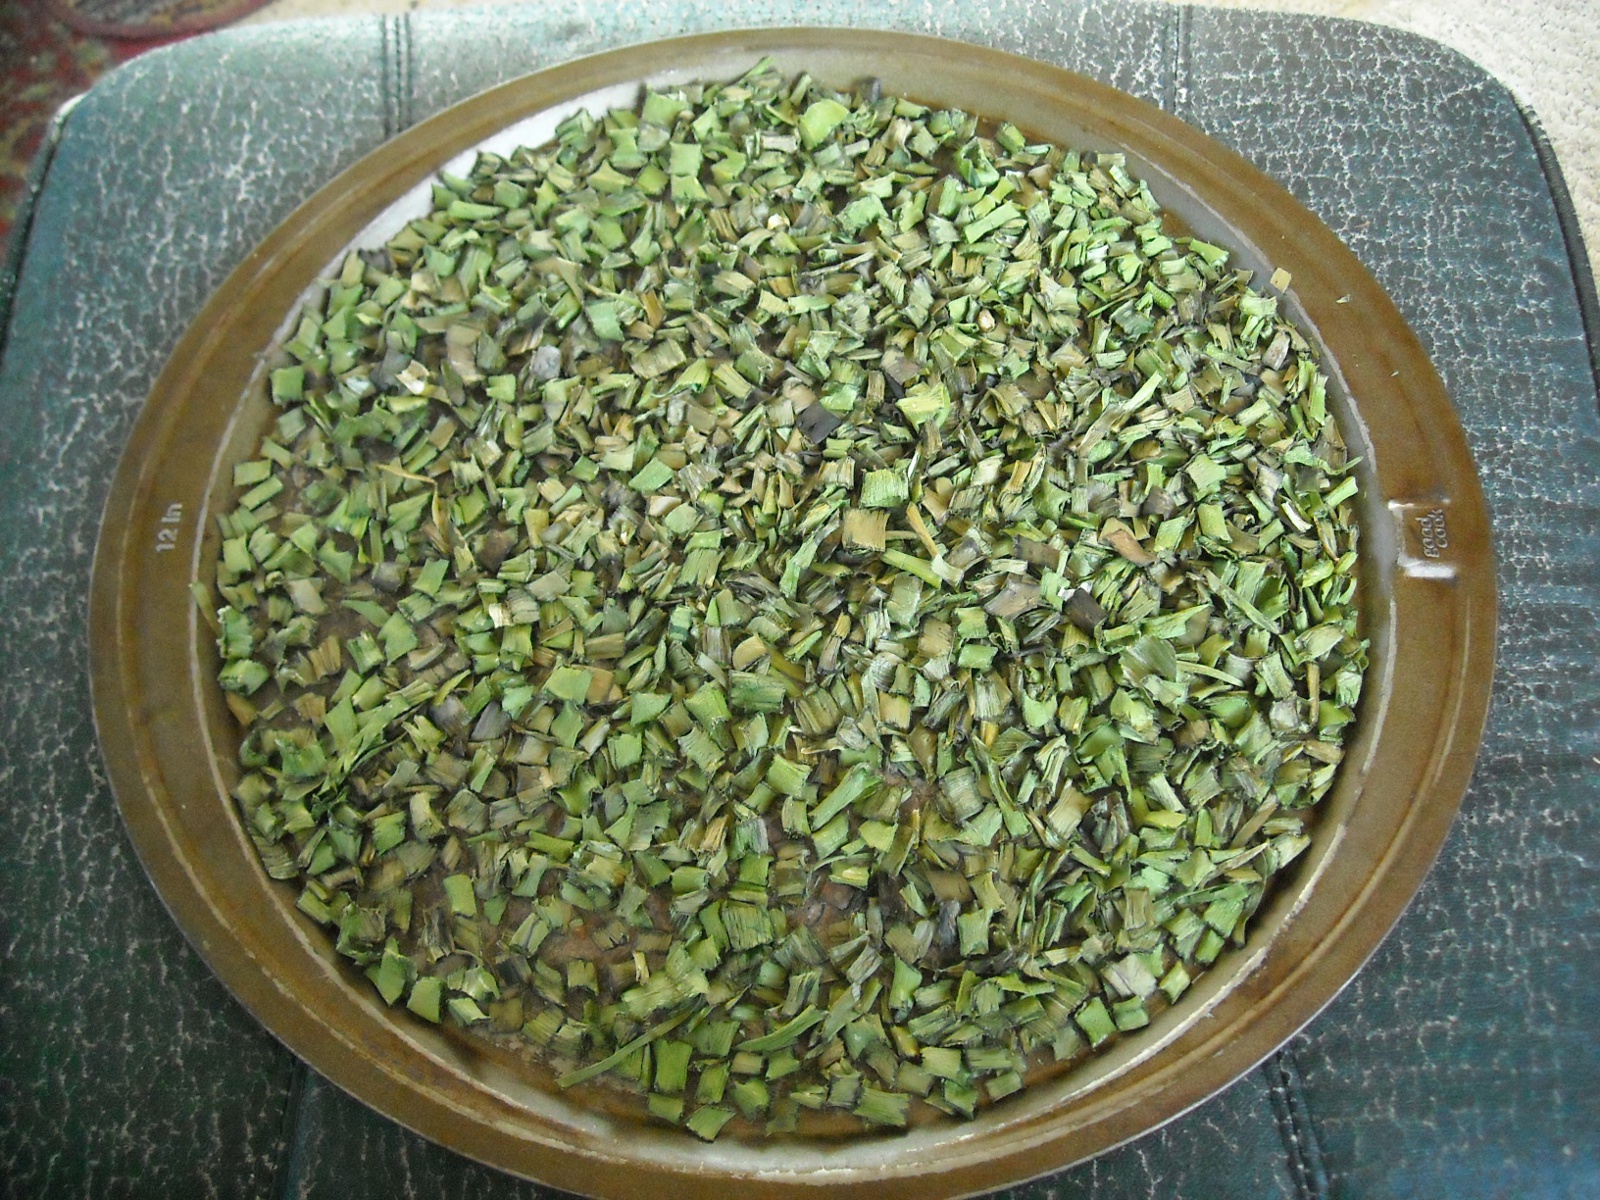
I didn’t want to waste any of the green onions, and the weather we have been getting has been too overcast to use the solar food dehydrator much of the time, so I decided to put them in the oven overnight to slow dry. I cleaned and cut up the green onions and put them on a pizza pan sheet, set the oven to 150 degrees (or thereabouts), and left them overnight. They needed to stay in the oven a bit longer the next morning; but the end result was delicious, crispy, preserved green onion bits! I have since used them in a few various dishes; and it adds a nice, subtle onion flavor:

Garden 2009 Dried Onion Green Bits

We never tire of giving our Father thanks for His direct provisions. And we pray He grant us strength, resilience and growth through times of the spiritual winters of His chastisement, affliction, or the lessening of His presence to teach us to desire Him more.

Susan

Providence’s Perpetuation Provisions: New Kids “George” and “Gracie”

For our breeding scheme this year, we previously discussed our separating out our older does to be with our main buck Shatner, and the younger does, his female offspring, to be with Eastwood, a goat we traded one of our triplet bucks for. Well, there have been a couple of updates: first, Eastwood died during the Winter; so we borrowed a buck from our neighbor. He’s apparently pure Spanish, and we call him John Buck (think what you might call an unknown female goat 🙂 ) :

Spanish Goat Buck Borrowed for Breeding

We had put the bucks with our does in the beginning of November so they would give birth no earlier than April, where they should be mostly out of the cold. Well, Sue was out near the goats the other day, and she heard a very young sounding bleat. Umm…huh? She went to see what was going on, and lo and behold, our doe Pammy had given birth to twins! While quite surprising, we were both very thankful to find out God had granted us two new goats — a male and a female. We decided to call them George and Gracie, and here is your introduction to them:

New Goats George and Gracie with their Mother Pammy

And here is a video:


As I briefly mentioned in the video, last year, when Winnie had her triplet bucks, the middle one, Porthos, seemed to often have physical problems, from pink eye to swollen front knees. And he was smaller than his brothers, and so we kept him with Winnie much longer than we did the others, so he could continue to have her milk. Well, apparently we kept him in too long, as nearest we can figure, he is the father of the new kids. Porthos has grown up to be about as big has his younger brother now, and seems to have also matured normally. 🙂 Even though this is a possible situation of some in-breeding, which we were trying to avoid, since it’s Pammy it’s not too bad as the worst Porthos might be is Pammy’s nephew; with Betsy, she’s of a whole different line, so if Porthos got to her as well, it’s fine. However, he may have gotten to his mom, Winnie; we’re hoping not, but I guess we’ll have to see what happens. And now we know better for the future.

We are grateful for the Lord, in His graces and mercies, granting us these new provisions; and we pray that He might grant they be productive members of the herd, according to His will.

— David


A House – Update V – Homemade Termite Shields

In studying on how to build a pier and beam foundation, and how to prevent against termites, I learned that there are termite shields available to put on top of a concrete pier. Well, I wasn’t able to obtain any locally; so I thought I might try to make them myself. The following is the process of how I did that:

Since flashing is galvanized, which again helps against rust, I figured that would be a good material to use. I purchased 20″ flashing, and cut it into squares:

Cutting the Flashing for the Concrete Pier Homemade Termite Shield

Since they had to fit over a 5/8″ bolt sticking out of the concrete pier, I drilled two 3/8″ holes next to each other in the center of the flashing squares; and I was able to drill three squares at a time easily:

Drilling the Center Hole for the Concrete Pier Homemade Termite Shield

Since the two drilled holes were next to each other, and given the size of the pier’s bolt, I had to cut out the center hole a bit:

Cutting Out the Drilled Center Hole in the Flashing for the Concrete Pier Homemade Termite Shield

Here is the flashing pushed onto the pier. I usually had to work it down onto the bolt. Before putting it on, I sprinkled on some Seven termite powder because I heard that was a good thing to do, but my guess is the weather has removed most of it by now:

Flashing for the Concrete Pier Homemade Termite Shield Set in Place on the Pier

After placing the beam bracket on the shield over the bolt and finger tightening the nut down to hold the flashing in place, I folded the sides down to crease the flashing, and began to form it into its final shape. I originally tightened the bolt down all the way on quite a few of them, but realized that bent the brackets in the middle, which wouldn’t have allowed the beam to sit flat on them:

Folding the Sides of the Concrete Pier Homemade Termite Shield

On opposite sides of the pier, and starting several inches in from the side edge of the flashing, I cut the folded flashing from the lower edge to a point where two perpendicular creases met in a line, creating a square out of two flashing edges and a cut edge; and I did this for all four corners:

Cut Sides of Concrete Pier Homemade Termite Shield

Then I positioned myself on one side where I had made the cuts, reached around the other side of the pier, and tucked in underneath the opposite side of the flashing the cut edges in each of my hands:

Folding the First Cut Sides of the Concrete Pier Homemade Termite Shield

And then I folded the other sides on top of the tucked-in cut sides:

Folding the Final Cut Sides of the Concrete Pier Homemade Termite Shield

I didn’t want to leave the sides of the termite shield loose like that, so I decided to use rivets to fasten the corners in place. They are aluminum (again, to help against rust problems), and I chose 3/16″ short fastener rivets. I took a 2×4 and put it behind a folded corner to support the pressure of drilling; and using one hand, I closed the corner tightly around the 2×4. I then drilled a 3/16″ hole through the flashing in the corner of the overlapped flashing, and another hole in the corner of the folded-under flashing:

Drilling a Rivet Hole in the Concrete Pier Homemade Termite Shield

I then set the rivet in place…

Setting the Rivet in the Concrete Pier Homemade Termite Shield

…and squeezed the rivet tool several times until the stem of the rivet cut off:

Using Rivet Tool on Concrete Pier Homemade Termite Shield

And here is the completed rivet:

Completed Rivet on Concrete Pier Homemade Termite Shield

This is the completed termite shield:

Completed Concrete Pier Homemade Termite Shield

And here are all of the piers with all of their termite shields in place. No mind control for these concrete piers! 🙂

Concrete Piers with All Termite Shields Complete

We’re thankful to the Lord for His provisions, and for the idea and ability to put these together.

— David


David’s Digest: Walmart-Jireh

Webster’s 1828 dictionary defines the word “provider” in the following way:

PROVI’DER, n. One who provides, furnishes or supplies; one that procures what is wanted.

I’d like to ask a few questions:

Who or what is the provider of our water? If we pay to get our water piped into our house, the company that does that is our provider.

Who or what is the provider of our food? If we go to a grocery store, the grocery store is (along with every part of the chain involved in getting it there).

Who or what is the provider of our clothing? If you get it from a retail store, the store and the manufacturers are.

I could go on; but if we’re paying someone or some entity for us to have the necessities of life, then by the definition above, they are our provider.

If we’ve placed a middle man between us and God’s direct provisions, then in reality we no longer look to God for His providence — we look to the middle man. Don’t believe that? In a town, if our water stopped flowing from the faucet in our house, what would we do? We’d call the water company — our water provider. If we would starve without the nearest grocery store having food to buy, then it is our provider.

To whom we look for your life provisions, they are our provider.

Gen 22:13-14 – “13 And Abraham lifted up his eyes, and looked, and behold behind him a ram caught in a thicket by his horns: and Abraham went and took the ram, and offered him up for a burnt offering in the stead of his son. 14 And Abraham called the name of that place Jehovahjireh [the Lord will see/provide]: as it is said to this day, In the mount of the LORD it shall be seen.” (see John Gill’s commentary on vs. 14)

God provided the ram for the sacrifice, and we are to look to Him alone as our provider.

Spiritual Provisions

God providing temporily is really a “type” of His spiritual provisions (we eat bread — He is the bread of life (John 6:35); we drink water — He gives the water of life (John 4:14); etc.) In the same way God provided the ram above (also as a type), He provided a Sacrifice, a Savior, the Lord Jesus Christ, for His people; and we are to look to Him alone for salvation.

Further, God is the only source for all other spiritual provisions, such as spiritual graces, as the heart of man is desperately wicked; and everyone is dead in their sins until God, by His own sovereign will, graces and mercies, breathes new life into them. Did we conjure up our own free-will faith to believe in God, and that’s why He saved us? Then we were the provider of our faith (and thus our salvation?!) Do we pull ourselves up by our bootstraps, have “power thoughts” for courage and strength, and declare we’re going to be meek and humble and not let the things of life get us down? Then we are the provider of our Christian graces.

The Bible says otherwise, and prevents any man from boasting of providing his own faith and spiritual graces.

And so, in the end, who is our provider?

— David

The Blog Days of Winter

This Winter has gone on a bit longer than usual, at least from what we’ve experienced in our time here so far; and it’s also been wetter and colder than normal. With that continuing, yesterday, the Lord brought a decent amount of the “white stuff” to the land.

This was how things were first thing in the morning:


And this is how it was in the early afternoon:


We once again thank God for His mercies in the weather, the provisions of warmth and shelter He has allowed us, and for the provisions of the moisture for the ground.

— David


Nessa Makes a Mess-a

We still haven’t been able to figure out what she’s trying to get at here; but Nessa, one of our Border Collies, loves mud puddles:


We’ve been trying to think of ways to harness this to our advantage here in agrarian-land. Maybe she’s a new kind of post hole digger. Or maybe we could put her over a bucket of dirty clothes that are soaking; and she could be a fancy, automated laundry agitator.

Anyone out there have any other suggestions? 🙂

— David


Farmer’s (Goat) Cheese aka Neufchatel

I just finished eating a few crackers topped with my first (successful) attempt at Farmer’s Cheese, a soft “cream” type cheese.

A neighbor said she had made some Farmer’s cheese with the inexpensive Junket rennet tablets found in the local grocery store, so I thought I would try that first. An online cheese making blog said not to use Junket rennet because it is not the same as cheese rennet. But it was here and within my budget, so it was cheese rennet to me! 🙂

Goat Milk Cheese Rennet

My “first” first attempt was a bust, using the original recipe from the Junket instructions. Not to say it doesn’t work, but that my attempt didn’t work. The recipe calls for buttermilk, which I didn’t have; so I looked online and found you can substitute with milk and lemon juice. So I did that, along with adding 1/4 tablet of rennet dissolved in a little water. In hindsight, I don’t think the combination of those was enough to coagulate the milk. I heated the milk to 65 degrees F according to the recipe, added the “buttermilk” and rennet, and left the covered pot out overnight per the instructions. It was supposed to solidify overnight; but it just never did, even after I left it another 12+ hours. So that went to the chickens.

My next attempt was a conglomeration of a couple of recipes. This time I heated two quarts of our raw goat milk to just below boiling, and added two generous tablespoons of white vinegar (one per quart) and 1/2 tablet of the Junket rennet dissolved in a little water. Since this was previously frozen milk, it was a bit watery; so I decided to err on the side of caution and add too much vinegar and rennet rather than too little. The last thing I wanted was to ruin another batch:

Goat Milk Cheese Milk Heating

I whisked it all together, covered the pot, and hoped for the best. Well, this time it started to coagulate much more quickly, which gave me hope. By the next day, it was not as solid as I imagine a really good cheese probably would be; but it was close enough!

Goat Milk Cheese Milk Whisking

According to the recipe, the cheese is ready when you can poke your finger in and lift the top, gelled layer cleanly from the lower, liquid layer:

Goat Milk Cheese Curds

Then, you are supposed to cut it into 1/2 to 1 inch cubes in order to assist with the “draining of the whey” (sounds like a ceremony). The instructions call for the first cut starting down the middle, holding the knife at a 90 degree angle, and then each subsequent cut tilting the knife a little until you get to 45 degrees by the time you reach the side of the pot. You turn the pot 1/4 turn, and repeat the process, which eventually makes a grid of curd cubes. I forgot to tilt the knife as I cut — oh, well. But, it came out okay anyway:

Goat Milk Cheese Cutting Curds in Pot

Then, I spooned out the cubes of curds into a handkerchief-lined strainer with a bowl underneath to catch the whey drippings. They say to use cheesecloth, but it just seemed too loose of a mesh, and the handkerchief worked very well for this type of cheese:

Goat Milk Cheese Spooning to Handkerchief

Here it is all spooned into the strainer. You can’t tell here, but it’s draining like crazy underneath:

Goat Milk Cheese Whey Draining

Quite a bit of whey drained quickly, but it takes 2-3 hours to fully drain:

Goat Milk Cheese Whey

Here are the curds with the majority of the whey drained. Pretty cool, huh?!

Goat Milk Cheese Curds with Whey Drained

After the main draining, I hung up the handkerchief to draw out the rest of the whey with the help of a bit longer exposure to gravity:

Goat Milk Cheese Curds Drip Draining

Well, this looked like it might resemble Farmer’s, or some kind of cheese, and not too much like a train wreck:

Goat Milk Cheese

So I seasoned it with a little salt, garlic and onion powder, spooned it into a container and put it in the refrigerator overnight. Using two quarts of milk is supposed to make approximately 3/4 lbs. of cheese, and this looked about right:

Goat Milk Cheese Storage

I’m very pleased with the mild, seasoned taste. It has been too easy to eat a lot of crackers topped with the cheese at one sitting! But I’d rather have to combat will power than have to hold my nose closed and gag it down 🙂

Goat Milk Cheese on Crackers

All of our does have dried up in preparation to deliver more kids in the Spring, if the Lord wills; so this was my last opportunity to attempt making goat cheese until then; and I’m very thankful it turned out. I’m excited (and not as scared) at the future possibilities! What a great way to preserve milk; and we are, as always, very thankful for God’s direct provisions. Believe me, I know I probably could have done this much better and more “properly;” but, hey, it worked for me; and it’s food! I hope to continue to improve with more practice and maybe somebody out there can learn from my mistakes. Bon appetit!

Susan

« Older posts Newer posts »