Our journal of what we pray is our sojourn of life along the narrow way, even the old paths, submitting to the Bible as a light unto both.

Author: David & Susan Sifford (Page 81 of 96)

A House – Update VI – Beams Be Up, Scotty

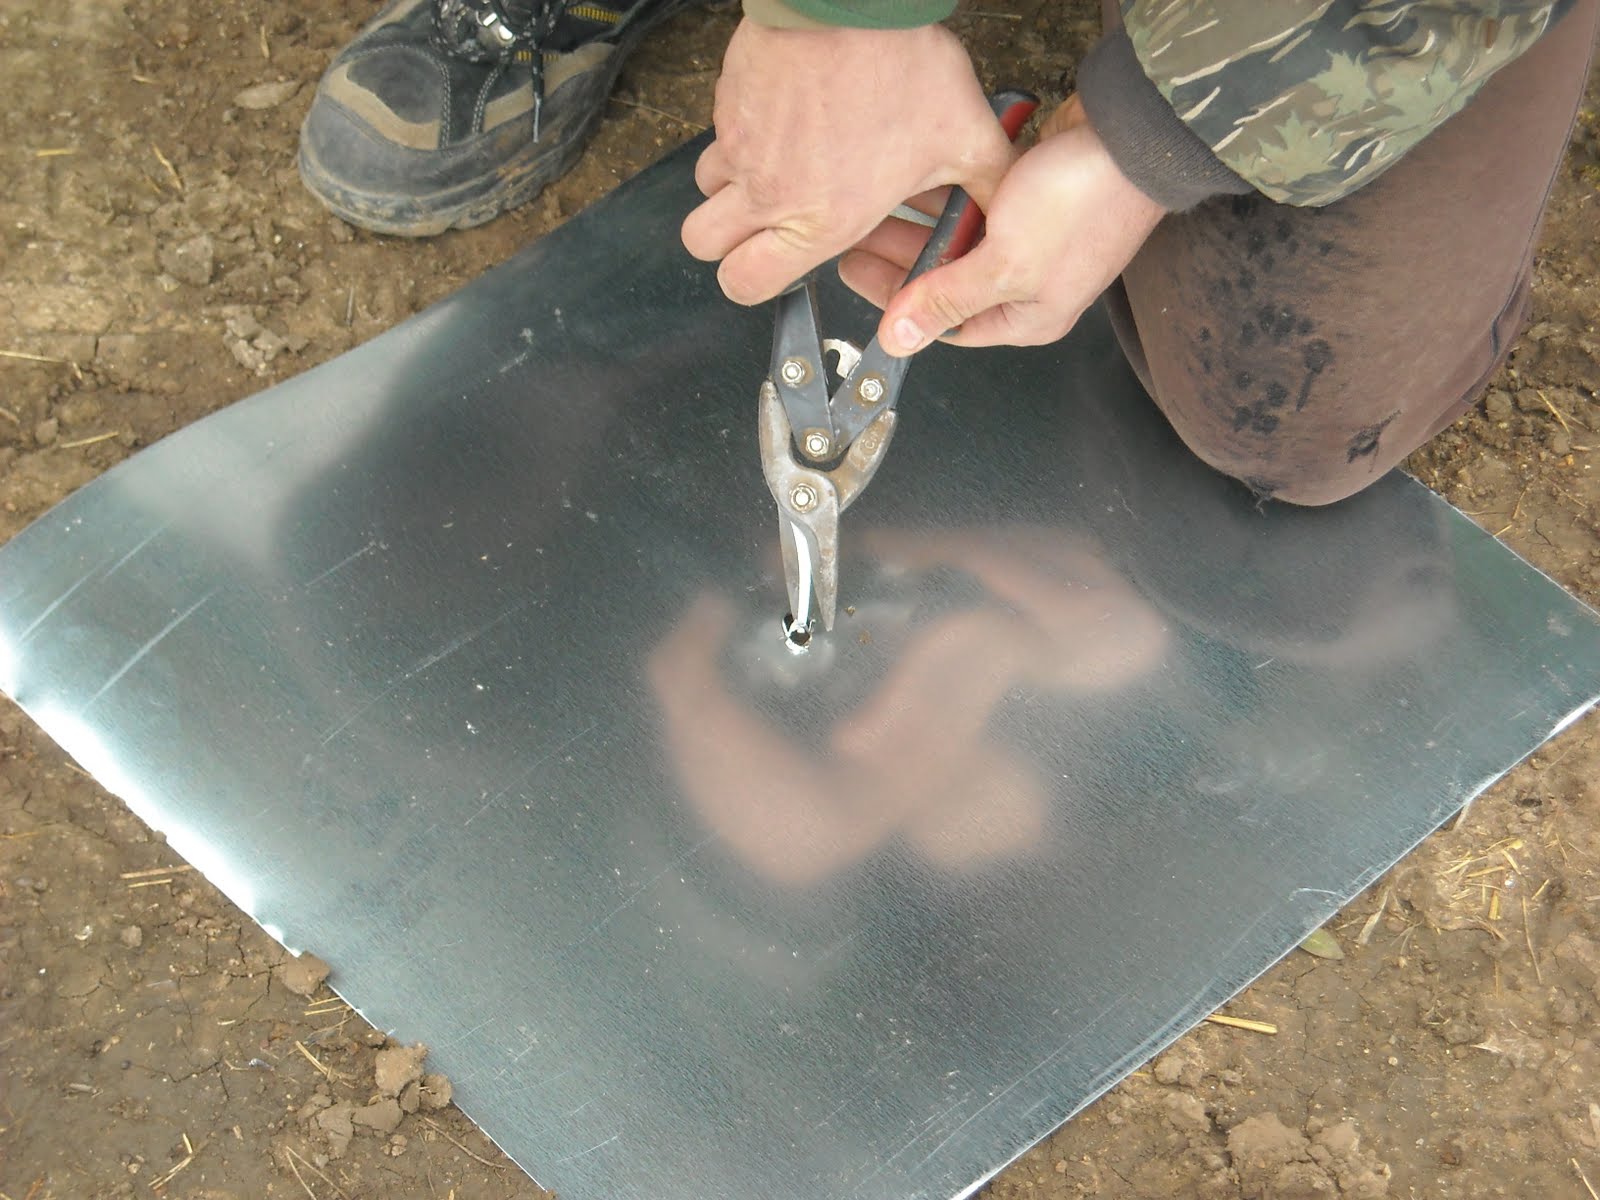
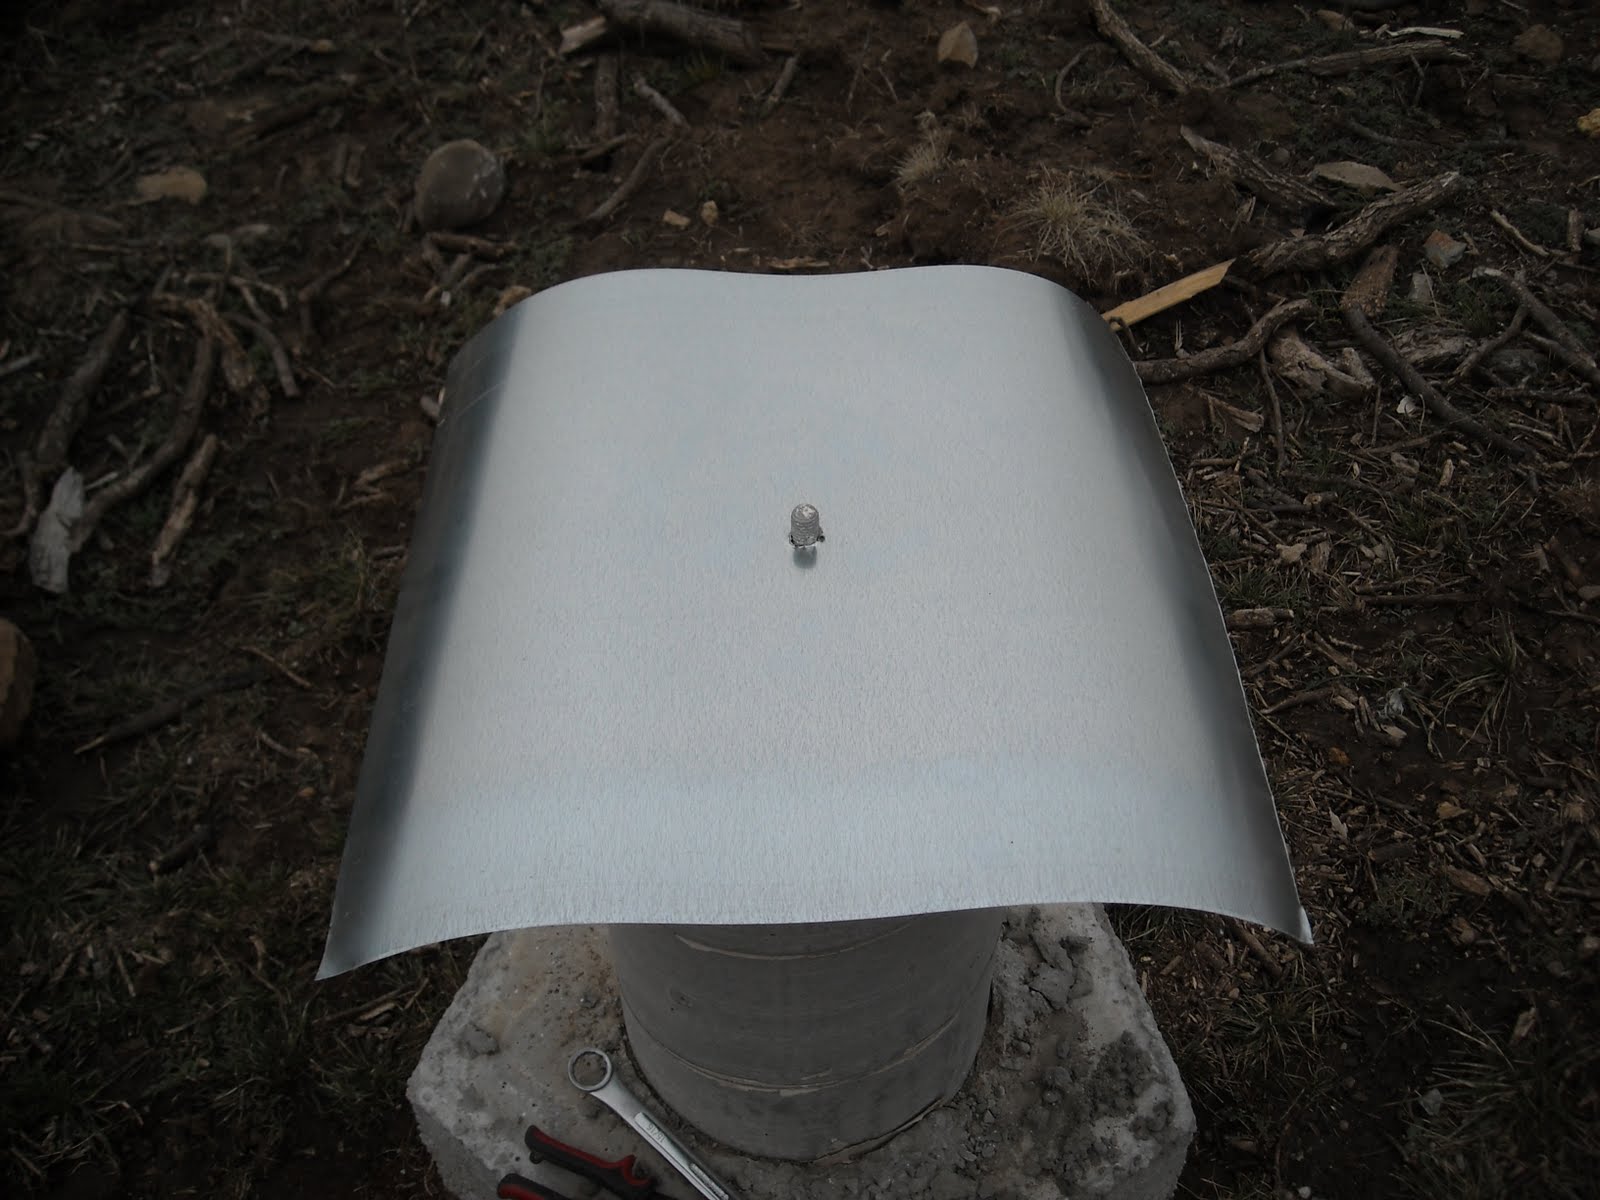
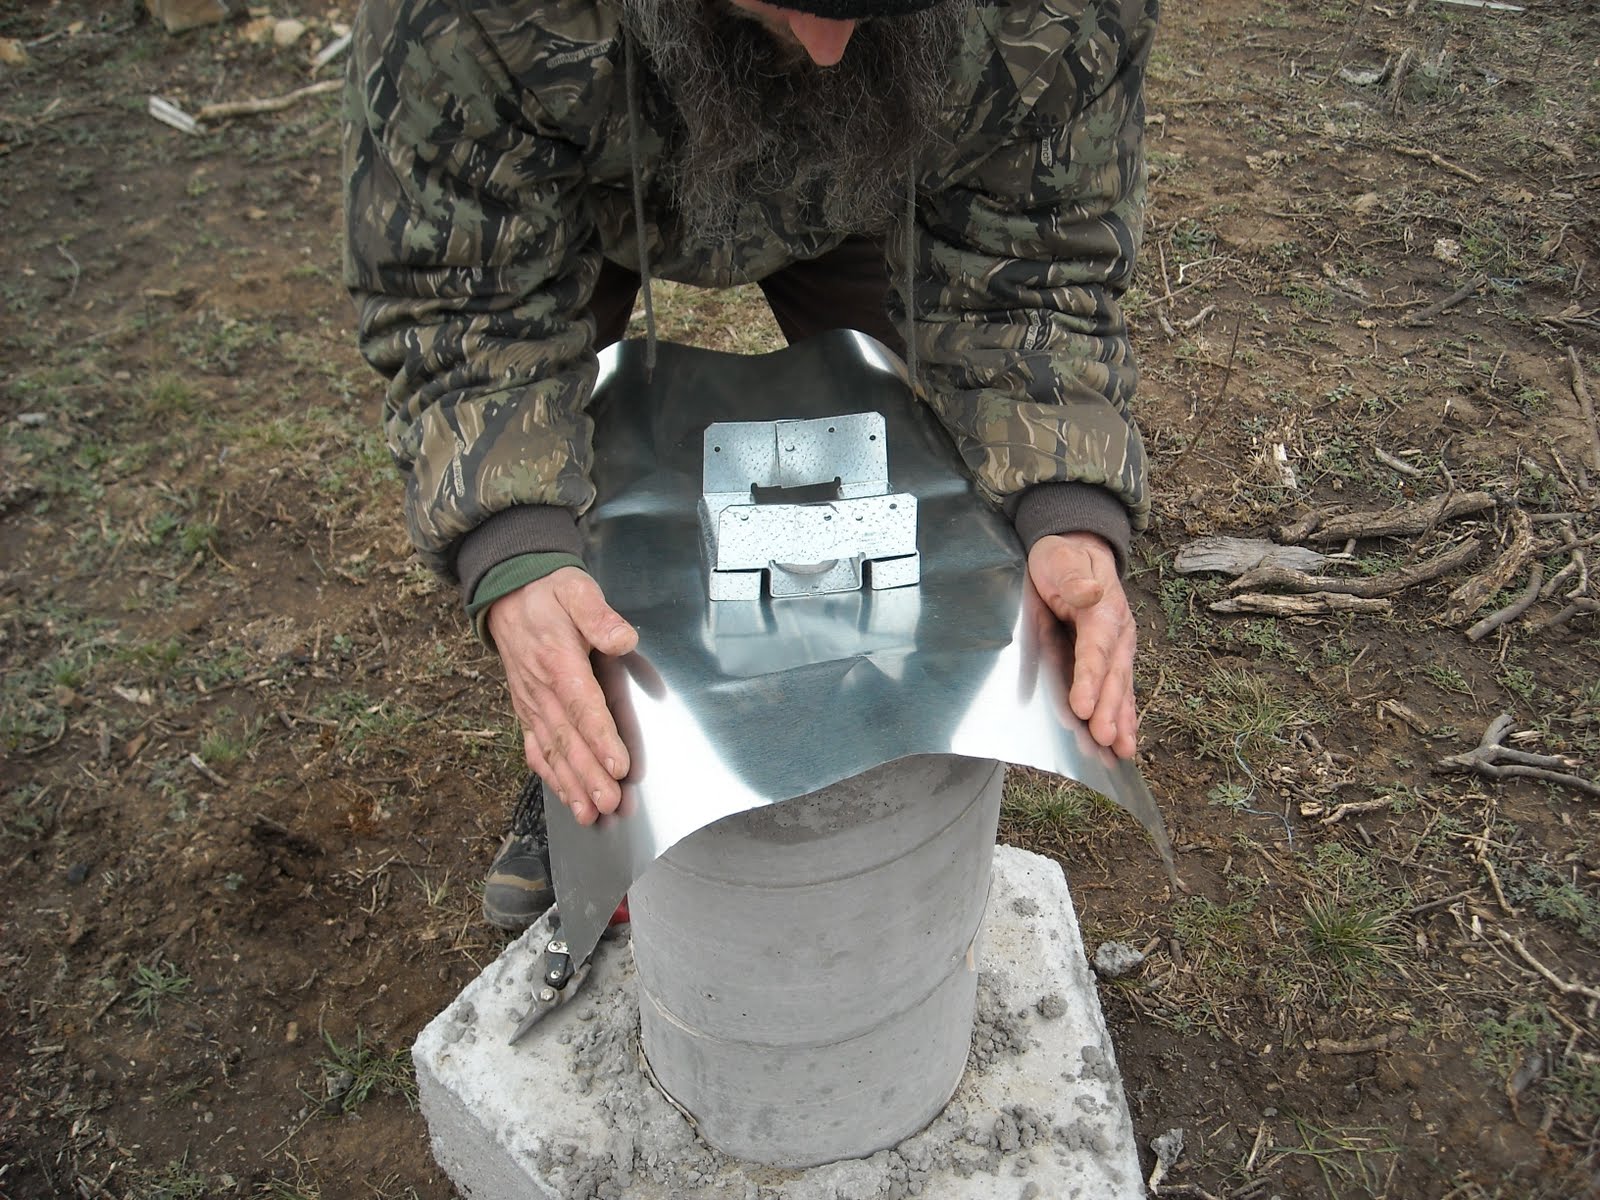
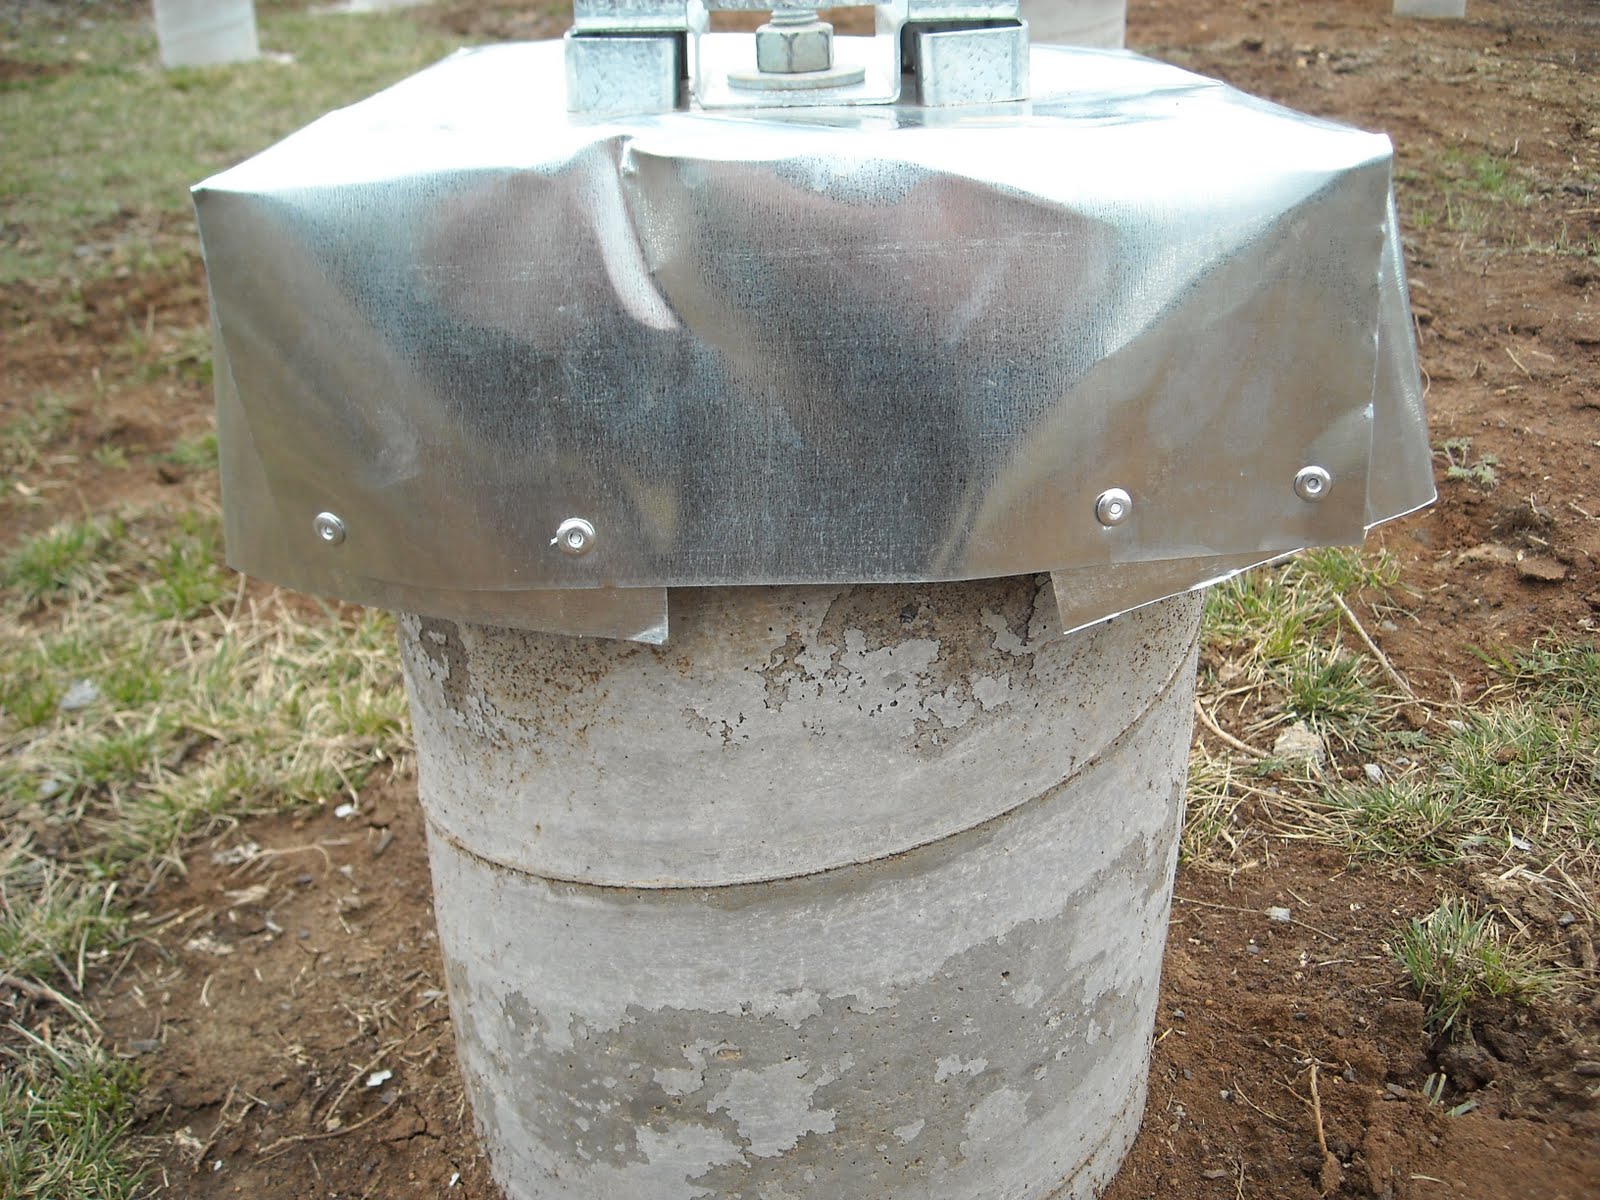
Once the concrete piers for the house were completed, and the homemade termite shields in place, it was time to put on the beams. I decided to use built-up beams (which is basically constructing together beams out of thinner wood) instead of buying one-piece beams, mostly because of the almost certain tremendous cost of beams for the sizes needed.

In looking at typical wood spanning charts, and with help from friends, I decided to go with two yellow pine (for strength) 2x10s, with 1/2 inch plywood in between, which sandwiched together would fit nicely into the brackets on the piers. Apparently, 1/2 inch plywood standing on end has about the same strength as 2-by wood used similarly. In fact, they make floor joists that way (or perhaps with OSB) called TJI joists.

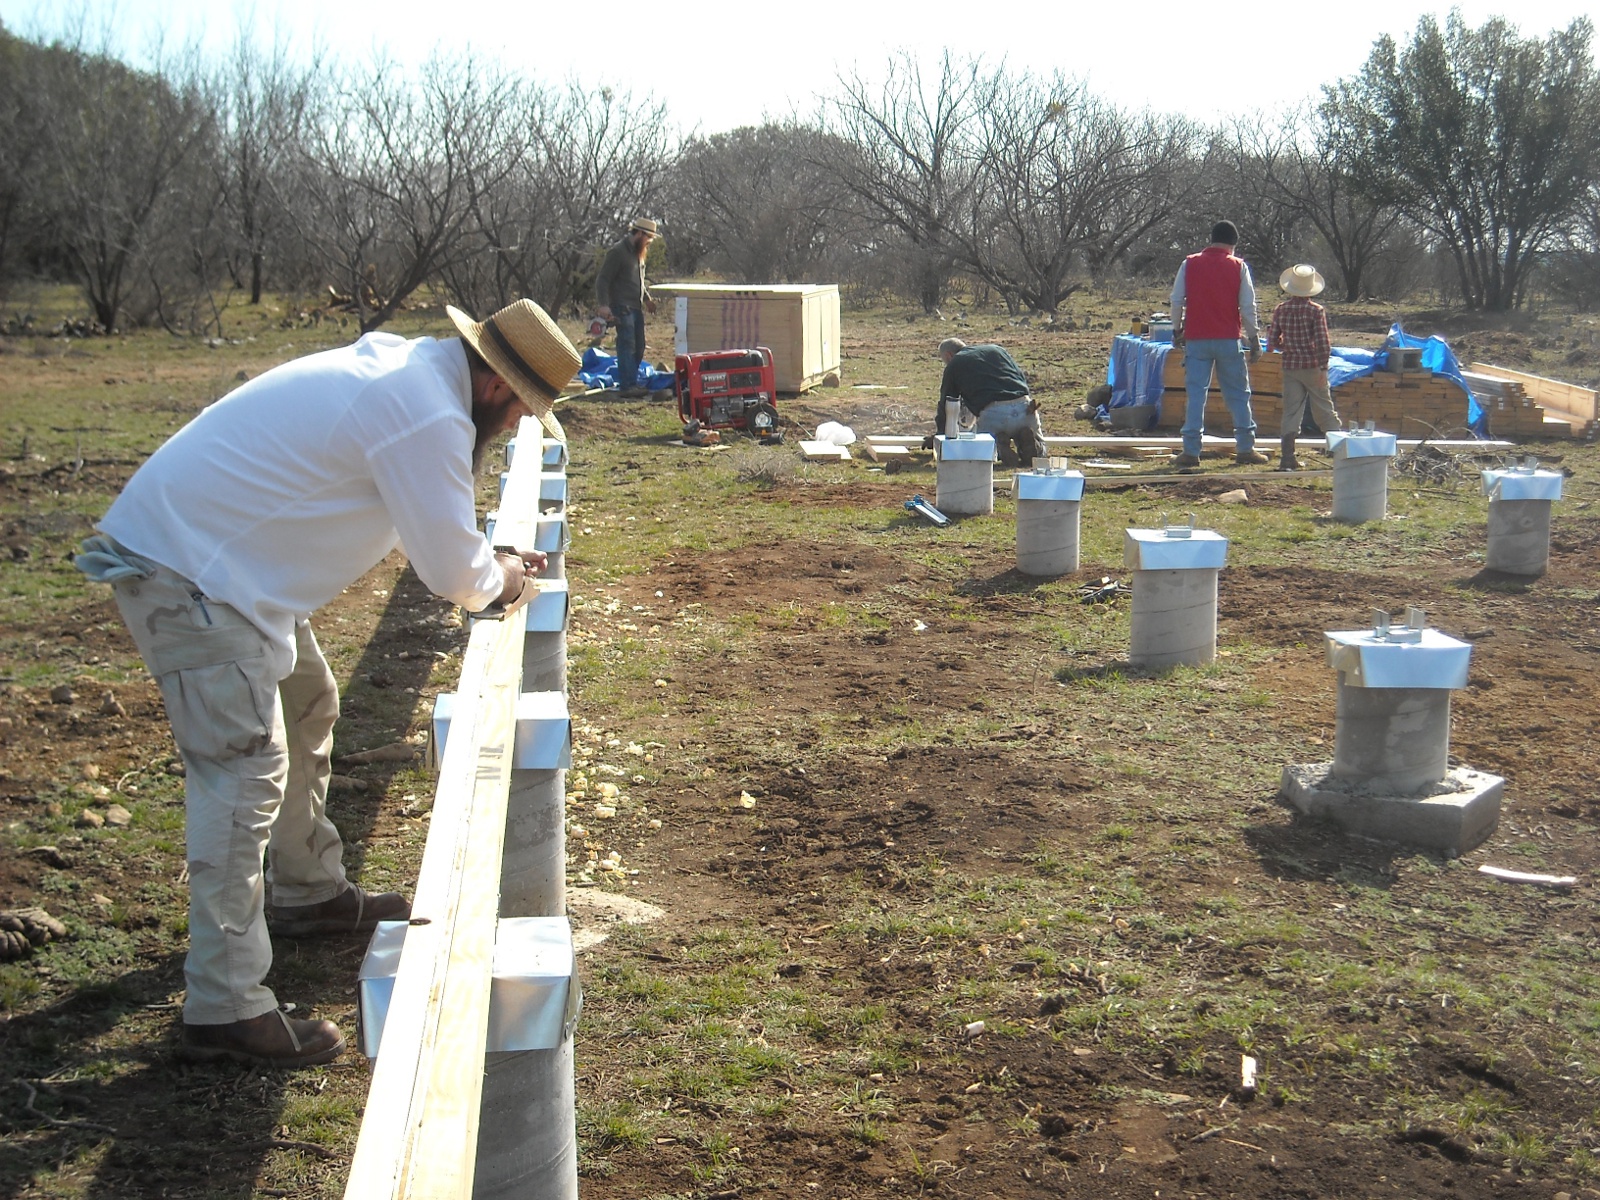
And so, on one of our monthly community work days, the men graciously helped me in working on them.

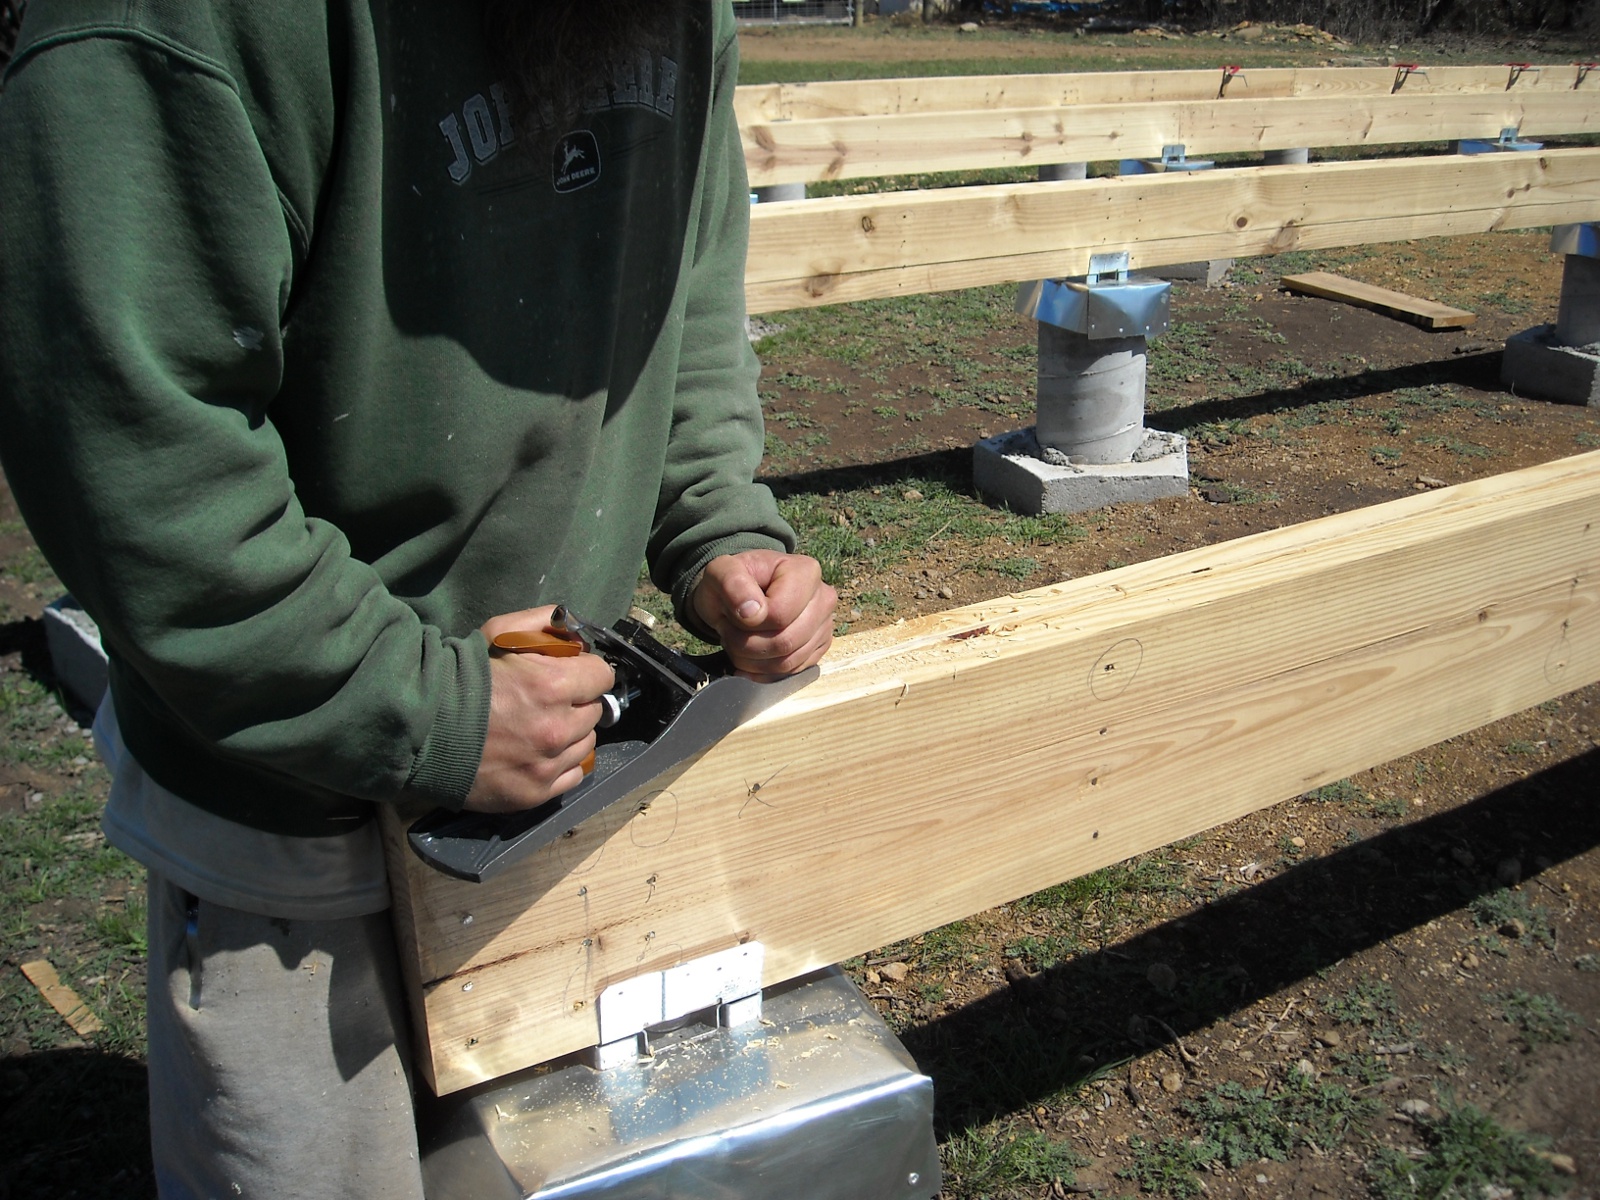
Here is everyone hard at work, including planing the one I had already done:

Men Working on Foundation Built-up Beams on Community Work Day

For strength across the spans, except for the end pieces, each 2×10 was to span two piers and was to be staggered from the other (ie. one 2×10 would span from piers one and three, and the 2×10 placed next to it would span from piers two to four, etc.); and all breaks would be positioned on the brackets on the piers. Also, the plywood pieces would span from pier to pier; but the breaks were to be staggered off the 2×10 breaks by 1 1/2 inches. The ends of each beam would extend past the concrete part of the piers at the end of each row by around two inches so the concrete would not be setting outside the perimeter of the floor (I had to plan for that at the time the concrete piers were poured).

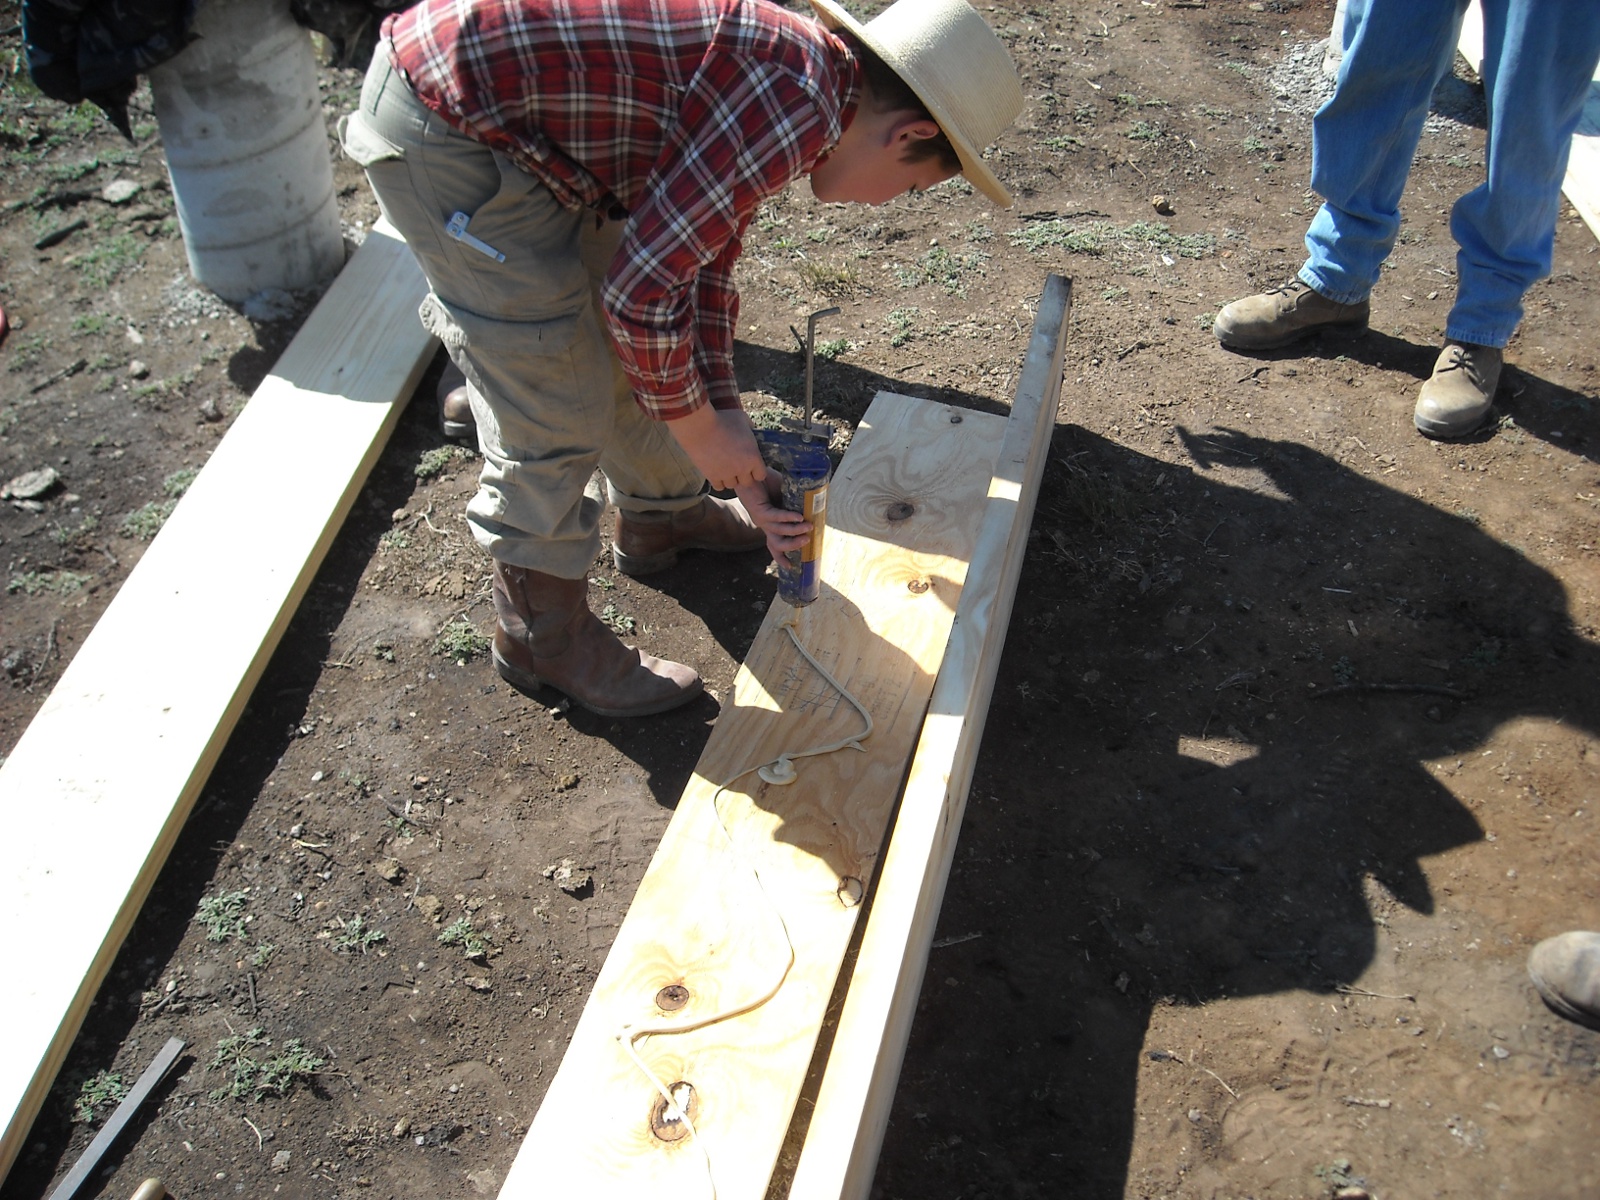
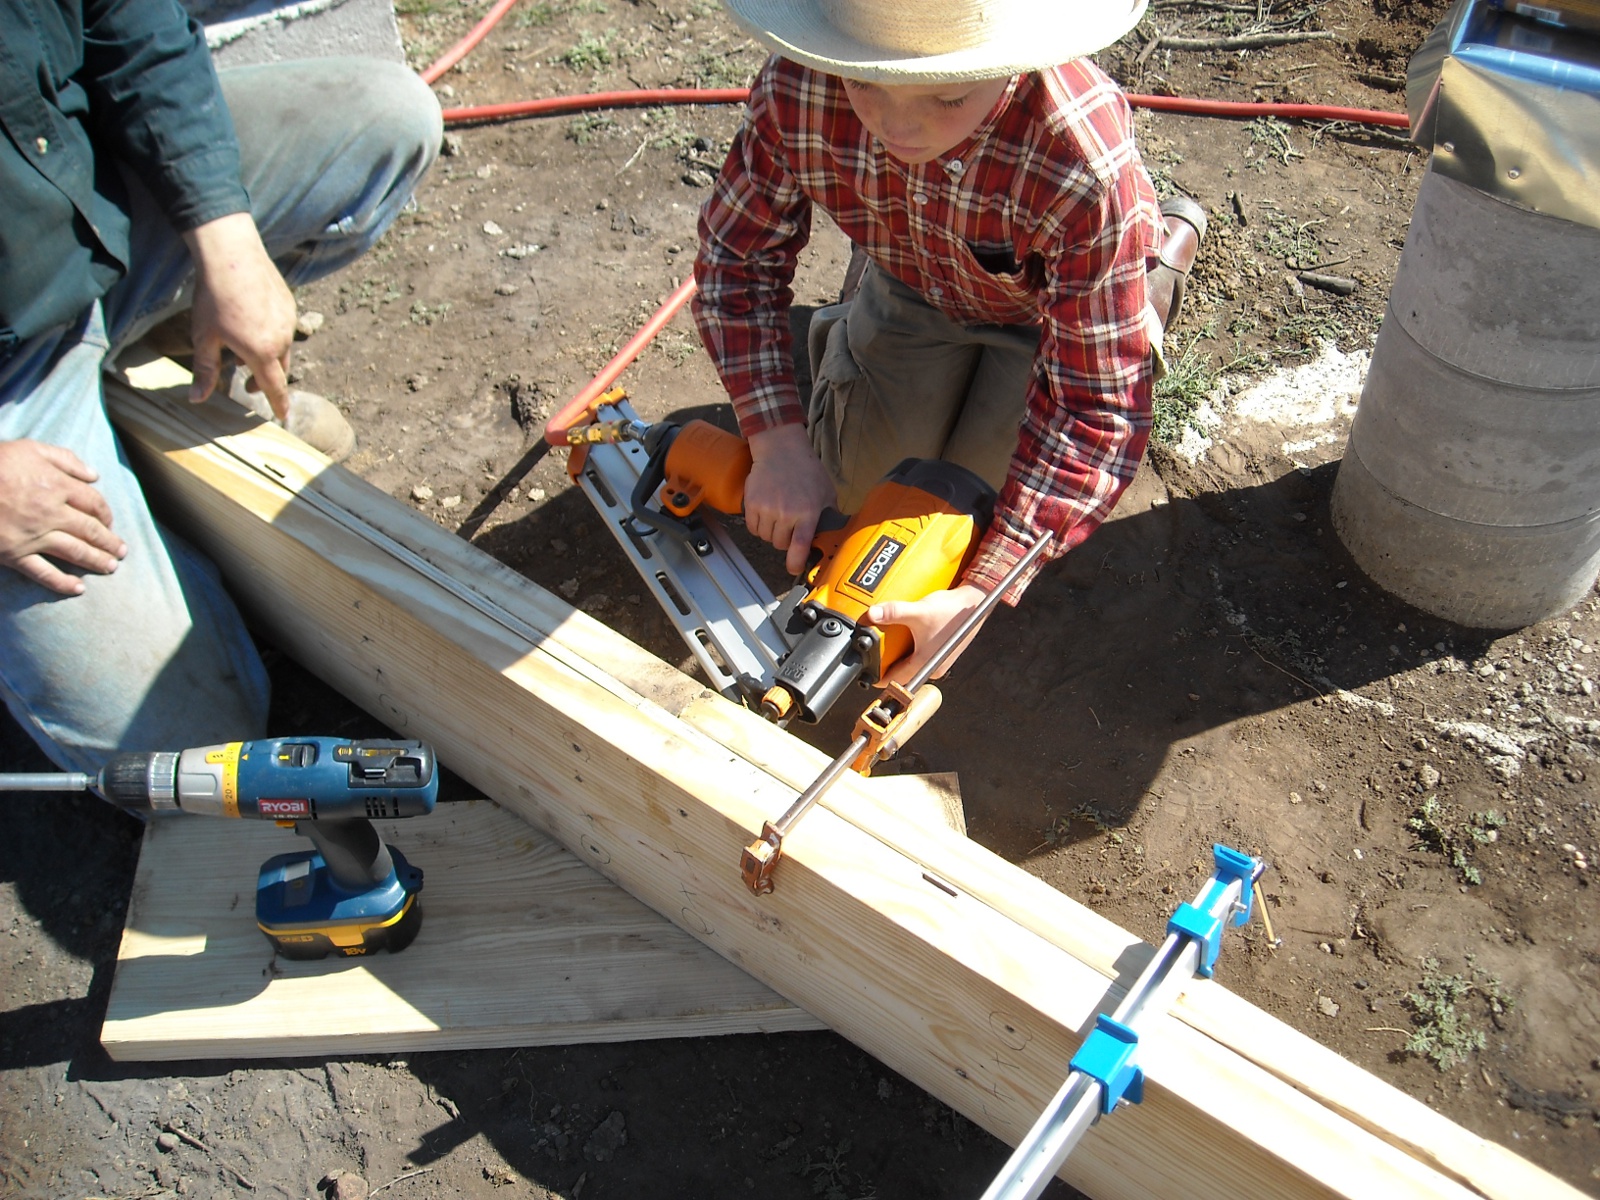
And so, with the wood cut, here is one of the men’s son, applying Liquid Nails to the plywood to help keep the built-up beam together:

Gluing Plywood for Foundation Built-up Beam

The glued plywood is set in place, flush with the top:

Placing Plywood in Foundation Built-up Beam

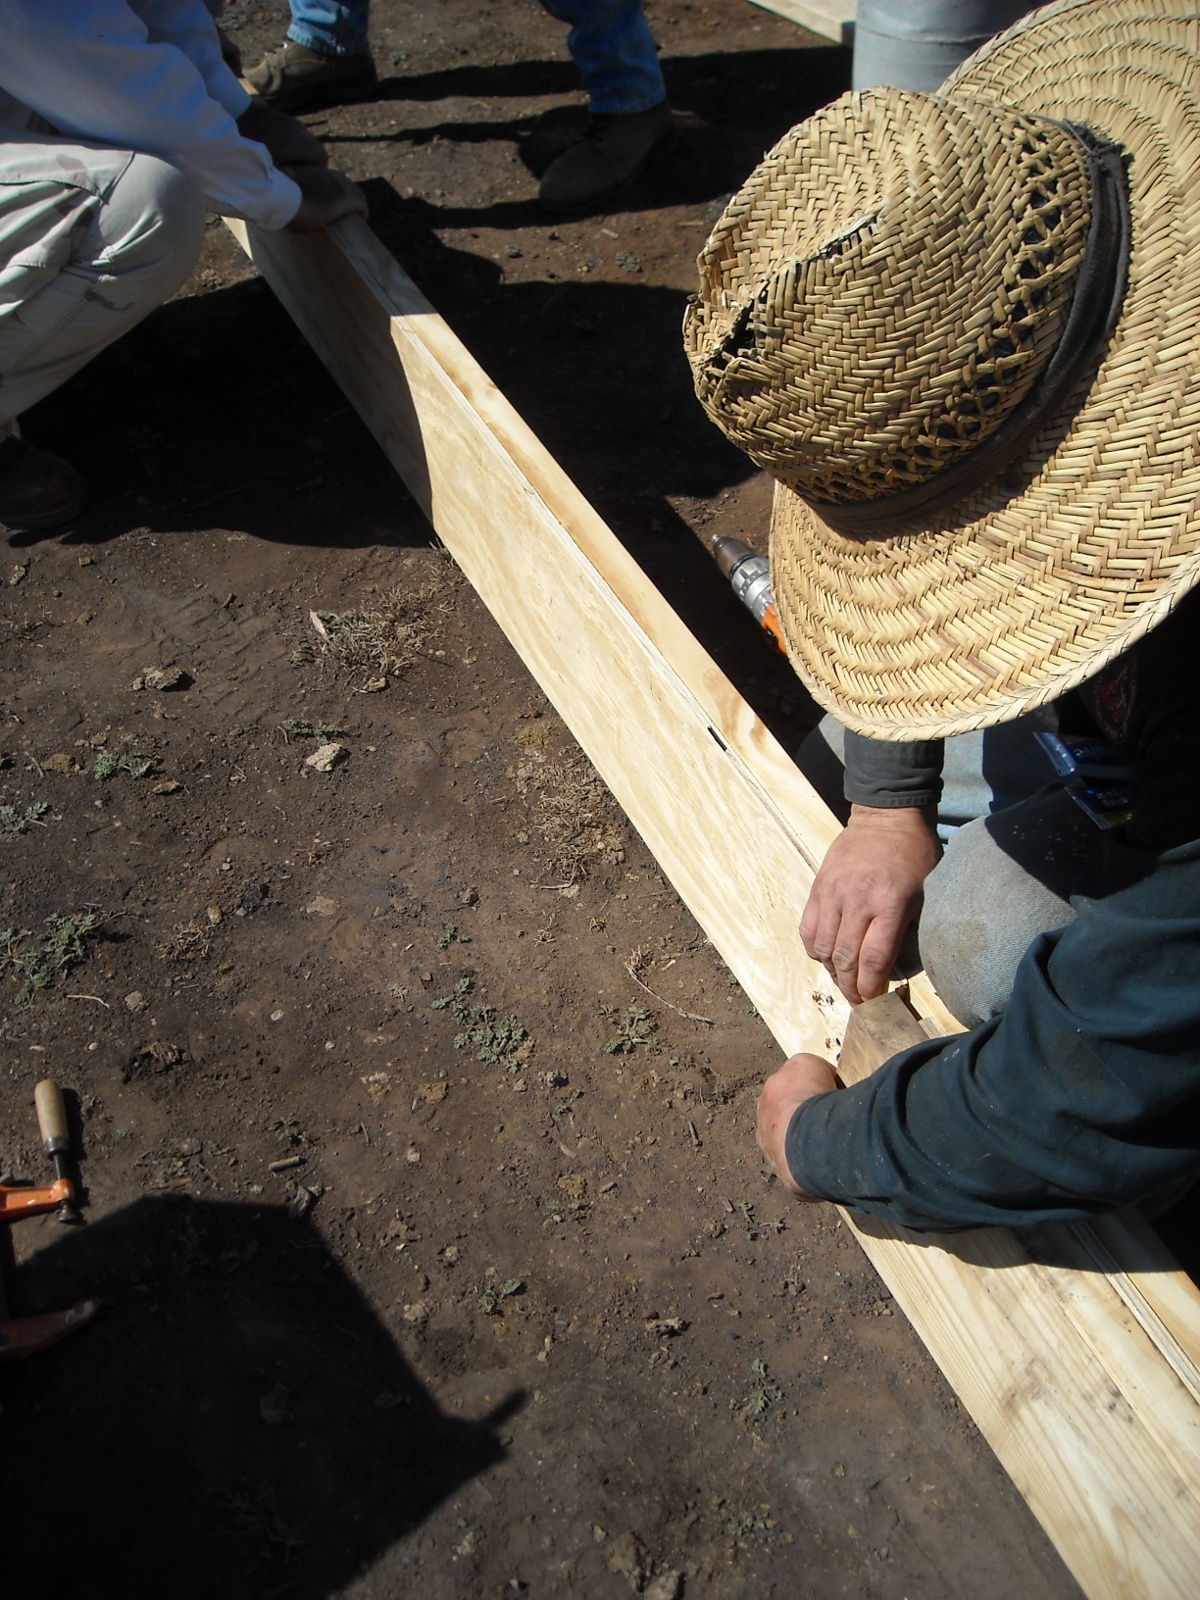
And some screws are put partially in to hold it in place:

Setting Screws in Plywood in Foundation Built-up Beam

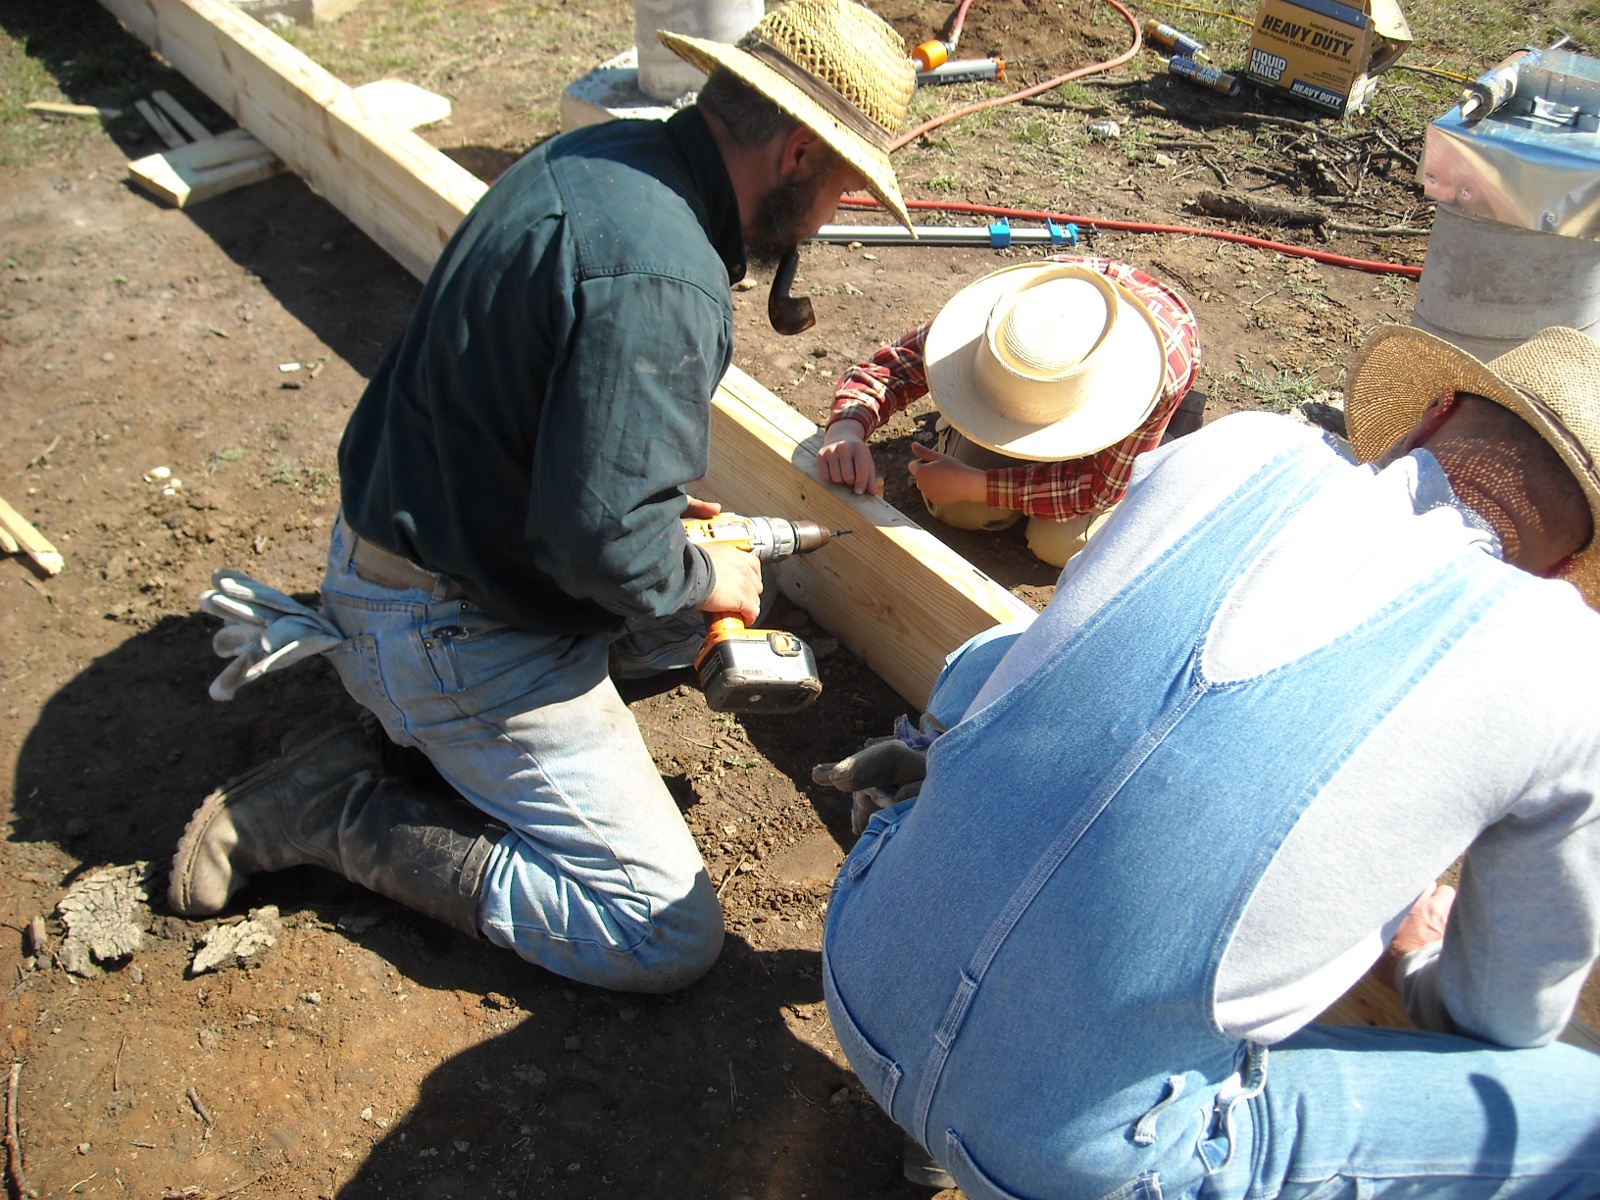
After gluing the second 2×10, it is placed in position as well:

Placing Second 2x10 in Foundation Built-up Beam

With the tops all flush, clamps are put in place to squeeze all of the wood together and hold it in place while some holding screws are set:

Clamps Set on Foundation Built-up Beam
Screw Setting in Foundation Built-up Beam

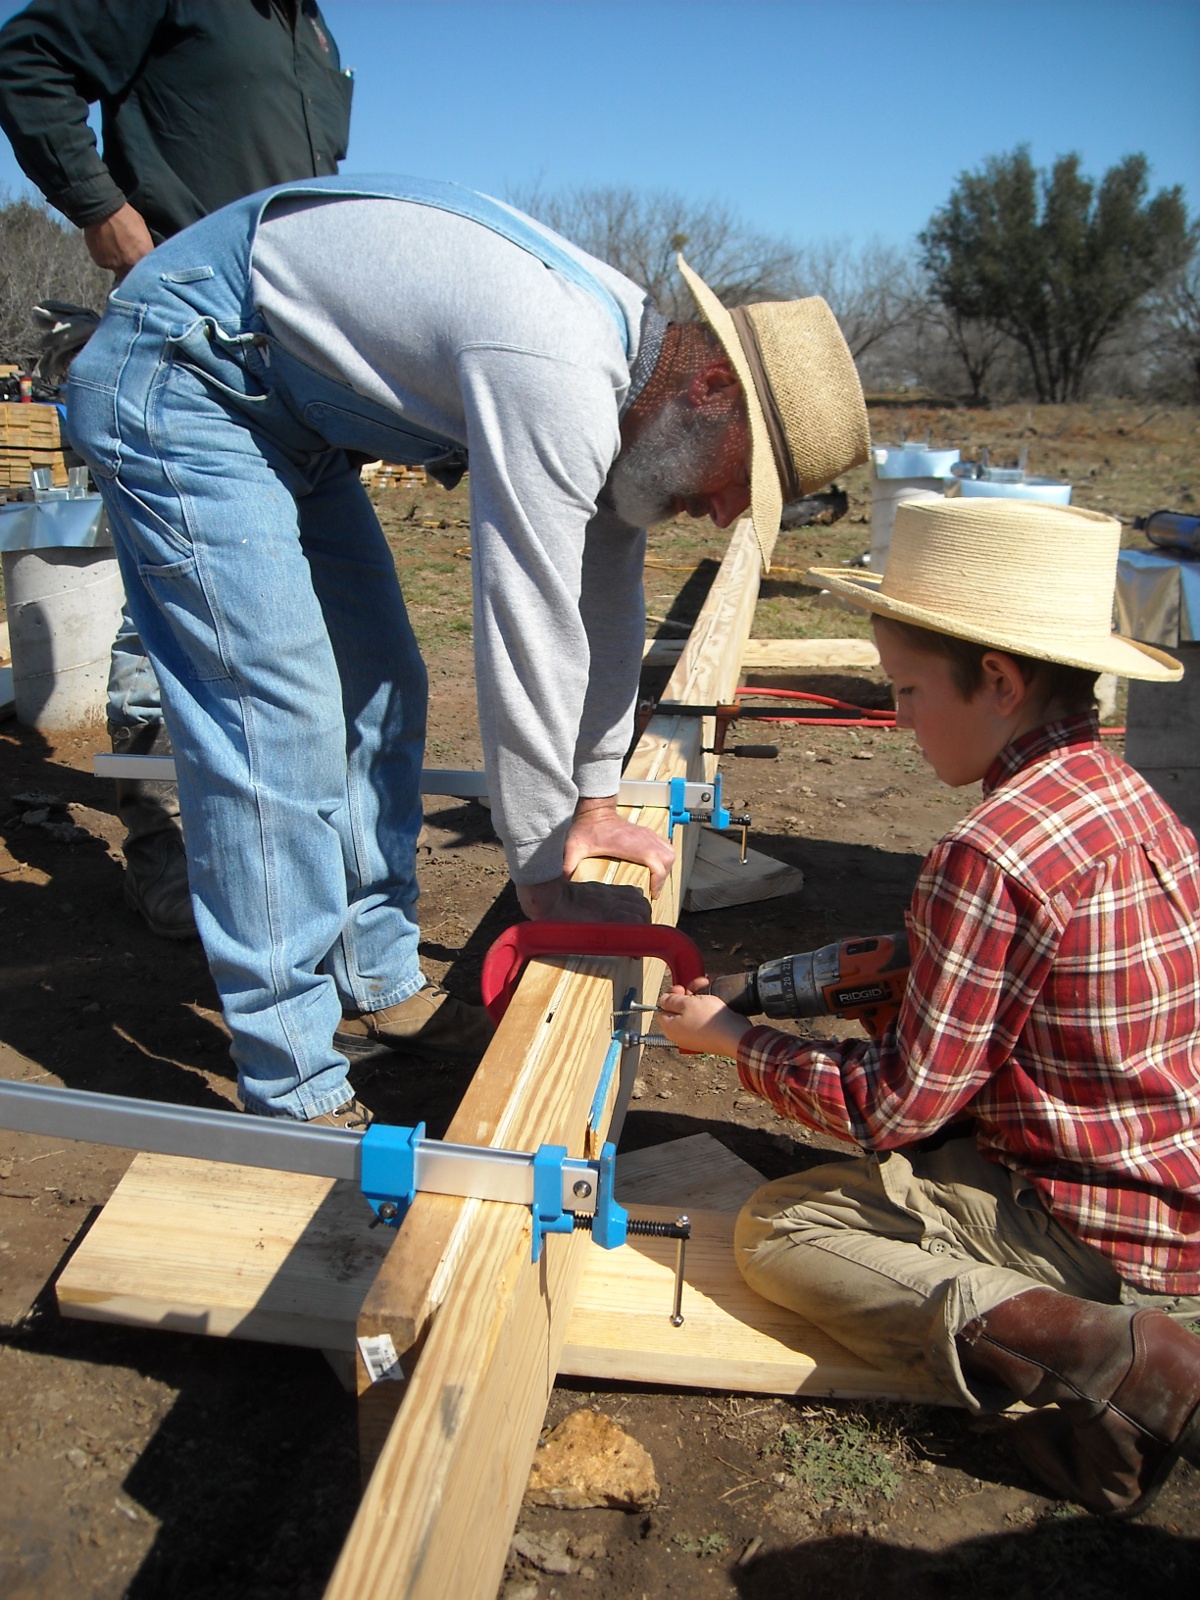
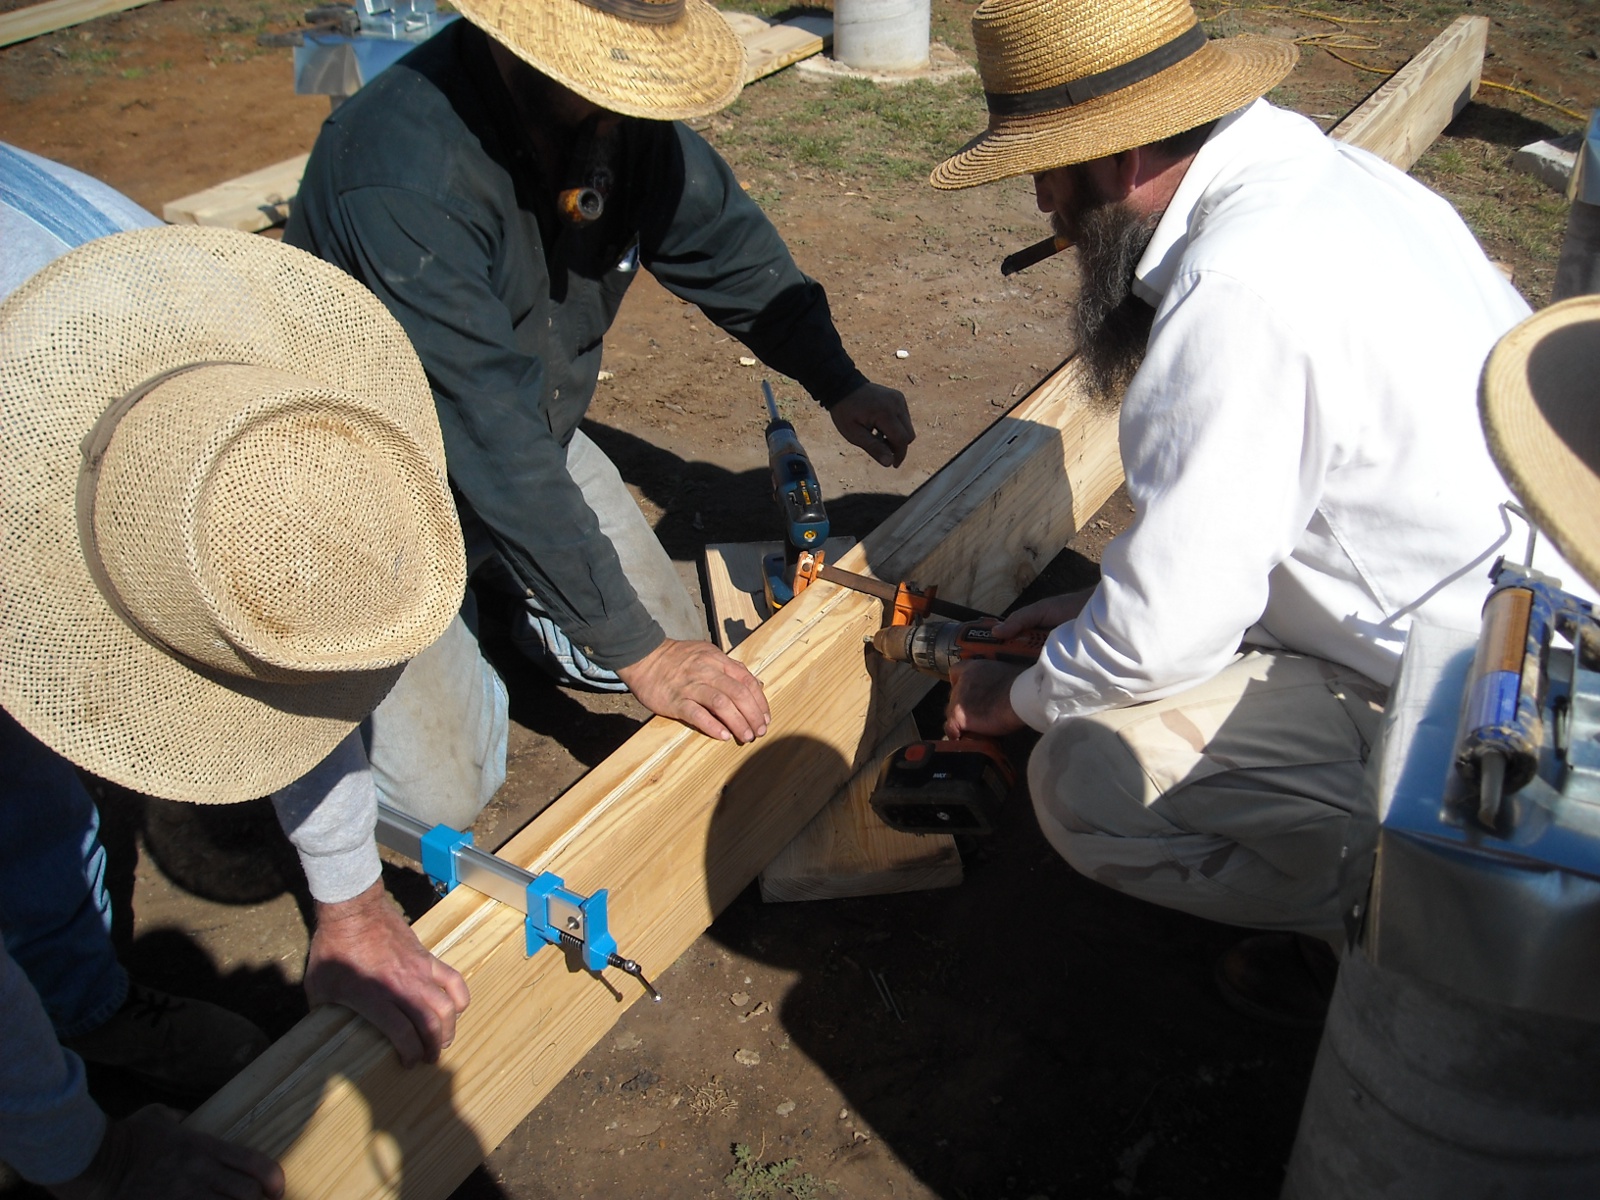
And then the youngster finishes it off with the nail gun:

Nailing the Foundation Built-up Beams

Some time later, after the rest of the beams were assembled, I did some further planing on them, to even them out on the bottom where they would sit on the piers, and on the tops overall:

Planing the Foundation Built-up Beams

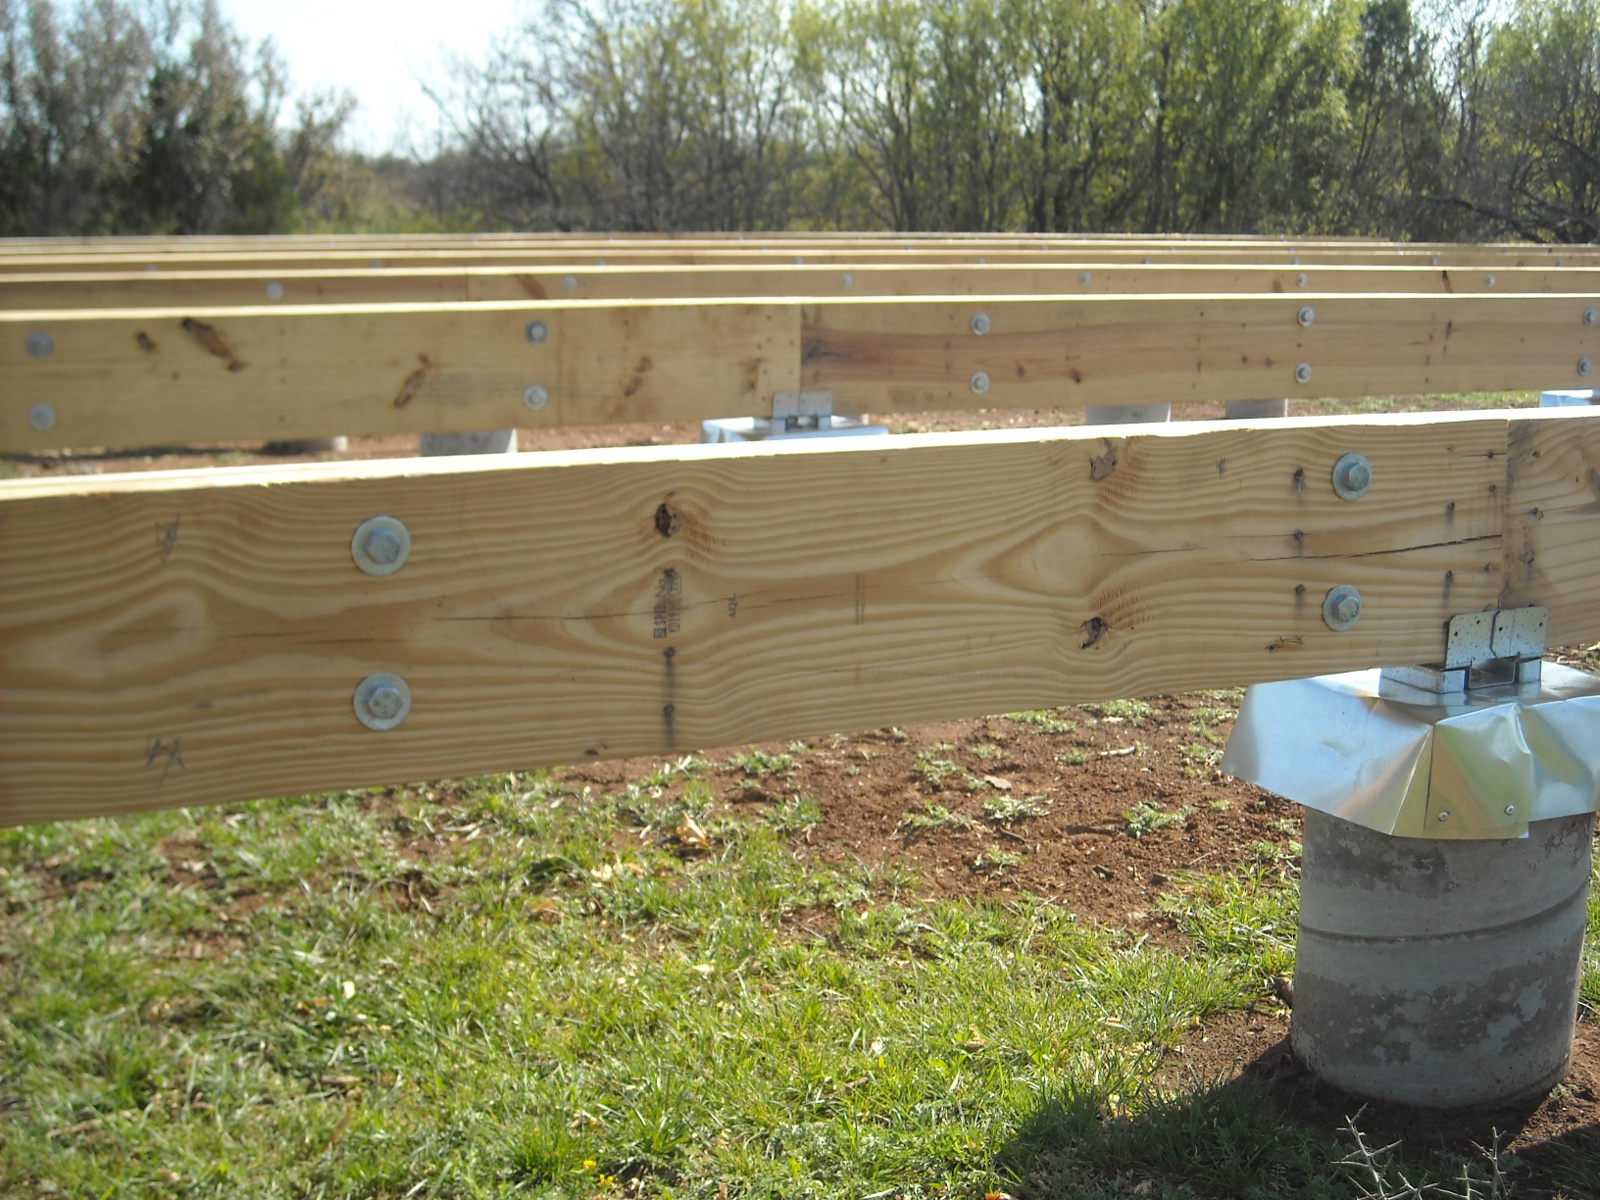
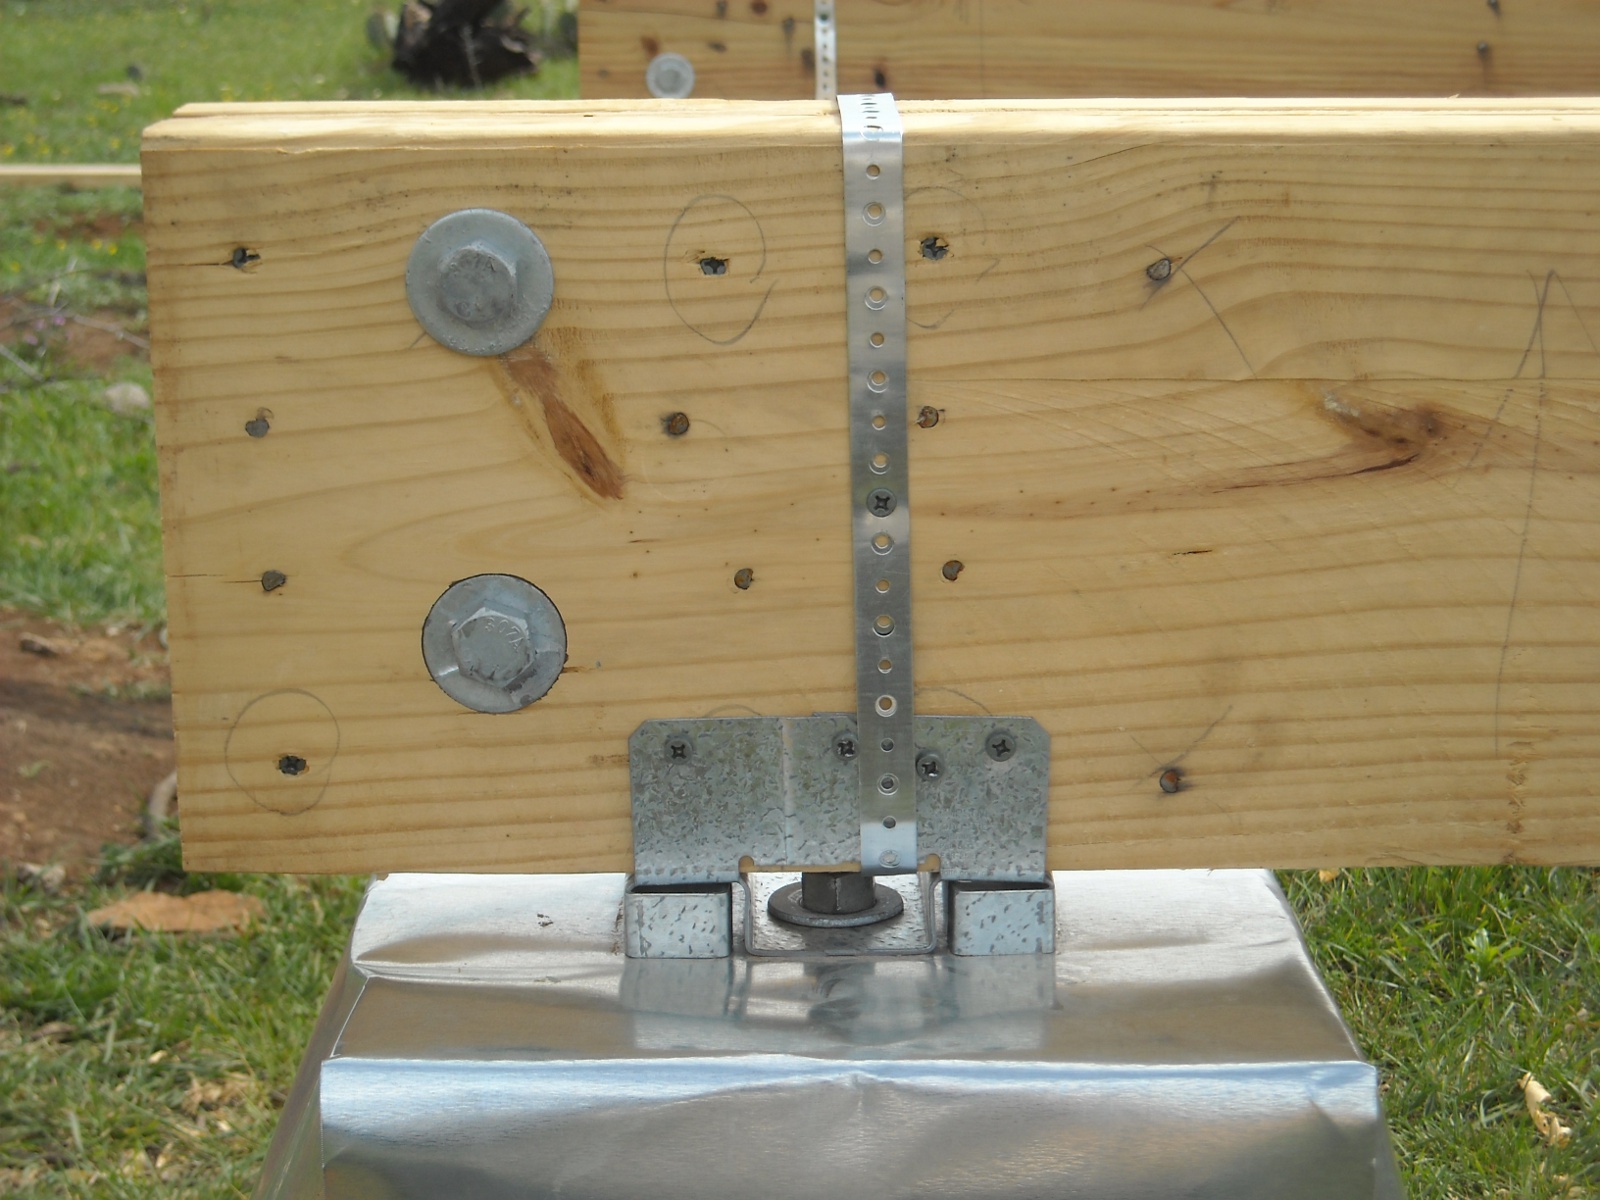
Sadly, my strategy of placing a screw or nail two inches vertically apart every two feet horizontally, staggering each side offset by one foot, didn’t keep the beams together that well, even with the glue. And so I decided to add 5/8″ galvanized bolts every three feet to make sure things wouldn’t get worse:

Galvanized Bolts in Foundation Built-up Beams

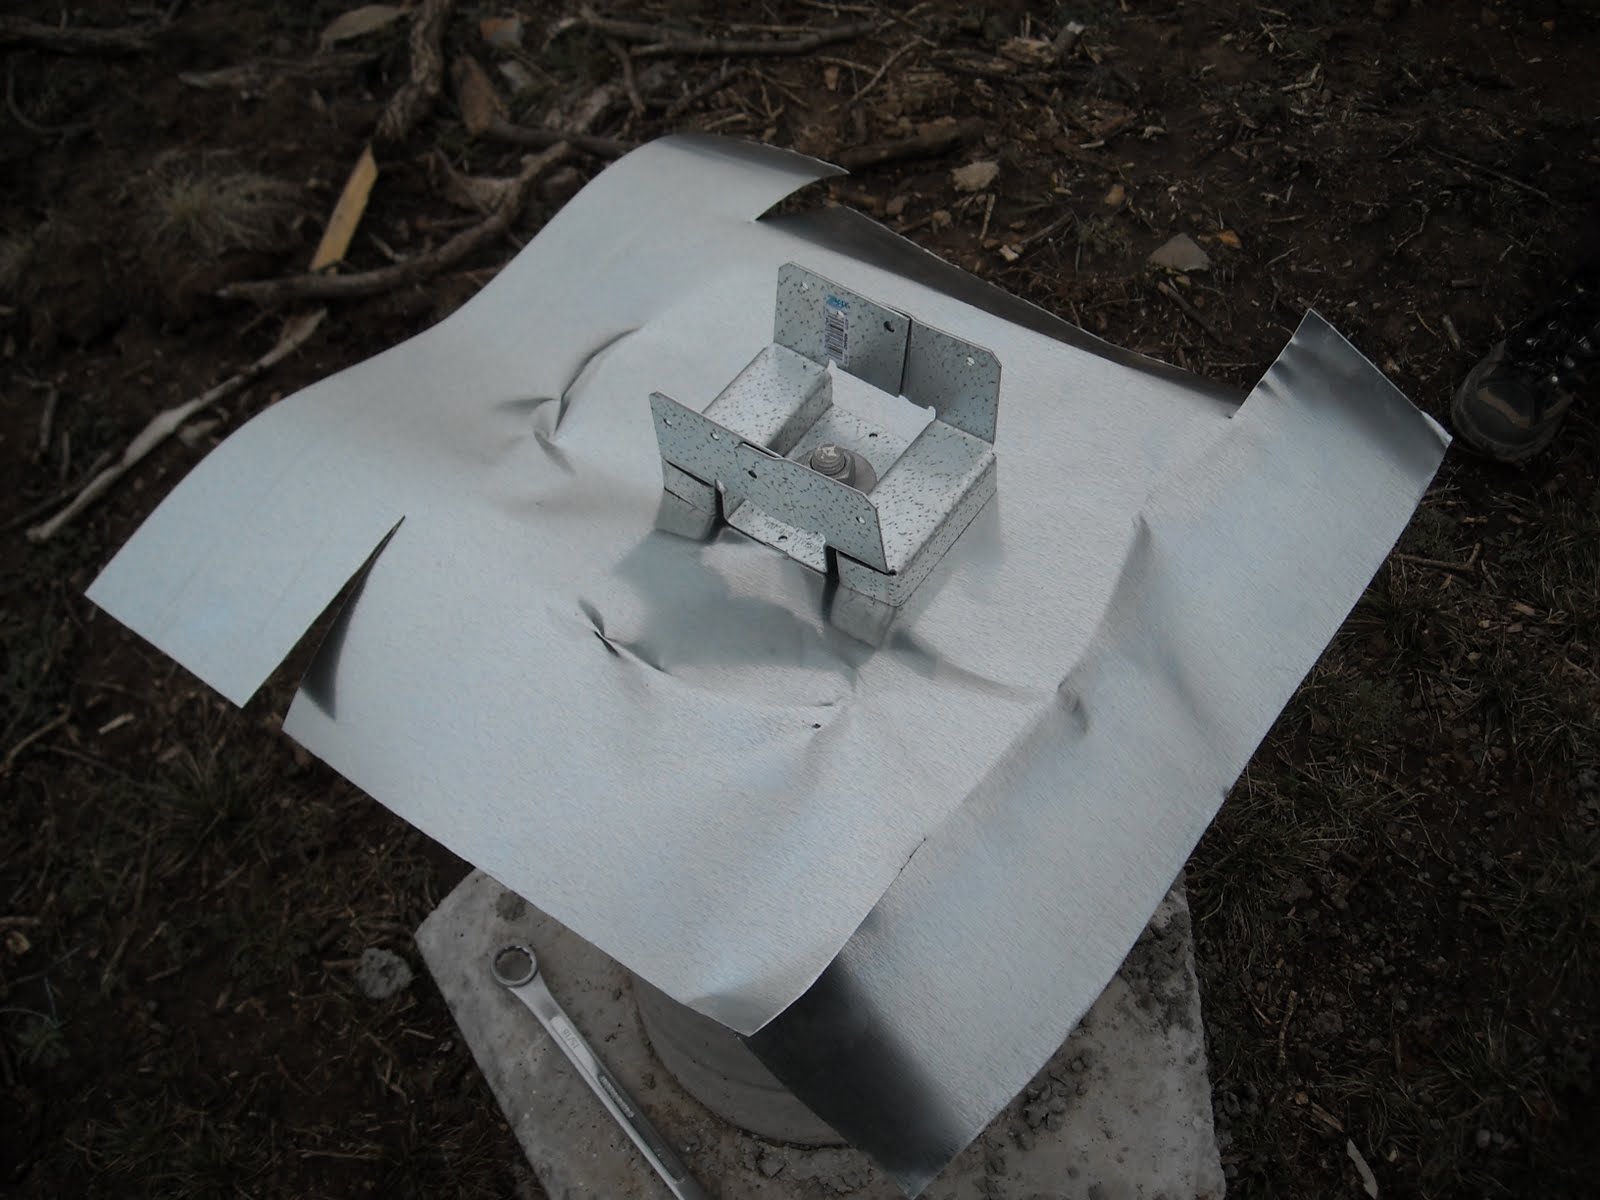
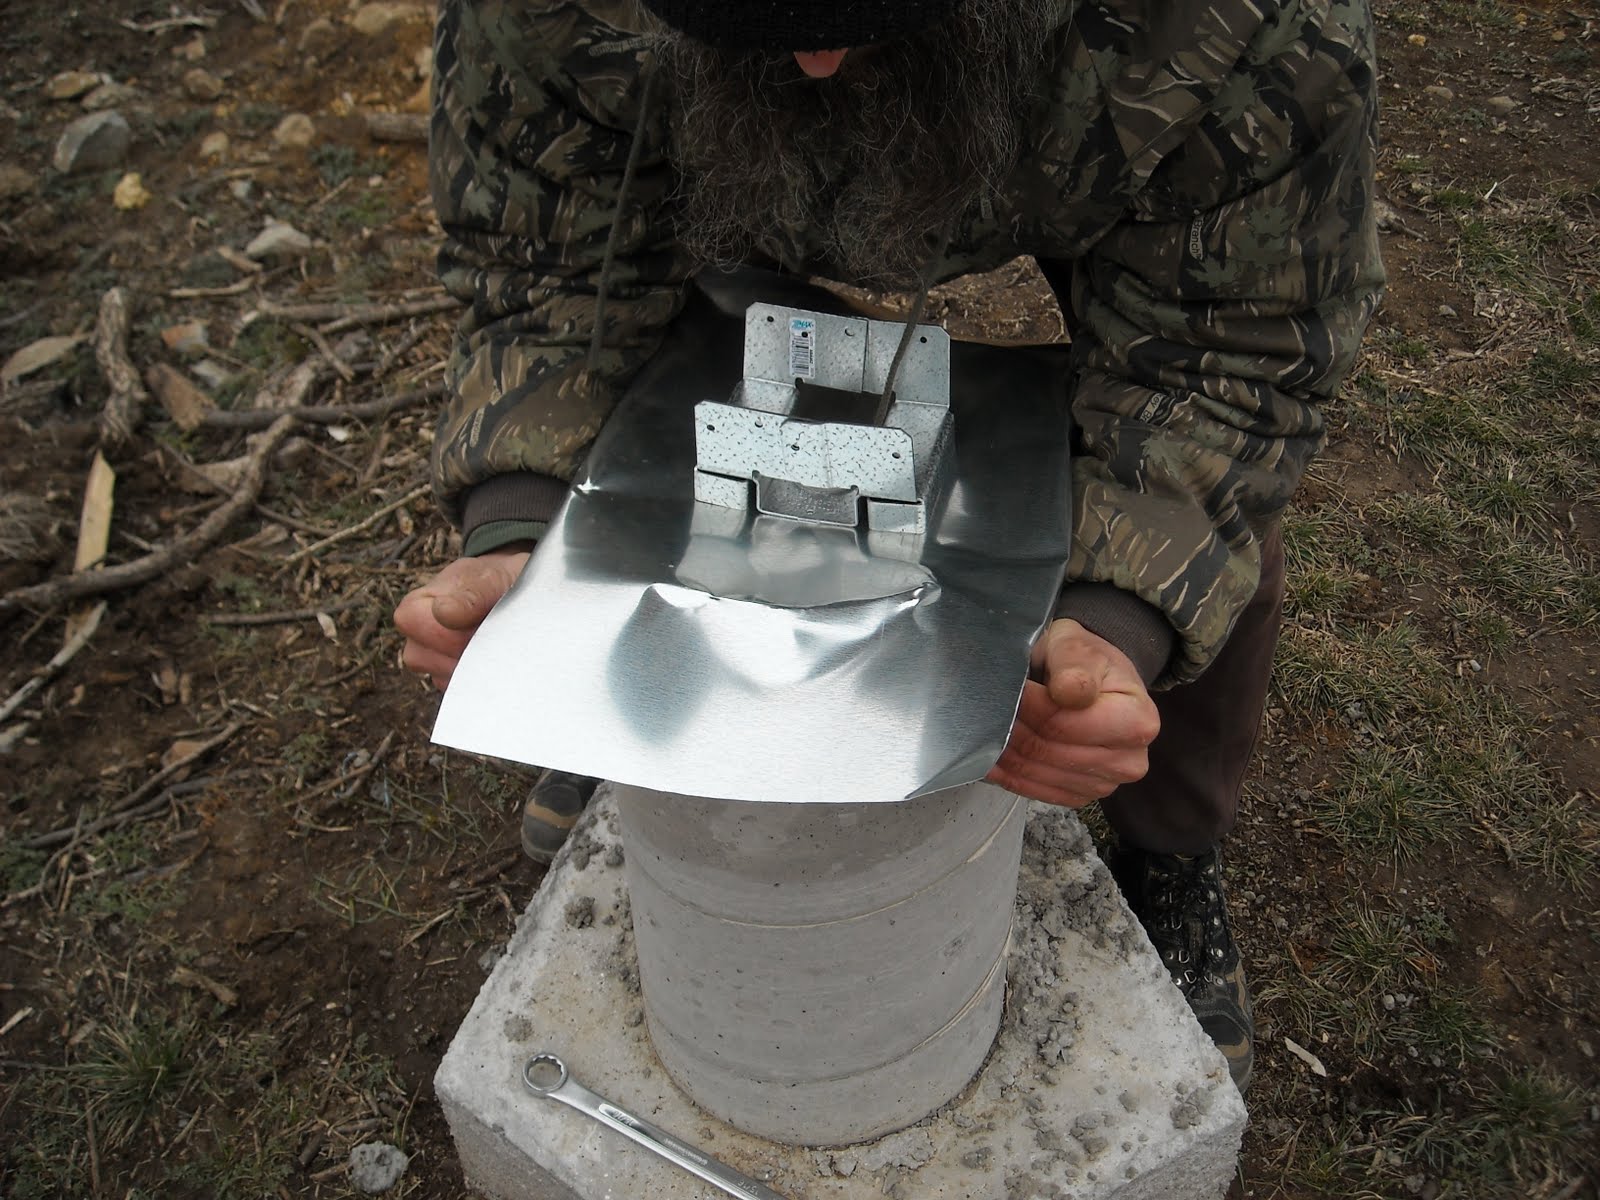
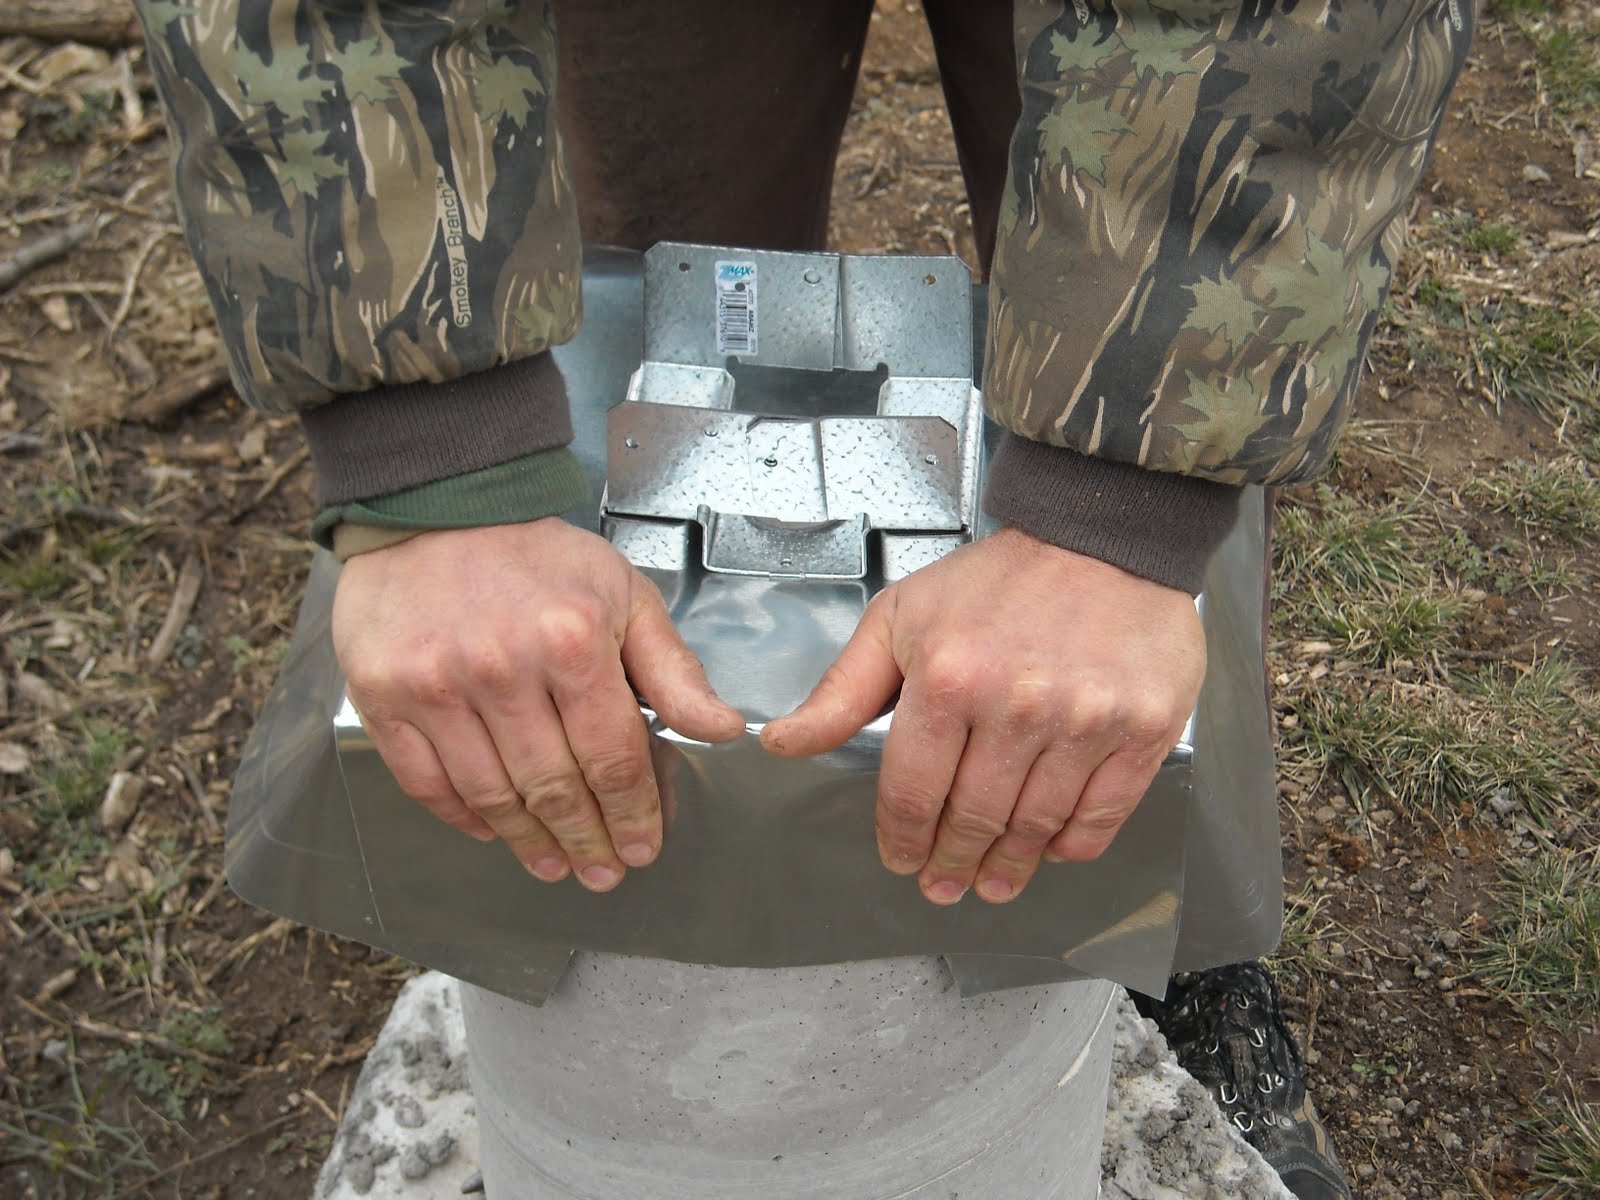
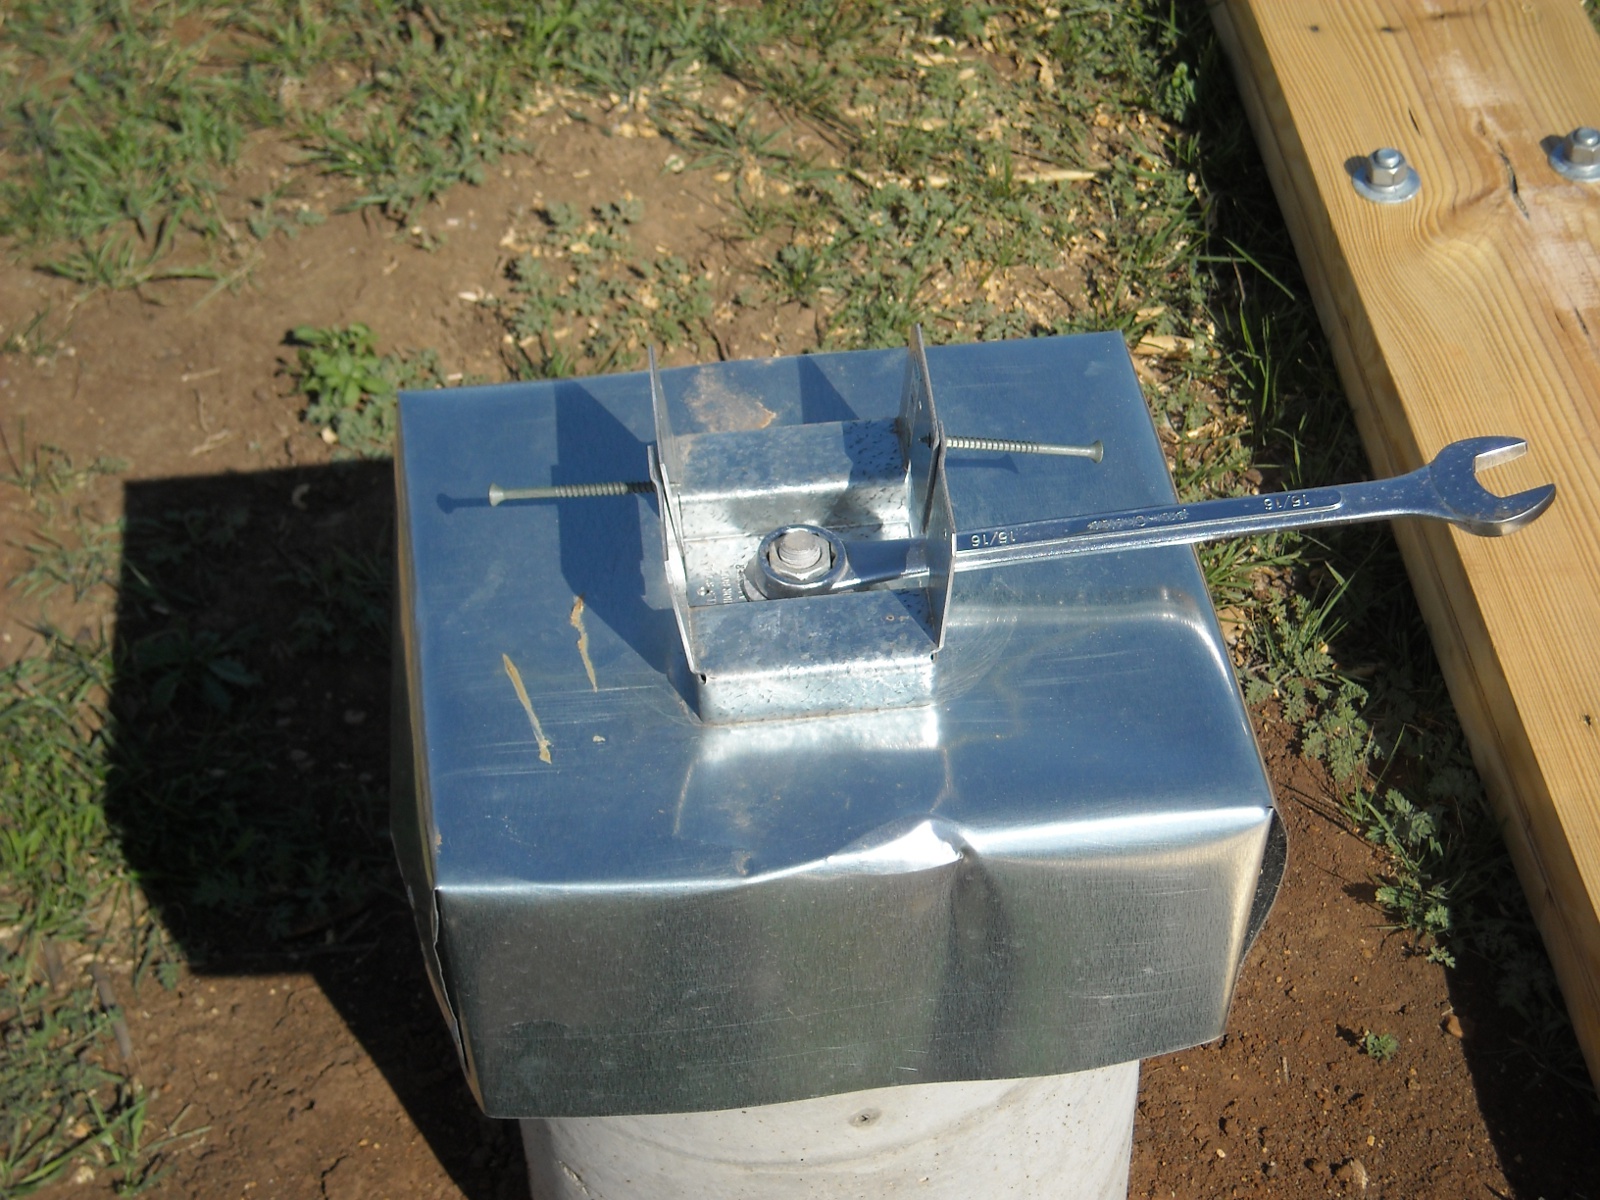
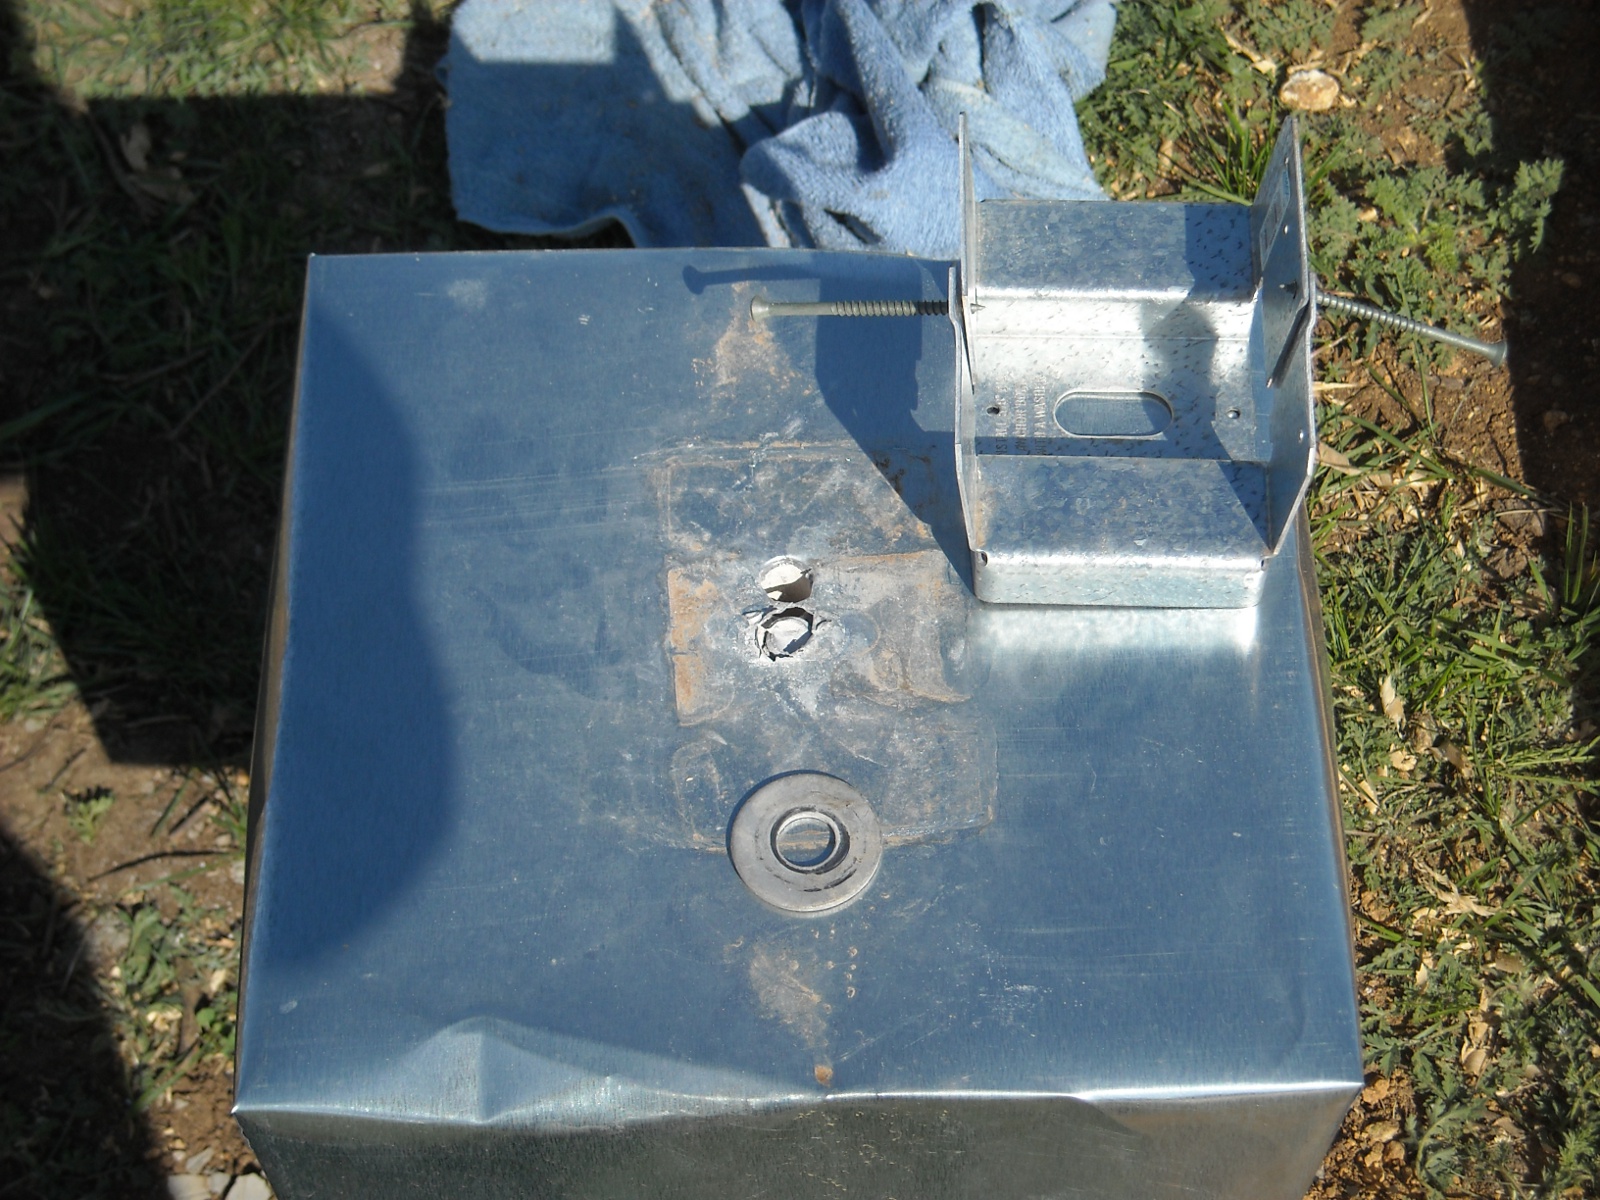
I mentioned in the homemade termite shield blog post above that I had originally tightened the brackets down onto the termite shields and piers, but that the brackets began to bend in the middle, which caused the holes that lined up where the vertical sides of the brackets overlapped to not be lined up anymore; and when I loosened them before, I had thought that I would be able to tighten the nuts down on the concrete pier bolts after the beams were in place. However, once the beams were set on the brackets, there ended up being no way to turn the nut with the wrench. And so, I had to figure out a way to solve my original problem of the brackets bending while tightening the nut. I thought I might try inserting a screw tip into the two lined-up holes on each side of the overlapped part of the bracket to hold them apart while I tightened down the nut, and this worked well:

Tightening Down Concrete Pier Brackets with Screws Holding the Bracket Sides Apart

Sadly here too, I ended up tightening down one of the nuts too hard; and the bolt sheered off at the base of the concrete pier. Nice. So, I drilled a 5/8″ hole next to the bolt in the pier down far enough to hold a 4 1/2″ concrete anchor bolt. Thankfully, this repair worked pretty well:

Repairing Broken Concrete Pier Bolt

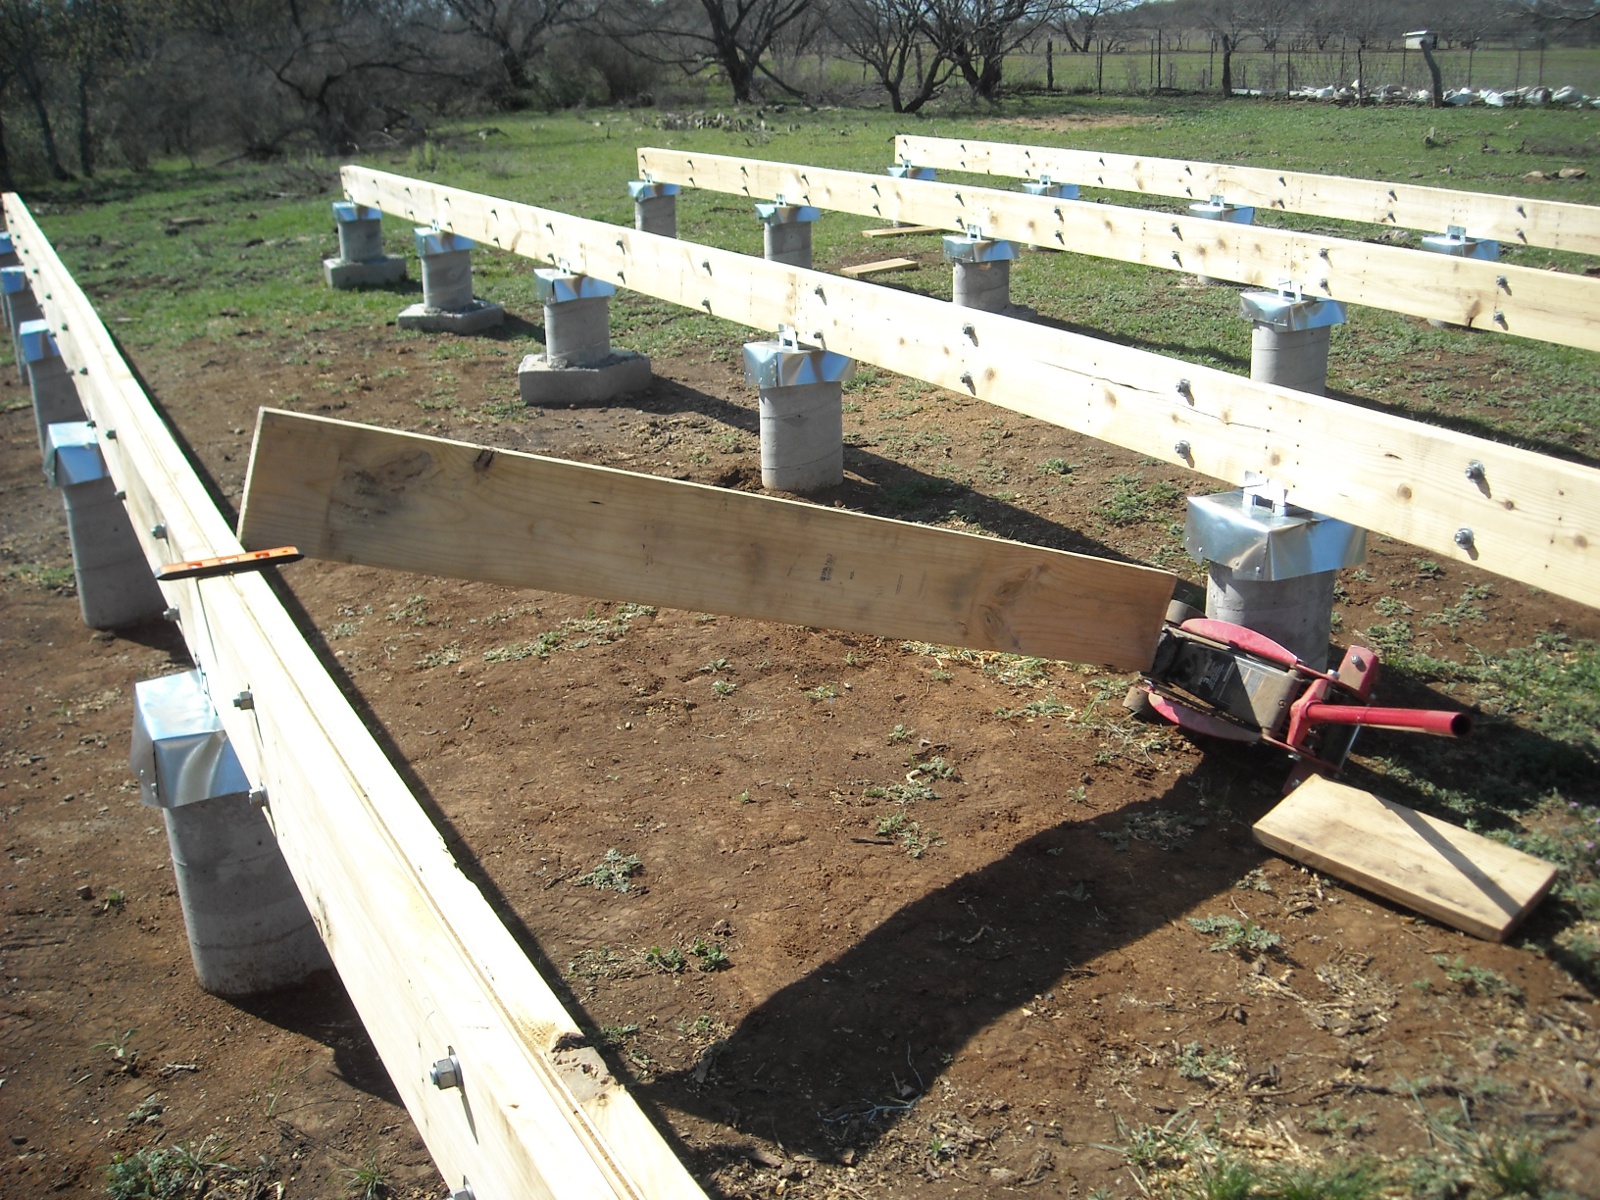
When it came time to attach the beams to the brackets, I had to bend the beams to an upright position as the beam, over the 40 foot length of it, was often torqued. I used a floor jack against a concrete pier and 2-by wood to do the work:

Using Floor Jack to Upright the Torqued Foundation Beams

To keep the beams more securely fastened, it was suggested that I tie them to the concrete pier brackets with metal strapping:

Tying the Beams to the Concrete Pier Brackets Using Metal Strapping

(Just a side note: I worried about them being cantilevered off the center of the pier, so on some of them quite some time later, I went back and added brackets under that part. You can see that in this blog post.)

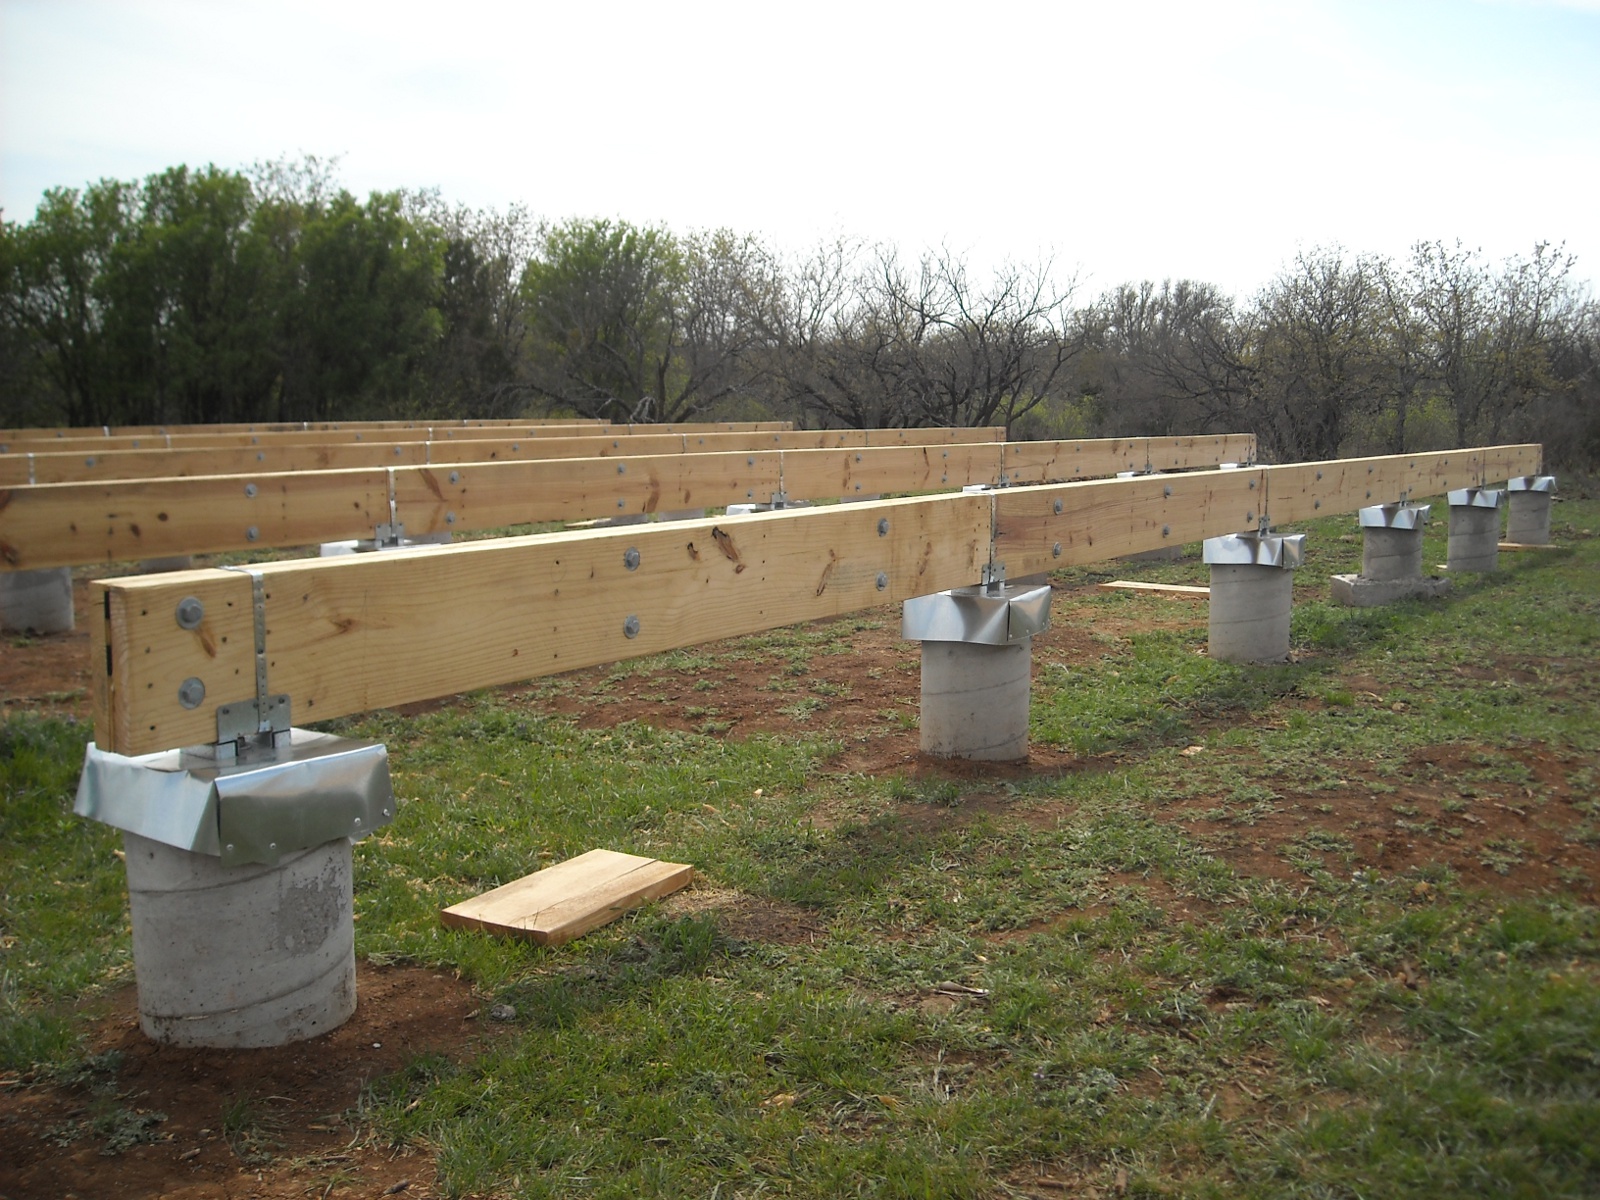
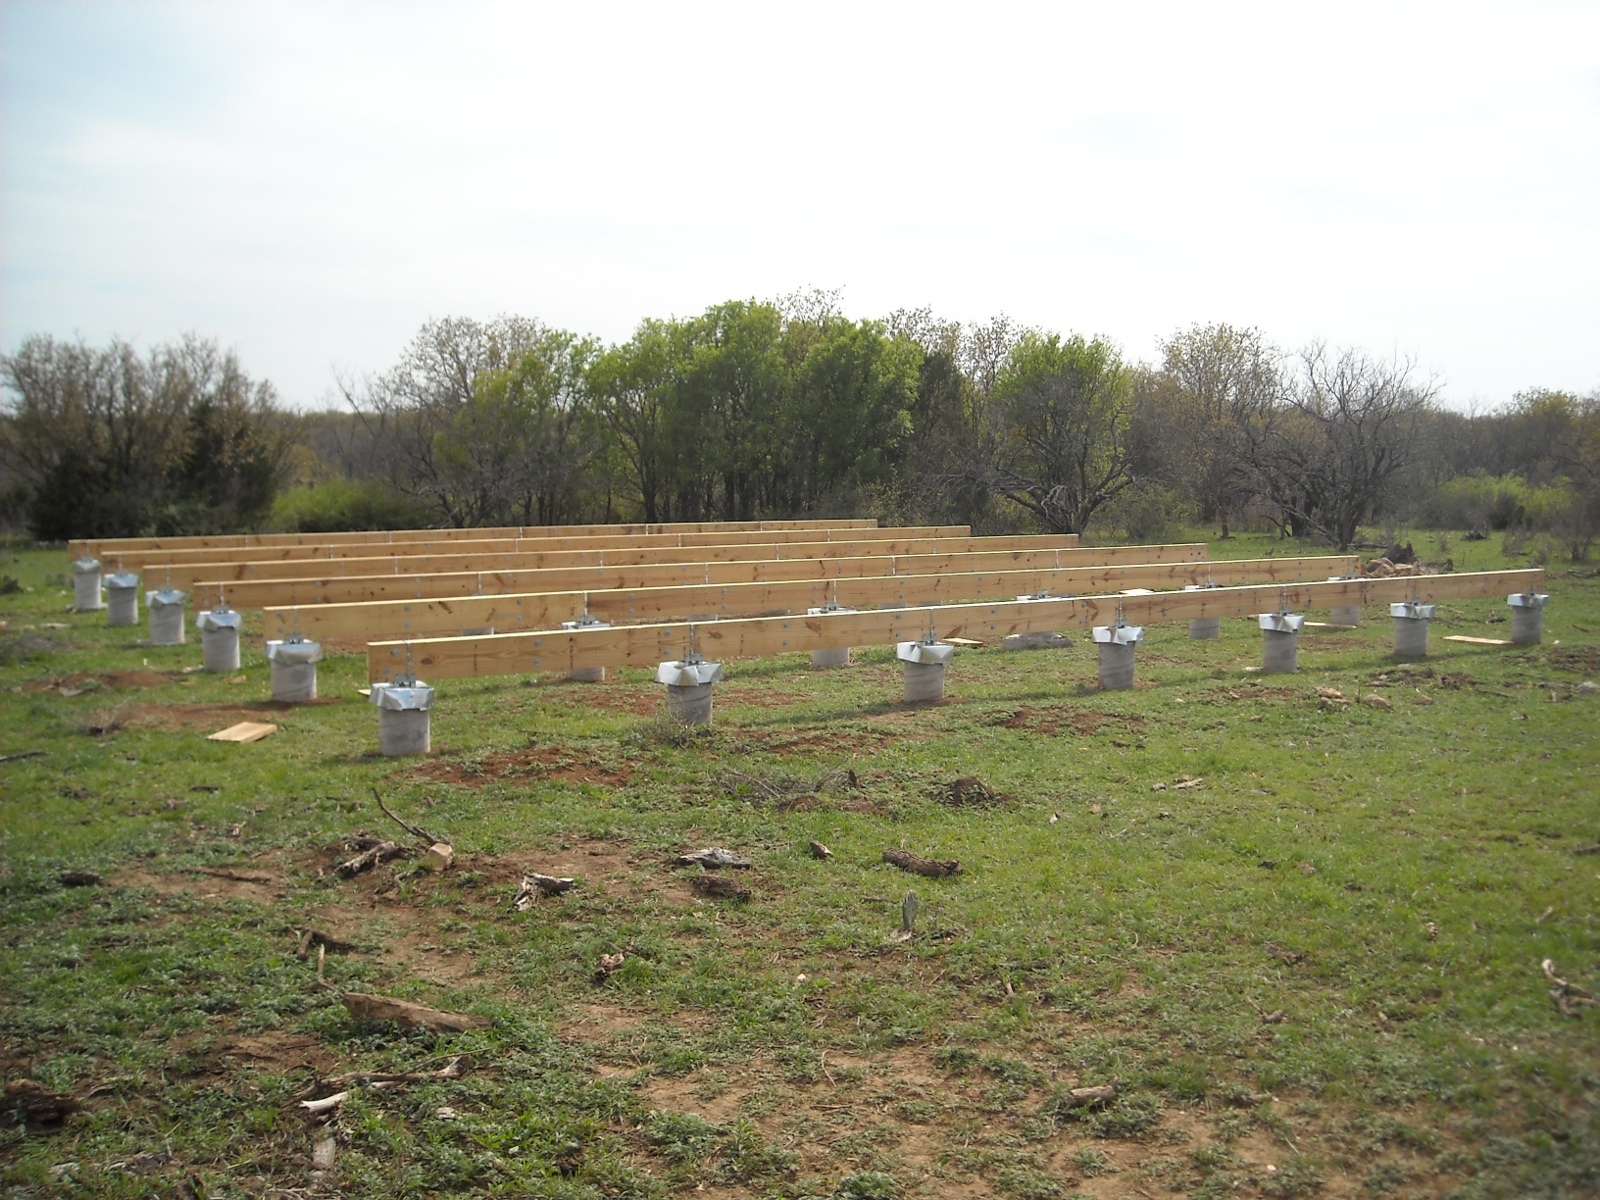
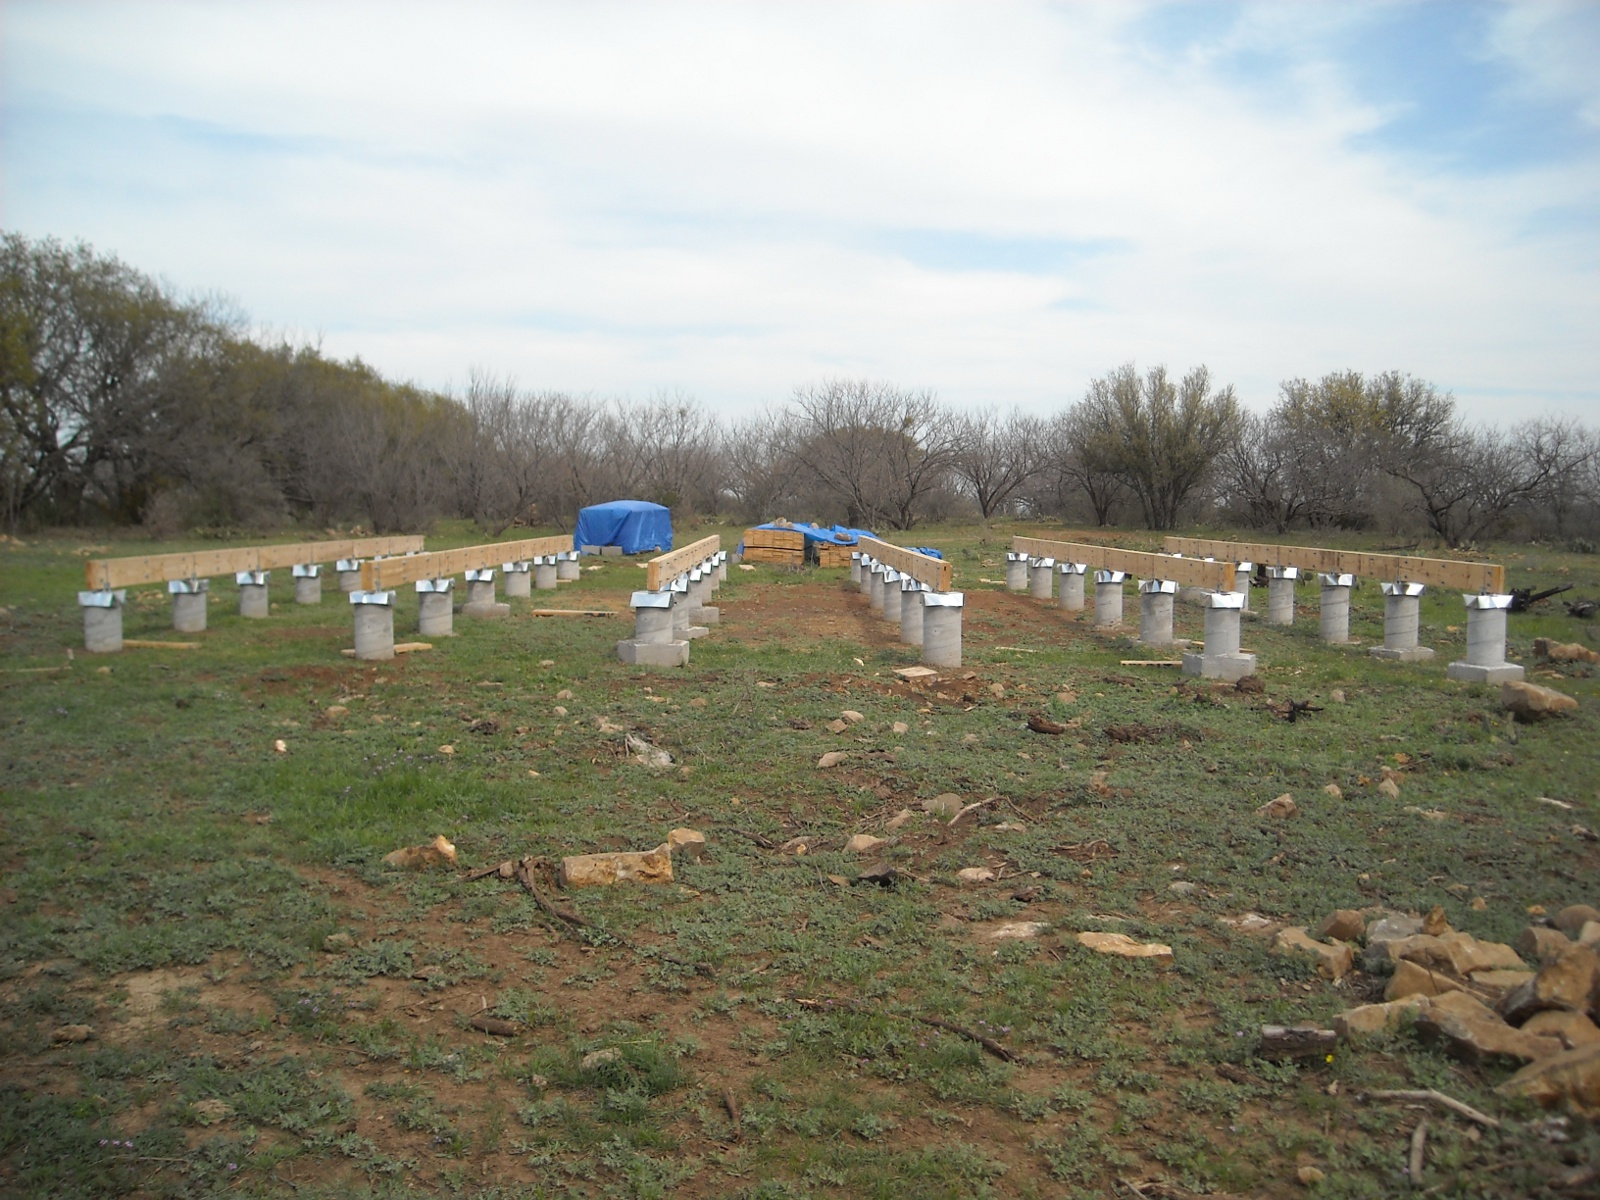
And here are the beams finished and in place! (I had originally thought I would need the entire end piers under the floor; but in looking back, given there is planned to be a porch, I probably would have moved the end piers all the way to the end of the beams.)

Built-up Beams in Place for Pier and Beam Foundation

(Please see an update where I added some brackets to fortify the beam overhang, just as a precaution.)

Here are a couple of wider angles:

General View of Built-up Beams in Place for Pier and Beam Foundation
Side View of Built-up Beams in Place for Pier and Beam Foundation

We once again thank the Lord for His gracious provision of the fellowship that He’s given us, and for the resources, strength, and guidance to continue with the building of the house.

— David

Gigi’s New Digs

Last year, our goose Gigi laid a clutch of eggs in a nest she made behind our main, inner fence area. With all of the critters running around at night looking for a delectable morsel, such as a goose, to eat, we couldn’t let her continue to nest back there; and so, we tried moving her eggs into the barn, where she and Gary are put at night. Sadly, that didn’t work as she showed no interest in sitting on them; and so nothing came of the eggs she laid.

Also last year, I had put together a couple of palettes on their sides, end to end in a right angle to use as a separator in our goat sheds to keep kids away from their mother over night to allow us to be able to milk the doe in the morning. When the milking had stopped, I moved it into another pen area to get it out of the way. Well, this year, Gigi decided to nest in the inside the corner of that palette structure. With it away from the back wooded area by maybe 150 feet, we figured this would be a fine place for her, if I could build up the structure to make it a shelter that would keep out critters if they discovered her presence up there.

And so, I did some work on the structure to enclose it for her, adding two more palette sides, putting some plywood on them, and adding a roof. This was to allow her to begin to have a more secure place in which to sit, but wasn’t quite ready for her to be there all night, as it had many places for critters to get in. Then, one night recently, Gigi decided to sit on the eggs, even up to darkness, when we would have typically put she and Gary in the barn. And so, suddenly she needed the finished product available to her. Sue and I grabbed some spare wood, and we worked to finish sealing it up as best we could. Gigi sat there the whole time we shored it up too. And here is her completed nesting shed:

Gigi the Goose's Laying Shed Front
Gigi the Goose's Laying Shed Back
Gigi the Goose's Laying Shed Inside

However, the next morning, she decided to not nest anymore, and hasn’t tried to again in the evening since; but now she has her place ready, if she decides to again sit.

This is a look at her clutch of eggs:

Gigi the Goose's Eggs in Laying Shed

And here she is another day actually on the eggs:

Gigi the Goose Sitting on Her Clutch of Eggs

It would be neat if the Lord granted some goslings, although it appears that since Gary and Gigi don’t have access to a real watering hole (like a pond), and they seem to mate when they’re in the water, I don’t know if they’ve actually connected; but we’ll see what happens.

We’re thankful to God for allowing us to watch this process, and for ordaining that Gigi would nest in a more secure area.

— David

Providence’s Perpetuation Provisions: New Calf “Cuervo”

I was looking out our camper this last week into one of our fields, and saw something black behind one of the cows. I wondered what it was (and thought maybe it was a plastic bag…or maybe even a new calf!). Sue and I slowly made our way toward it, still trying to make out what it was that was behind her. Well, we got within 30 feet or so, and finally realized indeed it was a new calf, and that the cow was Rosa, one of ours. We hadn’t noticed Rosa showing signs of immanently giving birth, but there it was.

And so, after discovering it to be a little bull calf, and continuing with our Spanish naming convention, Sue was looking in Spanish for things black, and looked up the word “crow.” And with that, we decided to name him Cuervo:

Here are a couple of pictures:

New Longhorn Bull Calf Cuervo

And a video:


The larger bull we show in the video was not the sire, even though he has the same colorings. We think one of the other younger bulls, which has black and white colorings, and is penned away elsewhere right now, but happened to get out for a few days some time ago (9 months perhaps?) might have gotten to Rosa; although there was another bull, a grullo (grey) one, running with the herd at the time, but he would have had to have gotten to Rosa right around the time he was removed from the herd; and even then, Rosa was a few days late in delivering beyond that. At any rate, I guess we’ll have to see how Cuervo’s colors end up, although evidence is pointing to the younger black and white bull.

Also, even though in the video he isn’t doing much, and he typically doesn’t move around a lot during the warmer days that have been occurring lately; but at night, he’s literally running circles around his mother.

We are thankful to the Lord for granting this provision of the calf, and we pray for God’s continued guidance with the animals.

— David


David’s Digest: The “True” Church?

Several years ago in a conversation, a friend cautioned me to be wary of any Christian teacher who talked about there being a “true” Church vs. I guess everyone who calls themselves Christian being the Church. I suppose he was trying to warn me against people who think that they have the only true way. But is everyone who takes the name of Christ a Christian? Is there a true Church, thus implying a false “church”?

First, when I use the word “Church,” I refer to Christ’s bride, those who are or will be saved, and not a place where people go to meet to worship.

Now, using typology in the Bible can help us find answers to the above questions. For review, briefly, typology is seeing the spiritual realm via the temporal.

Let’s start with the people of Israel — God’s “chosen people.” God called them out from among all other nations of people to be His people (Deut 7:6). While God temporily saved the people of Israel out from bondage of Egypt as a “type” (shadow) of spiritual salvation and separating a people (His children, the Church) unto Himself, later on, many of those individuals who were brought out of Egypt perished in their sins (Num 16; Num 14:22-34; Num 21:4-9). How could this be if they were part of the group called “God’s chosen people”?

In Jer 5:25-31, God declares that among His people are found wicked men and false prophets; but how can they be such if they are His people? The Lord goes on further to say in Jer 23:3 that He will gather the remnant of the people of Israel who He scattered to other countries. Why only the remnant? Are they not all God’s chosen people?

During His time here on earth, much of Christ’s ministry was the condemnation of the Jewish religious people of the day (John 8:44; Matt 23:27). They called themselves God’s chosen people, their genealogical father being Abraham; but Christ condemned them; and yet, there were a few around Him of the same Jewish chosen people that had a God-given faith in Him (Matt 16:16; John 11:24-27). How is that possible?

As you can see with these examples, God deals with these two groups within the “people of God” separately, one being false professors of religion, the others being actual (true) followers of God. But what about the heathen as a group? If you look at it high-level, most of who Scripture addresses are the people of God in general, and the heathen are not really dealt with by God or even Christ, other than in their relation to God’s people — all of the Old Testament is generally directed toward God’s chosen people, Christ never really dealt with the heathen authorities, and the New Testament is essentially written to Churches in various locations. And so, it is evident that there are three groups of people in the Bible — the two divisions of God’s chosen people, and the heathen — and not just two groups — the saved vs. the not saved, Christians vs. non-Christians (although those delineations do exist).

This is shown to be true in the New Testament, where Paul states in Rom 9:6 that “…they are not all Israel [spiritual], which are of Israel [temporal].” And he further describes who are the true seed of Abraham (spiritual Israel) in Gal 3:16,29: “Now to Abraham and his seed were the promises made. He saith not, And to seeds, as of many; but as of one, And to thy seed, which is Christ….And if ye be Christ’s, then are ye Abraham’s seed [spiritual Israel], and heirs according to the promise.” Now, Abraham had his physical seed, which were Isaac and Ishmael — both the seed of Abraham, but yet one not the spiritual seed, as Ishmael was not of the line chosen by God. The same was with Jacob and Esau. Similarly, the Jewish people at Christ’s time were of the temporal seed of Abraham, considered by themselves to be God’s chosen people (from lineage); but the religious leaders of the day weren’t of the spiritual seed, whereas the apostles were — both groups of people known as “God’s chosen people” from Abraham, and yet only some of them being truly (spiritually) God’s chosen people.

As previously noted, these temporal conventions are “types” or shadows of spiritual realities. Spiritually, the heathen are still the heathen; but the people of Israel, those called by Jehovah’s name, were “type” for those who are called by Christ’s name (this is not an argument for dispensationalism or otherwise — it’s simply type and antitype). Now, since there were those in Israel who weren’t godly and those who truly were, the same applies in the spiritual realm, with those who are not Christians even though they call themselves such, and those who actually are Christians. Thus, there are those who are false professors of Christianity, and those who are true Christians (ie. the true Church).

Understanding this then begs the question: how do we know who is part of the true Church? The Bible declares we know them by their doctrine (Rom 6:17; 1 Tim 1:9-11) and their fruit (Matt 7:15-20). Not everyone who claims the name of Christ is saved (Matt 7:21-23), and so having the truth is important, in beliefs and how one lives his life.

May the Lord always give us eyes to see and ears to hear His Word, may He grant us a love of the truth (2 Thess 2:10), and may He grow us in the knowledge and understanding of who He is.

— David

Garden 2009 – Update VI – Onions

Garden 2009 Growing Onion GreensI sit here writing this blog post on the first full day of Spring 2010. Wow, I never thought I’d still be writing about our Spring 2009 garden! In it, we planted onions; and they have been going strong through the wettest, harshest winter we’ve had since we’ve lived here in Central Texas. I had picked all of the green onion stems off of the onions last summer in order to dry them in our solar food dehydrator, and decided to leave the remaining onions in the ground and pick them as needed as we entered into Fall. In actuality, once everything else in the garden had come to its natural end, I forgot to go out and pick the onions much of the time. Then, mid-way through winter, Dave noticed there were green onion stems (aka: scallions) that had grown back long and healthy. Boy, talk about a gift that keeps on giving!

One recent evening I went out and pulled several onions when my supper dish recipe called for it. These bulbs are much smaller than regular onions you buy in the store, but the taste is delicious and robust. I was pleased and surprised with how well the onions had survived through Winter, and with the bright, healthy color and texture that had been maintained:

Garden 2009 Picked and Clipped Onions

You really do get two vegetables for the price of one with these onions. The green onion stems are potent with their own milder onion taste. They also looked green and very healthy. It’s amazing how some garden vegetables are so fragile when severe weather comes; and others, like these green onions, seem to thrive:

Garden 2009 Picked and Clipped Onion Greens

I didn’t want to waste any of the green onions, and the weather we have been getting has been too overcast to use the solar food dehydrator much of the time, so I decided to put them in the oven overnight to slow dry. I cleaned and cut up the green onions and put them on a pizza pan sheet, set the oven to 150 degrees (or thereabouts), and left them overnight. They needed to stay in the oven a bit longer the next morning; but the end result was delicious, crispy, preserved green onion bits! I have since used them in a few various dishes; and it adds a nice, subtle onion flavor:

Garden 2009 Dried Onion Green Bits

We never tire of giving our Father thanks for His direct provisions. And we pray He grant us strength, resilience and growth through times of the spiritual winters of His chastisement, affliction, or the lessening of His presence to teach us to desire Him more.

Susan

Providence’s Perpetuation Provisions: New Kids “George” and “Gracie”

For our breeding scheme this year, we previously discussed our separating out our older does to be with our main buck Shatner, and the younger does, his female offspring, to be with Eastwood, a goat we traded one of our triplet bucks for. Well, there have been a couple of updates: first, Eastwood died during the Winter; so we borrowed a buck from our neighbor. He’s apparently pure Spanish, and we call him John Buck (think what you might call an unknown female goat 🙂 ) :

Spanish Goat Buck Borrowed for Breeding

We had put the bucks with our does in the beginning of November so they would give birth no earlier than April, where they should be mostly out of the cold. Well, Sue was out near the goats the other day, and she heard a very young sounding bleat. Umm…huh? She went to see what was going on, and lo and behold, our doe Pammy had given birth to twins! While quite surprising, we were both very thankful to find out God had granted us two new goats — a male and a female. We decided to call them George and Gracie, and here is your introduction to them:

New Goats George and Gracie with their Mother Pammy

And here is a video:


As I briefly mentioned in the video, last year, when Winnie had her triplet bucks, the middle one, Porthos, seemed to often have physical problems, from pink eye to swollen front knees. And he was smaller than his brothers, and so we kept him with Winnie much longer than we did the others, so he could continue to have her milk. Well, apparently we kept him in too long, as nearest we can figure, he is the father of the new kids. Porthos has grown up to be about as big has his younger brother now, and seems to have also matured normally. 🙂 Even though this is a possible situation of some in-breeding, which we were trying to avoid, since it’s Pammy it’s not too bad as the worst Porthos might be is Pammy’s nephew; with Betsy, she’s of a whole different line, so if Porthos got to her as well, it’s fine. However, he may have gotten to his mom, Winnie; we’re hoping not, but I guess we’ll have to see what happens. And now we know better for the future.

We are grateful for the Lord, in His graces and mercies, granting us these new provisions; and we pray that He might grant they be productive members of the herd, according to His will.

— David


A House – Update V – Homemade Termite Shields

In studying on how to build a pier and beam foundation, and how to prevent against termites, I learned that there are termite shields available to put on top of a concrete pier. Well, I wasn’t able to obtain any locally; so I thought I might try to make them myself. The following is the process of how I did that:

Since flashing is galvanized, which again helps against rust, I figured that would be a good material to use. I purchased 20″ flashing, and cut it into squares:

Cutting the Flashing for the Concrete Pier Homemade Termite Shield

Since they had to fit over a 5/8″ bolt sticking out of the concrete pier, I drilled two 3/8″ holes next to each other in the center of the flashing squares; and I was able to drill three squares at a time easily:

Drilling the Center Hole for the Concrete Pier Homemade Termite Shield

Since the two drilled holes were next to each other, and given the size of the pier’s bolt, I had to cut out the center hole a bit:

Cutting Out the Drilled Center Hole in the Flashing for the Concrete Pier Homemade Termite Shield

Here is the flashing pushed onto the pier. I usually had to work it down onto the bolt. Before putting it on, I sprinkled on some Seven termite powder because I heard that was a good thing to do, but my guess is the weather has removed most of it by now:

Flashing for the Concrete Pier Homemade Termite Shield Set in Place on the Pier

After placing the beam bracket on the shield over the bolt and finger tightening the nut down to hold the flashing in place, I folded the sides down to crease the flashing, and began to form it into its final shape. I originally tightened the bolt down all the way on quite a few of them, but realized that bent the brackets in the middle, which wouldn’t have allowed the beam to sit flat on them:

Folding the Sides of the Concrete Pier Homemade Termite Shield

On opposite sides of the pier, and starting several inches in from the side edge of the flashing, I cut the folded flashing from the lower edge to a point where two perpendicular creases met in a line, creating a square out of two flashing edges and a cut edge; and I did this for all four corners:

Cut Sides of Concrete Pier Homemade Termite Shield

Then I positioned myself on one side where I had made the cuts, reached around the other side of the pier, and tucked in underneath the opposite side of the flashing the cut edges in each of my hands:

Folding the First Cut Sides of the Concrete Pier Homemade Termite Shield

And then I folded the other sides on top of the tucked-in cut sides:

Folding the Final Cut Sides of the Concrete Pier Homemade Termite Shield

I didn’t want to leave the sides of the termite shield loose like that, so I decided to use rivets to fasten the corners in place. They are aluminum (again, to help against rust problems), and I chose 3/16″ short fastener rivets. I took a 2×4 and put it behind a folded corner to support the pressure of drilling; and using one hand, I closed the corner tightly around the 2×4. I then drilled a 3/16″ hole through the flashing in the corner of the overlapped flashing, and another hole in the corner of the folded-under flashing:

Drilling a Rivet Hole in the Concrete Pier Homemade Termite Shield

I then set the rivet in place…

Setting the Rivet in the Concrete Pier Homemade Termite Shield

…and squeezed the rivet tool several times until the stem of the rivet cut off:

Using Rivet Tool on Concrete Pier Homemade Termite Shield

And here is the completed rivet:

Completed Rivet on Concrete Pier Homemade Termite Shield

This is the completed termite shield:

Completed Concrete Pier Homemade Termite Shield

And here are all of the piers with all of their termite shields in place. No mind control for these concrete piers! 🙂

Concrete Piers with All Termite Shields Complete

We’re thankful to the Lord for His provisions, and for the idea and ability to put these together.

— David


« Older posts Newer posts »